The increasing digitalization has made image-to-text conversion an essential tool for numerous applications. This data extraction process is essential for better information retrieval when dealing with scanned documents, screenshots, and images. Moreover, when converted, the context becomes more accessible and easier to edit, search, and share.
Therefore, we introduce Google Docs, which allows you to create and edit images with its built-in OCR technology. Thus, this enables you to extract data from the image with ease. Now, moving forward, this article will provide you with a comprehensive guide on how to convert images to text using Google Docs.
Part 1. Stepwise Instructions to Convert Image to Text Through Google Docs
Using this widely accessible cloud document manager, you can utilize advanced OCR text recognition technology for scanned images. The procedure is straightforward and doesn’t require much technical skills to turn scanned images into editable text. It also supports multiple languages and can handle complex imagery layouts. Now, let’s look at how to convert images to text using Google Docs using the given steps:
Step 1: Open Google Drive and Upload the Desired Image
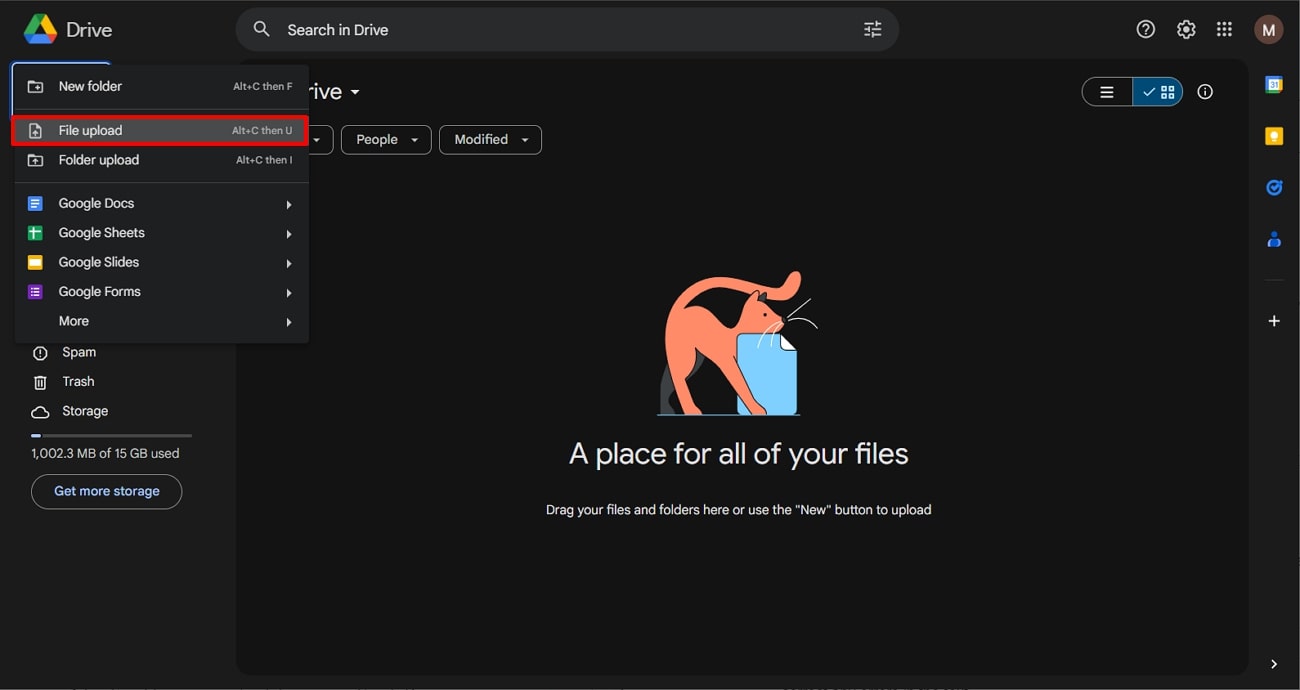
Open Google Drive on any of your desired browsers and access the main interface. Now, go to the left side panel and click the “+ New” button to open a drop-down menu. From here, choose the “File Upload” option and upload the scanned image.
Step 2: Access the Images on Google Docs
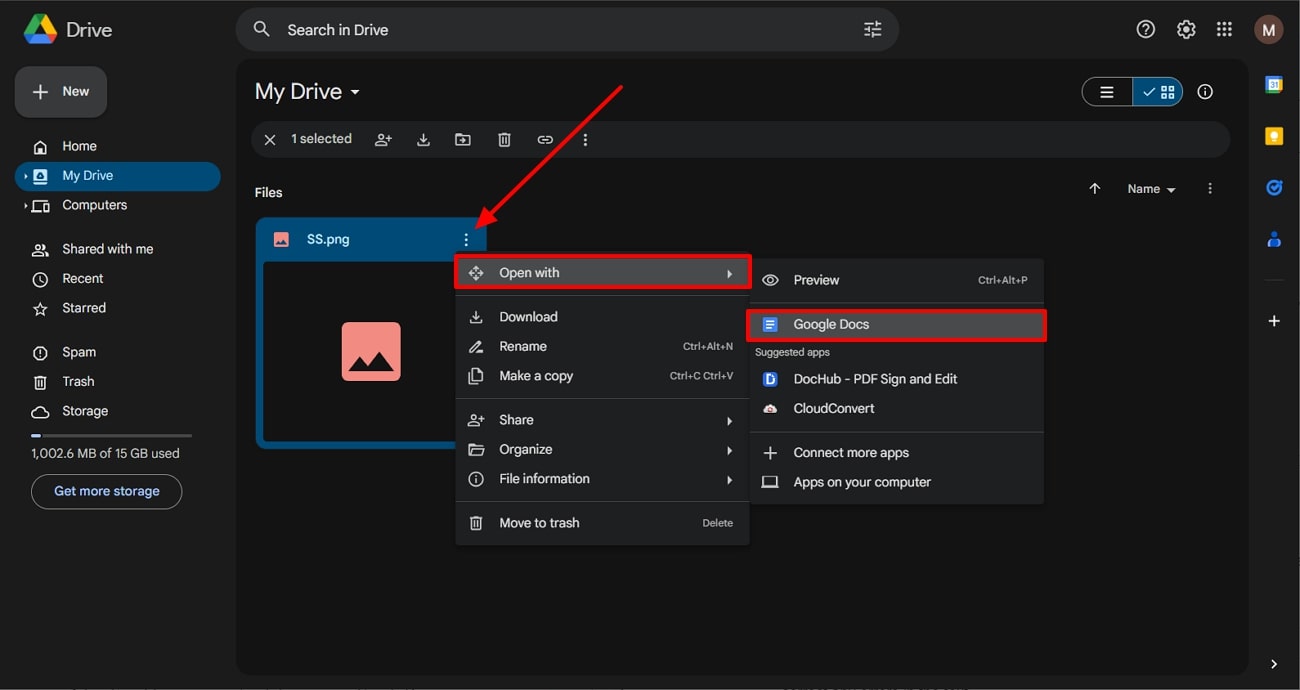
Once the image file is uploaded, press the “Three Vertical Dots” on the uploaded image to expand its menu. From the menu, select the “Open with” option to open its available options further. Now, click “Google Docs,” and the OCR procedure will automatically start once the “Google Docs” option is clicked.
Step 3: Make Suitable Formatting Adjustments to the Text
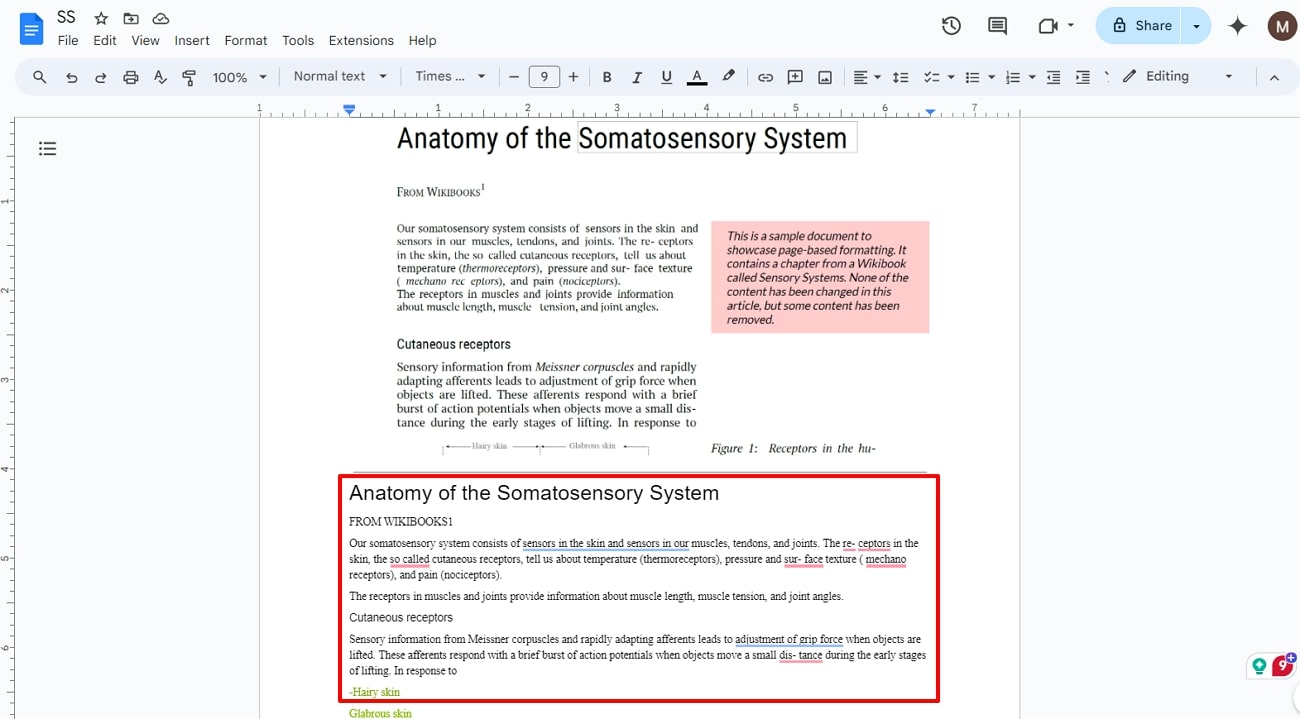
The image will instantly open in Google Docs as a new document, and it will be displayed at the top with extracted text. The text might contain some grammatical errors and misplacements that you can easily reformat. To do so, utilize the top toolbar to change the font, color, and structure to fix any errors.
Step 4: Save or Export the Final Document
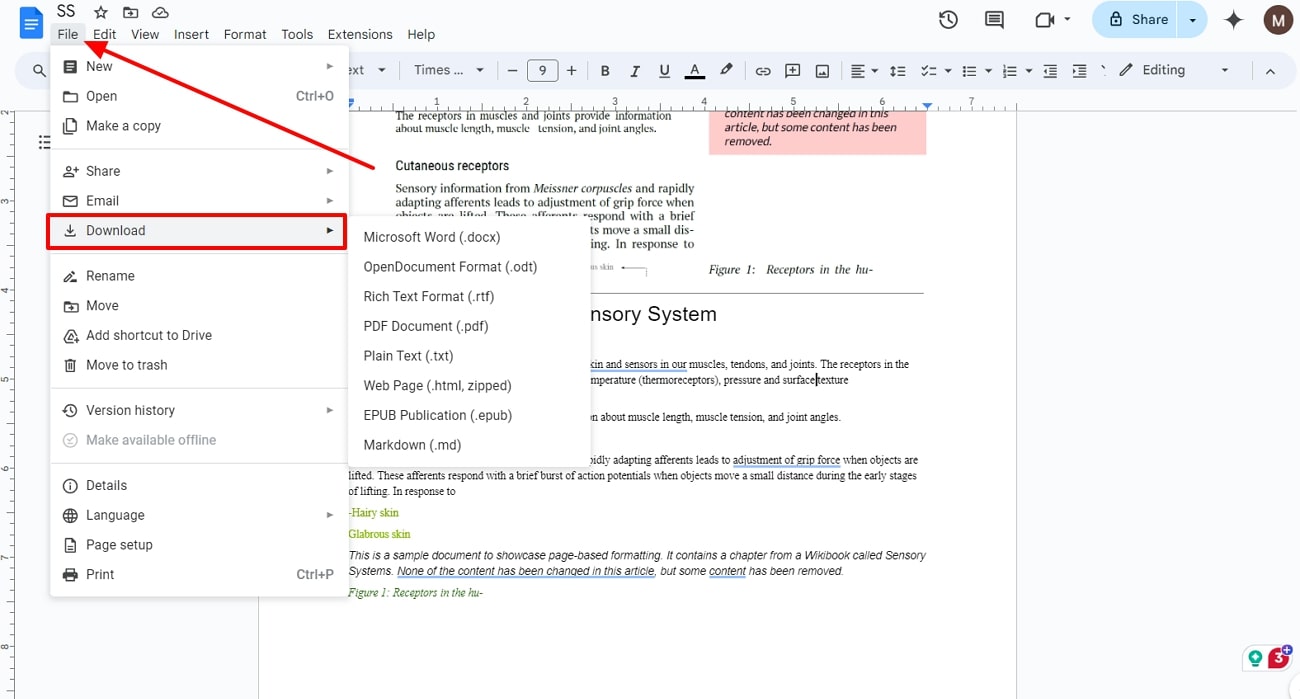
After editing every mistake, head to the top toolbar and press the “File” tab to reveal its menu. When the drop-down menu appears, hover over the “Download” option and choose any format, from Word to Markdown.
Part 2. Pros and Cons of Using Google Docs for OCR
After understanding how to convert images to text using Google Docs, let’s address something else about this platform. We have gathered the pros and cons of Google Docs, which can help you understand how this software operates.
Pros
- Easily Accessible:Google Docs is free and easily accessible from any device with internet access. This makes it a cost-effective solution for OCR without the need to acquire other software.
- No Software Installation: You can perform OCR without installing any software on your computer or device. It has a built-in OCR feature that provides you every bit of the data present of the scanned image or document.
- Integration with Google Drive:This tool is already integrated with Google Drive, thus making it easy to manage files. You can also share documents with others using Google Drive by adding a collaborator’s email or via a link.
- Cloud-Based Tool: As a cloud-based service, Google Docs allows users to upload any file, which they can convert and access from anywhere. Moreover, this offers flexibility and convenience as you can access your files on any device with internet connectivity.
Cons
- Limited Accuracy:The OCR feature of Google Docs struggles with handwritten text, complex layouts, and low-resolution images. Furthermore, it doesn’t produce accurate transformed results after applying OCR to scanned images.
- Formatting Issues:While this tool does extract all the information from the scanned file, it does not provide accurate formatting. The extracted text may lose its original formatting and may require manual adjustments.
- Internet Required: It is known that Google Docs works best with the internet to let you access features like the OCR. Moreover, it becomes inconvenient for users when they have to travel and are mostly offline.
- File Size Limitations: Google Docs has limitations and cannot handle large or high-resolution images or PDFs. This can reduce and restrict the users who want to review their whole documents or want to convert several pages at once.
Part 3. How to Use Afirstsoft PDF for More Advanced Image-to-Text Conversion
Although Google Docs has a built-in OCR feature, but as we discussed, that feature has some major drawbacks. Therefore, you can turn your attention to Afirstsoft PDF, which has a robust AI OCR feature with multiple customizable options. You can use this feature for free and turn any format of the image into an editable and searchable file with ease.
Moreover, this feature uses an advanced text recognition technology that deeply analyzes the characters of the document and makes them editable. This way, users can effectively extract and manipulate text, which also makes it easier to store and share text with others. So, let’s follow these given steps and learn how to convert images into text with Afirstsoft PDF:
Step 1: Access Create Feature and Import Image
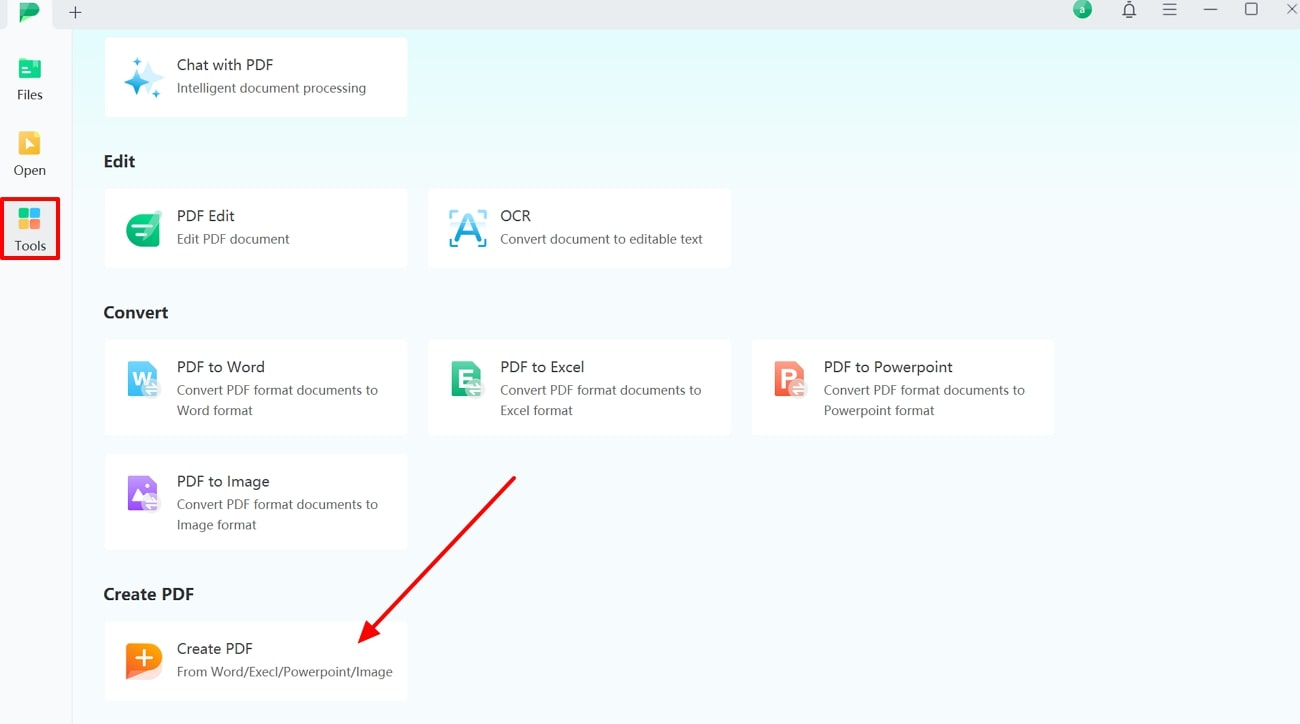
First, download and install Afirstsoft PDF from its main website on your computer. After that, open its main interface and click the “Tools” icon from the left-side panel. Now, from the various features, choose the “Create PDF” option and import the desired image.
- 100% secure
- 100% secure
- 100% secure
Step 2: Perform OCR on the Added Image
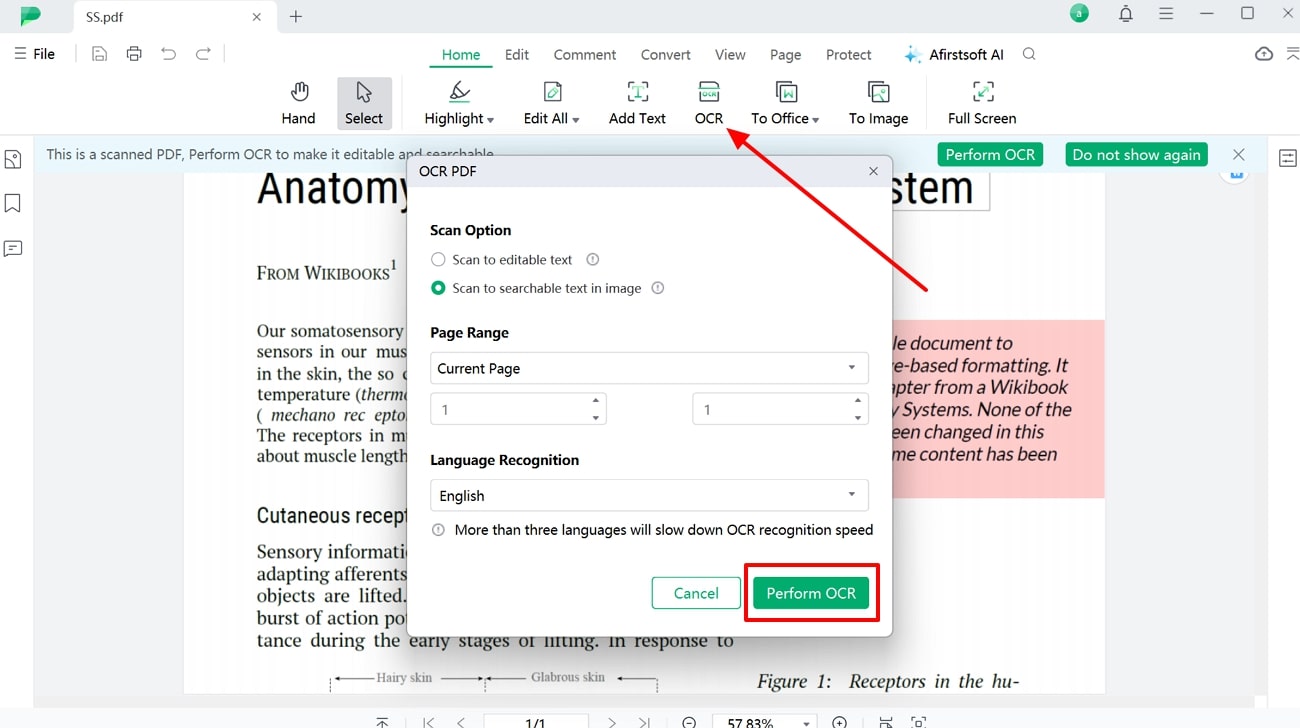
Now, head to the top toolbar and press the “OCR” button to open its settings menu on the main editing interface. In the settings, adjust scan options, page range, and language recognition options and hit the “Perform OCR” button to begin the conversion process.
- 100% secure
- 100% secure
- 100% secure
Step 3: Choose the Text Format from Convert
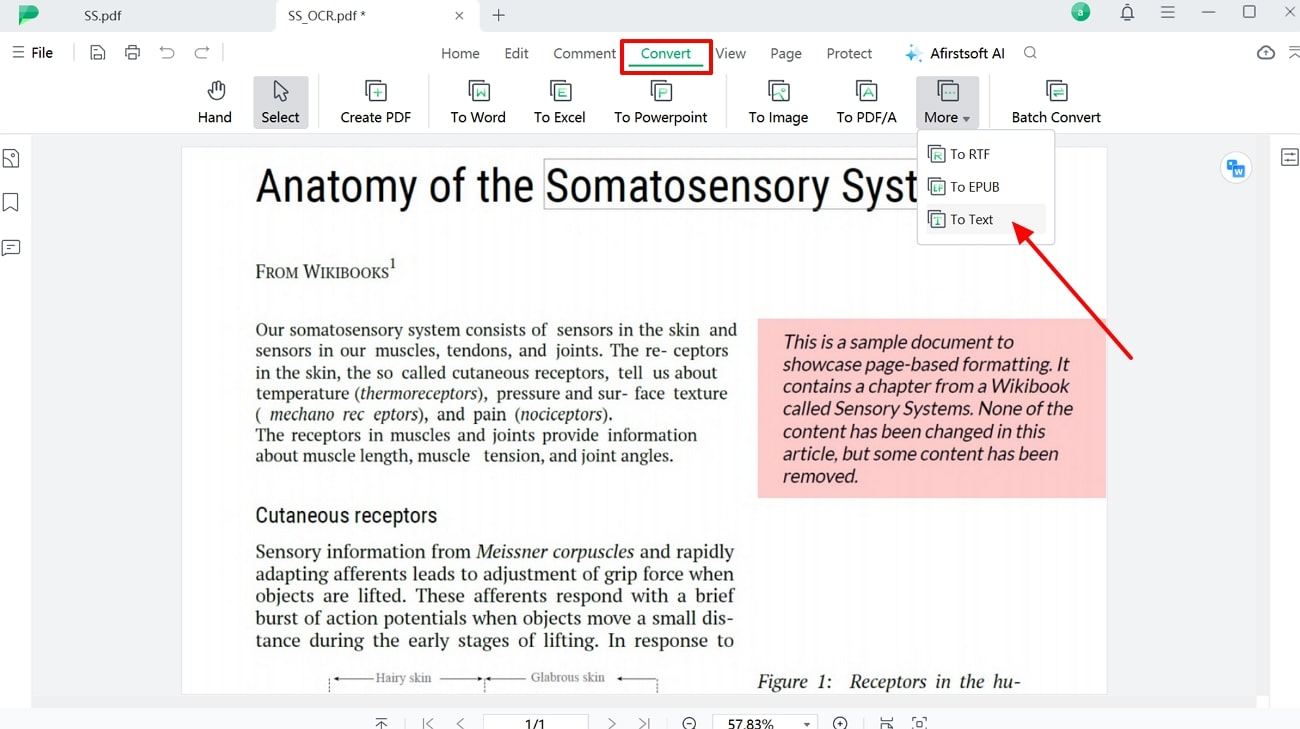
After the file becomes editable, navigate to the top and open the “Convert” tab options. From the available options, extend the “More” drop-down menu and select the “To Text” format to open its menu.
- 100% secure
- 100% secure
- 100% secure
Step 4: Customize Changes and Convert
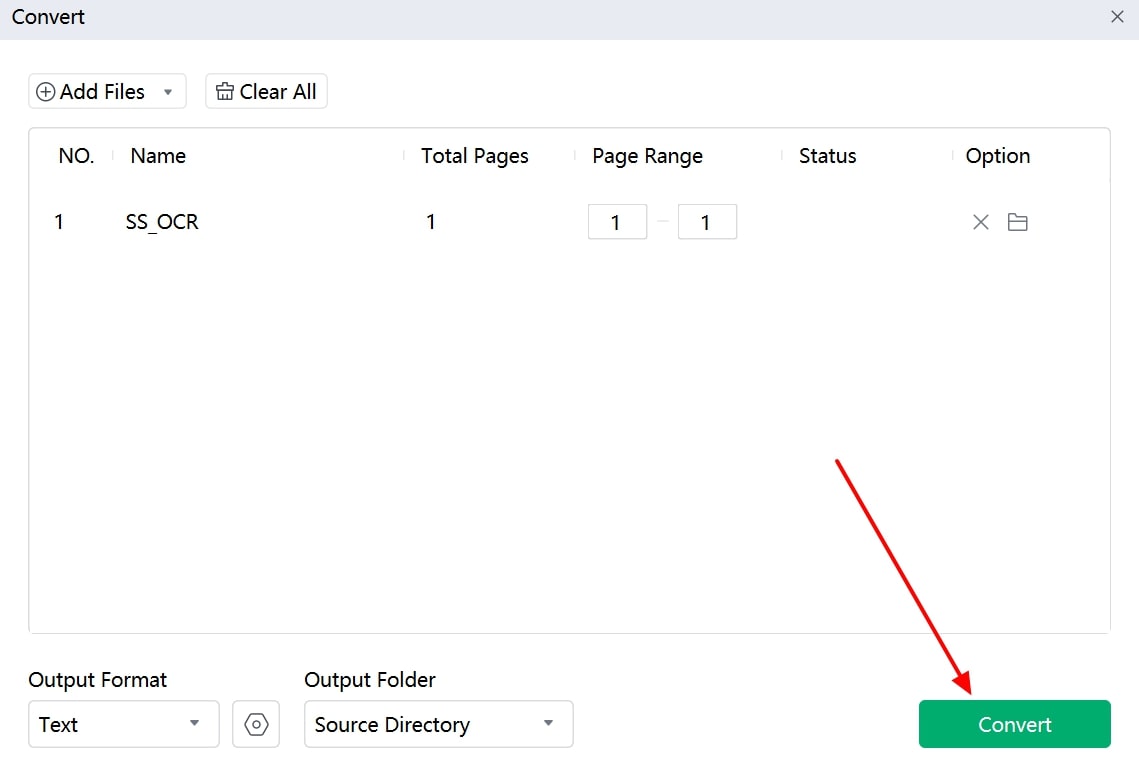
From the pop-up window, optimize the page range, output folder, and other changes before converting the PDF to text. When satisfied, click the “Convert” button to initiate the conversion process.
- 100% secure
- 100% secure
- 100% secure
Conclusion
To summarize the article, we learned that converting images to text is essential to students and professionals in different situations. Therefore, we utilize the Google Docs built-in OCR feature to turn scanned images into text that you can extract easily. Throughout this discussion, we looked at how to convert image to text using Google Docs and also learned about their pros and cons.
Above all, if you want a more convenient and effective extraction of text, use the Afirstsoft PDF AI OCR feature. While supporting multiple languages, Afirstsoft PDF effortlessly converts images into editable text.

