Editing text on images is a common need in both personal and professional settings, whether correcting details on marketing materials or modifying social media posts. In this digital era, visually appealing content plays an essential role in communication as it can streamline your workflow.
This is why it is crucial to be aware of how to edit text on an image so that you have the right tools to manipulate text. So, we will try to cover various ways to edit text on images, including using Afirstsoft PDF, to simplify the process through its OCR capabilities.
Part 1. How to Edit Text on Images Using Basic Image Editors
Building on the idea of editing text on an image, let's examine the two basic editors we can use to make simple edits on photos. These editors provide a user-friendly interface for non-technical users with basic image manipulation features.
Option 1. Paint 3D
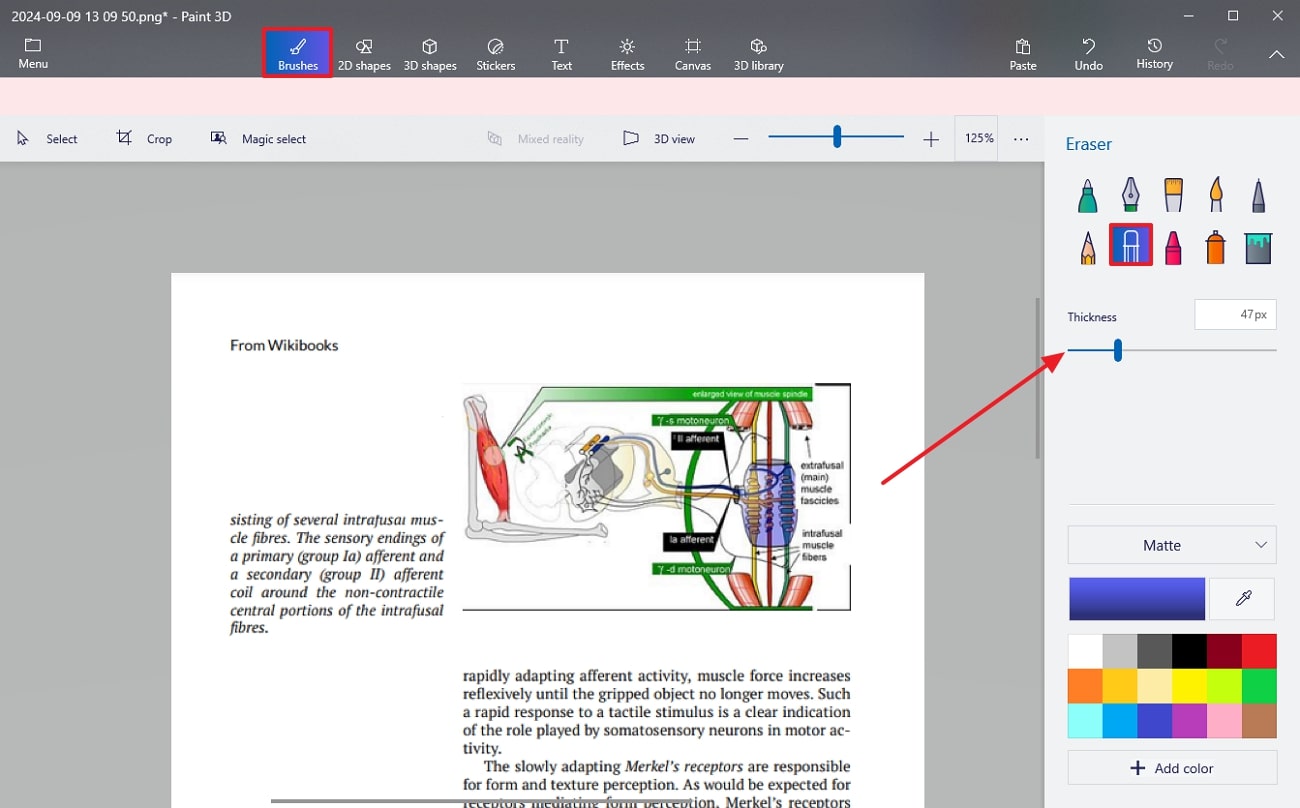
This comprehensive yet easy-to-use image editor allows users to edit text effortlessly within an image. The eraser tool can remove existing text, which can help redact any personal text. Moreover, users can add 2D and 3D shapes to enhance the picture’s visual appearance. Follow these simple steps below to understand how to edit text on an image using Paint 3D:
Step 1. To initiate this procedure, download the Paint 3D software onto your desktop and import the image you want to edit from your files. Next, click the “Brushes” option from the top toolbar and select the “Eraser” icon to brush over the original text you want to remove.
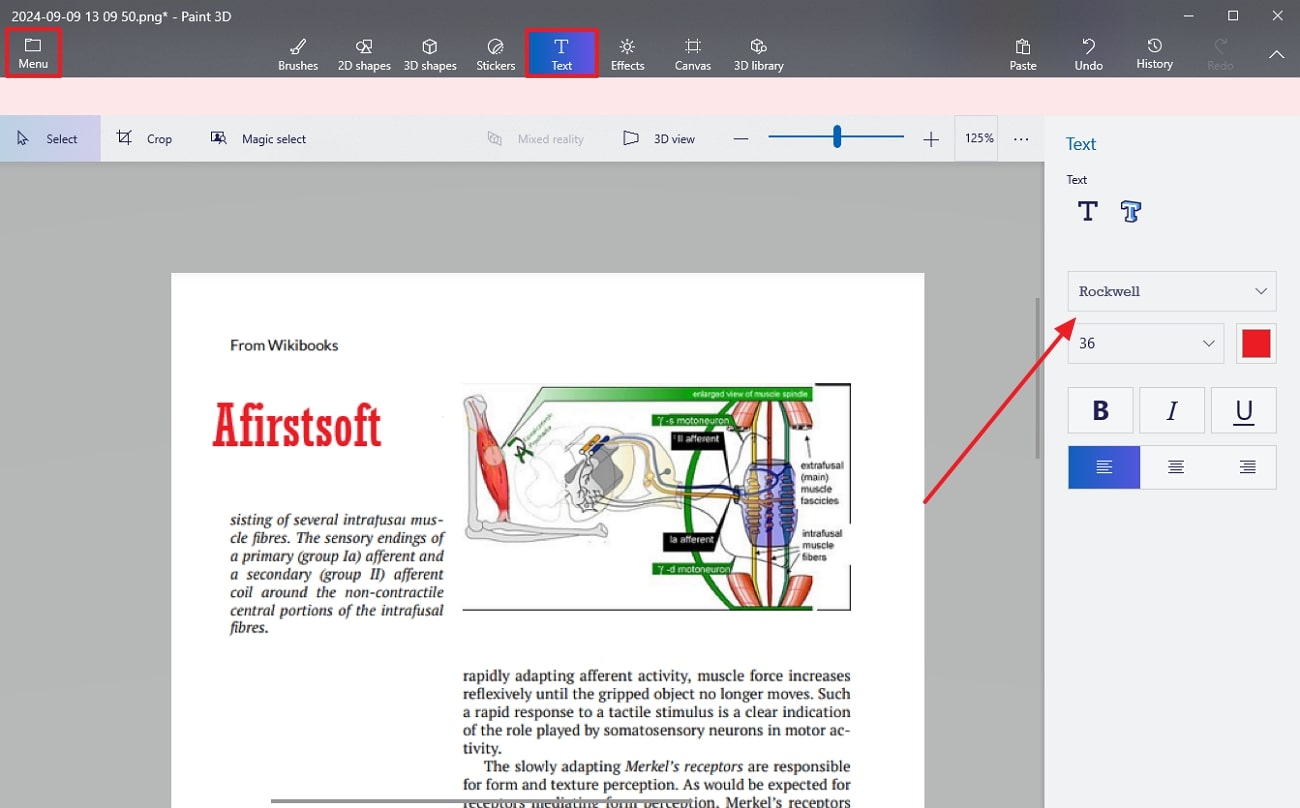
Step 2. Now, add text to the image file by clicking the “Text” tool from the top toolbar and hit the blank area to write the content. Select the font style, size, and color to match the picture's theme. To save the enhanced image to your device, go to the “Menu” bar on the top left corner of the screen.
Option 2. Canva
Canva is an online basic image editor that allows users to add multiple effects and changes to pictures. It’s pretty popular amongst many designers as it is a quick and convenient method of enhancing images. Users can add new text to the photos and adjust their parameters to match the image. The guide below can help you learn how to edit text on an image through Canva:
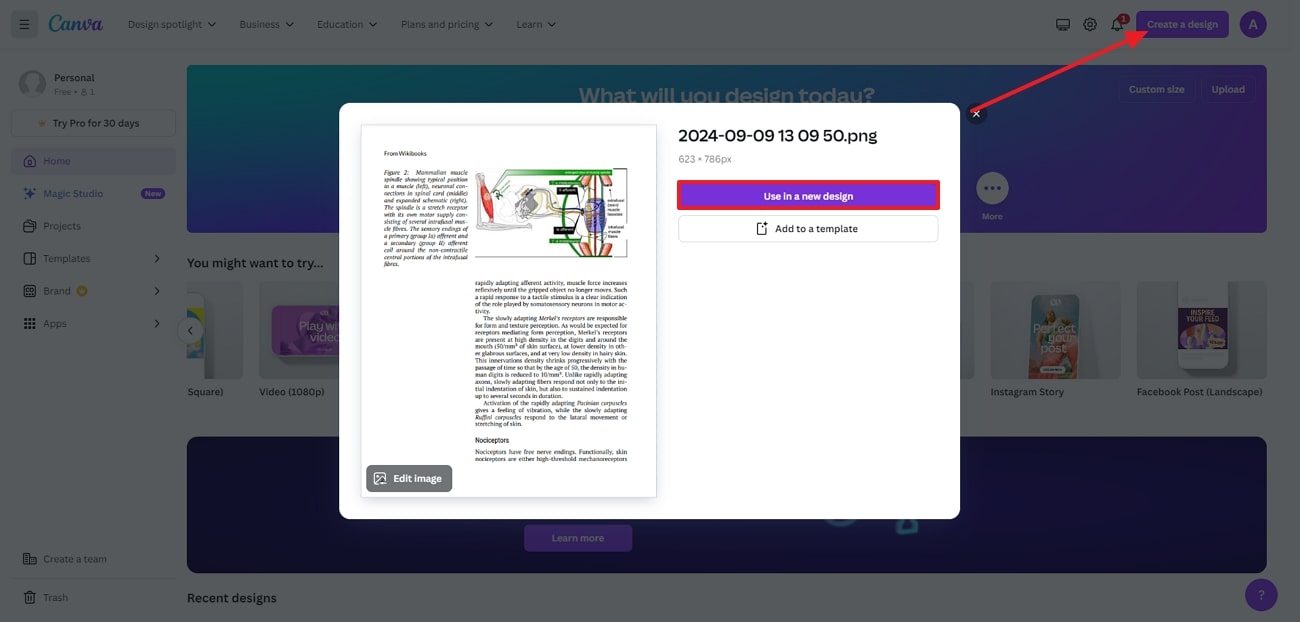
Step 1. Get access to this online tool and log in with your credentials. Afterward, select “Create a Design” to upload the image and hit the “Use in a New Design” button to begin editing the text on Canva.
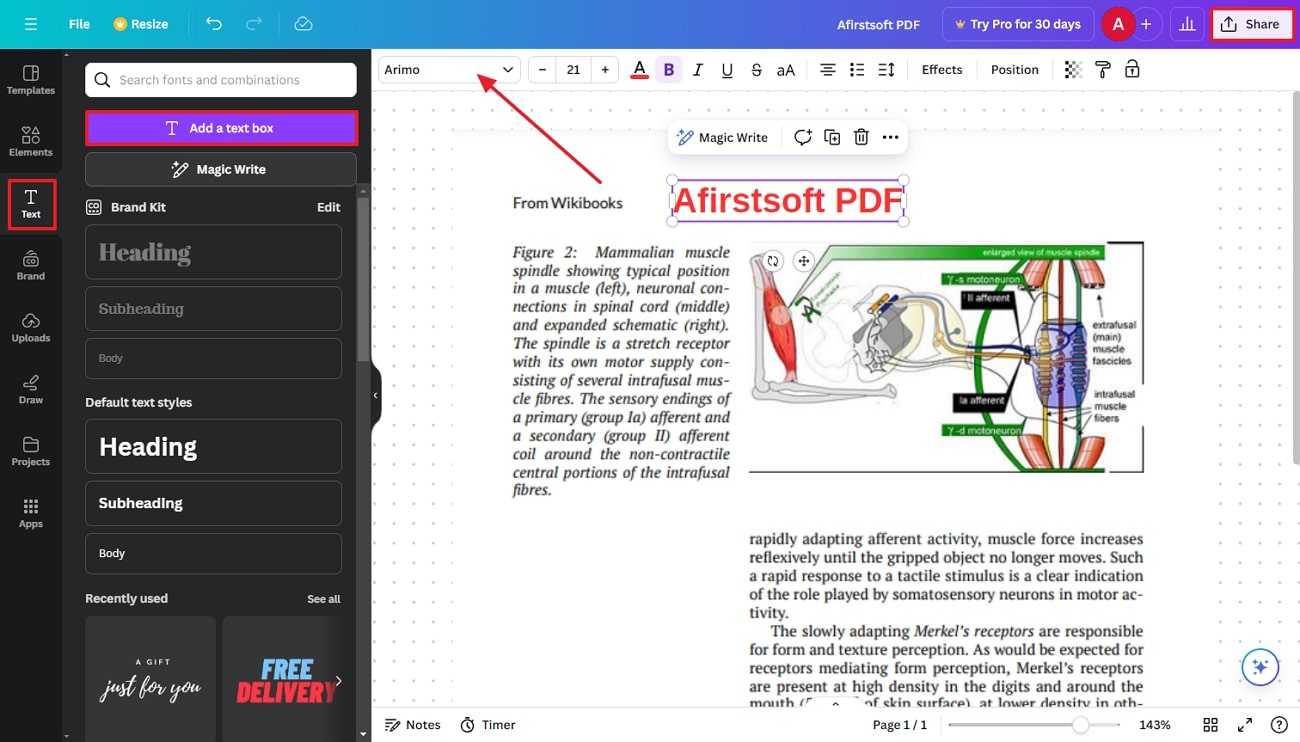
Step 2. From the left menu bar, navigate to the “Text” tab and select the “Add a Text Box” option. Lastly, after adjusting the text settings like font style and color, hit the “Share” button on the top right corner for downloading the file.
Limitations
If you are utilizing Paint 3D or Canva, you cannot make advanced changes to the images as they are essential tools with limited features. Despite being easy tools, users cannot perform tasks automatically, and they do not allow for direct text editing within the images.
Part 2. How to Use OCR to Edit Text on Images
Alternatively, using OCR to edit text on images can have a more substantial impact, as it allows us to edit the existing text. The following top two tools can help you learn how to edit text on an image through OCR for a better workflow.
Option 1. Afirstsoft PDF’s OCR Feature
Using this advanced PDF editor ensures users can perform OCR on non-editable documents and convert them into an editable format. Afirstsoft PDF supports more than 20 languages, allowing users to work in various languages. Users can import multiple documents and work on them simultaneously to improve productivity. With the help of this tool, you get to adjust the page range to tell the tool which specific pages you want to perform OCR on.
Moreover, Afirstsoft PDF ensures that users can convert documents into different supported formats, such as Word, Excel, RTF, EPUB, and more. Apart from that, it also allows you to add images to enhance the document further. Users even get to add interactive elements to the file to keep the readers engaged and improve the quality of the document. Follow this instructional easy guide to understand how to edit text on an image while using Afirstsoft PDF:
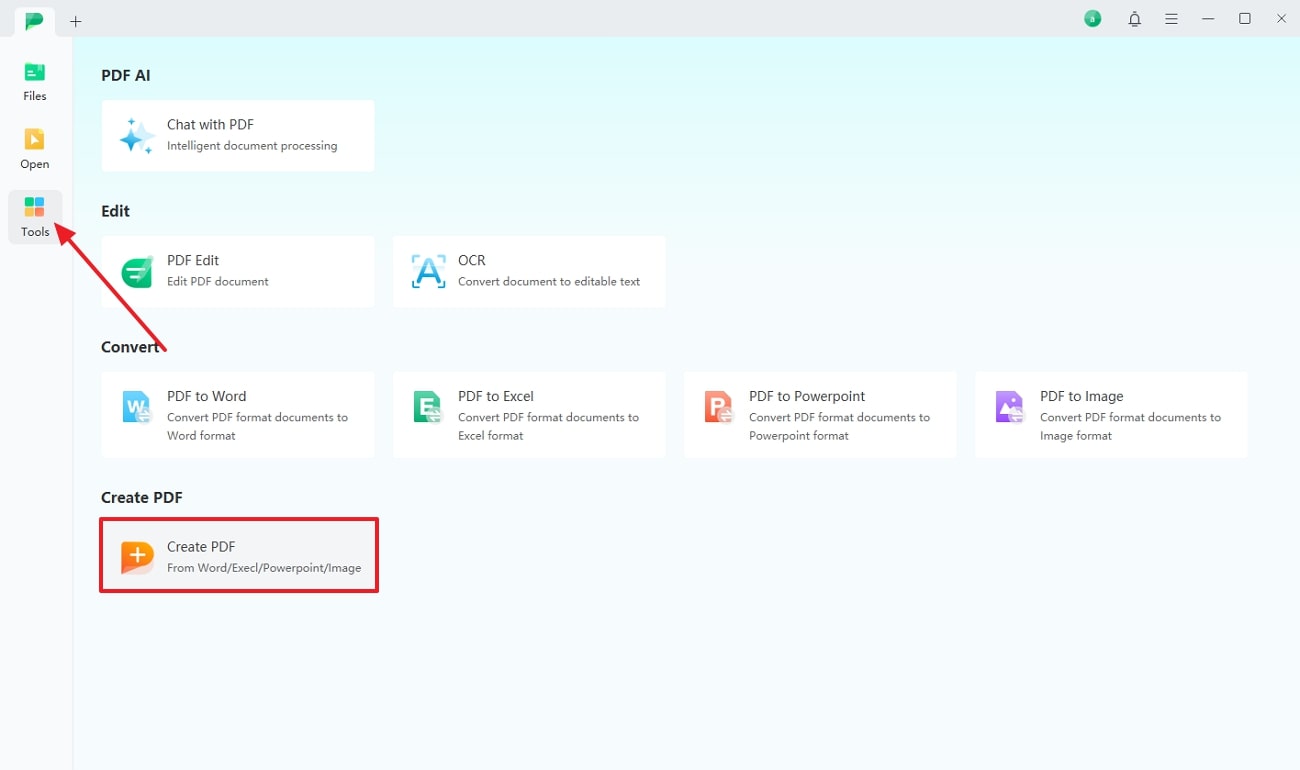
Step 1. Navigate to the Create PDF Tool
Commence the OCR process by navigating the “Create PDF” tool from the “Tools” tab from the left sidebar of the main interface of Afirstsoft PDF. Here, you can import the image file that you want to convert to a PDF editable format.
- 100% secure
- 100% secure
- 100% secure
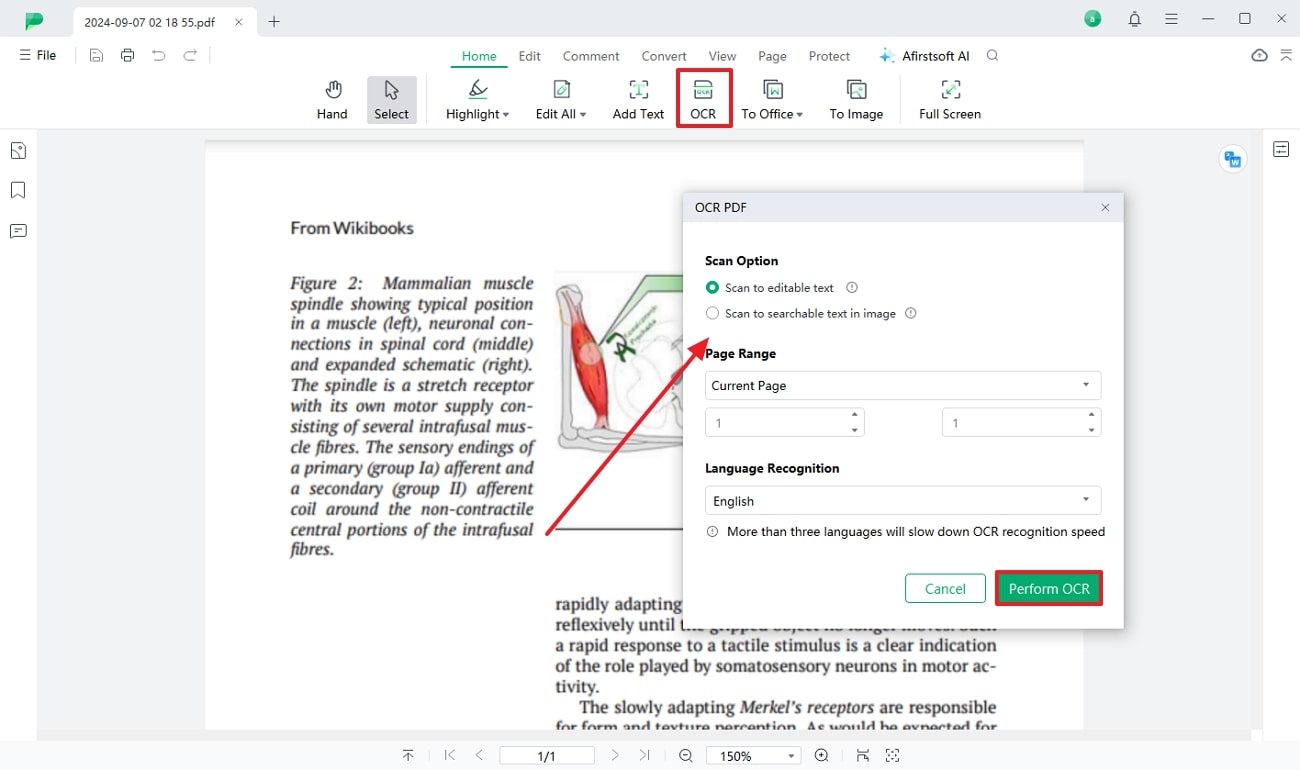
Step 2. Perform OCR to Convert from Non-editable to Editable Format
Next, as you import the image onto the software, click the “OCR” tool and adjust the “OCR PDF” parameters from the dialog box. Once you are satisfied with your adjustments, hit the “Perform OCR” button to get the editable format of your PDF file.
- 100% secure
- 100% secure
- 100% secure
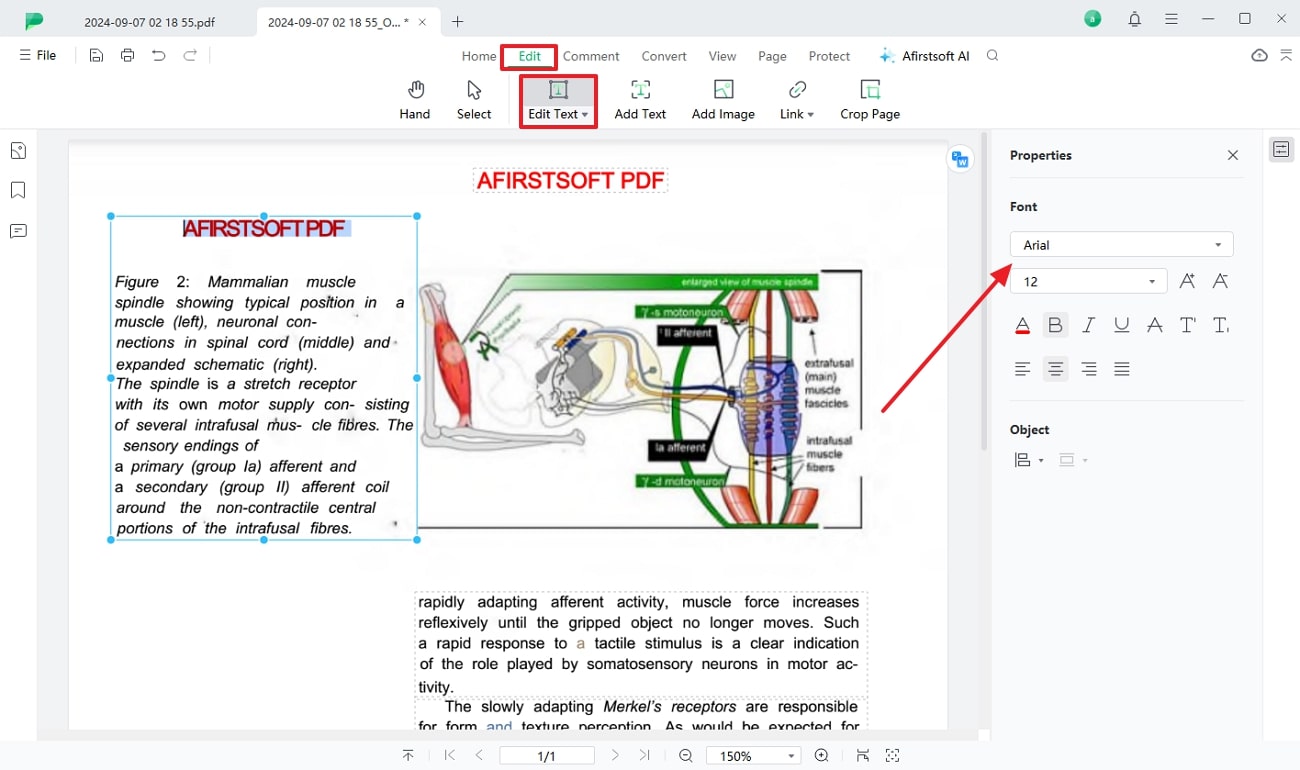
Step 3: Move to the Edit Tab to Edit Existing Text
Once OCR is performed on the PDF, move to the “Edit” tab and select the “Edit Text” feature to edit the existing text from the original document. Now, adjust the properties of the text edited according to the rest of the original content so everything looks polished.
- 100% secure
- 100% secure
- 100% secure
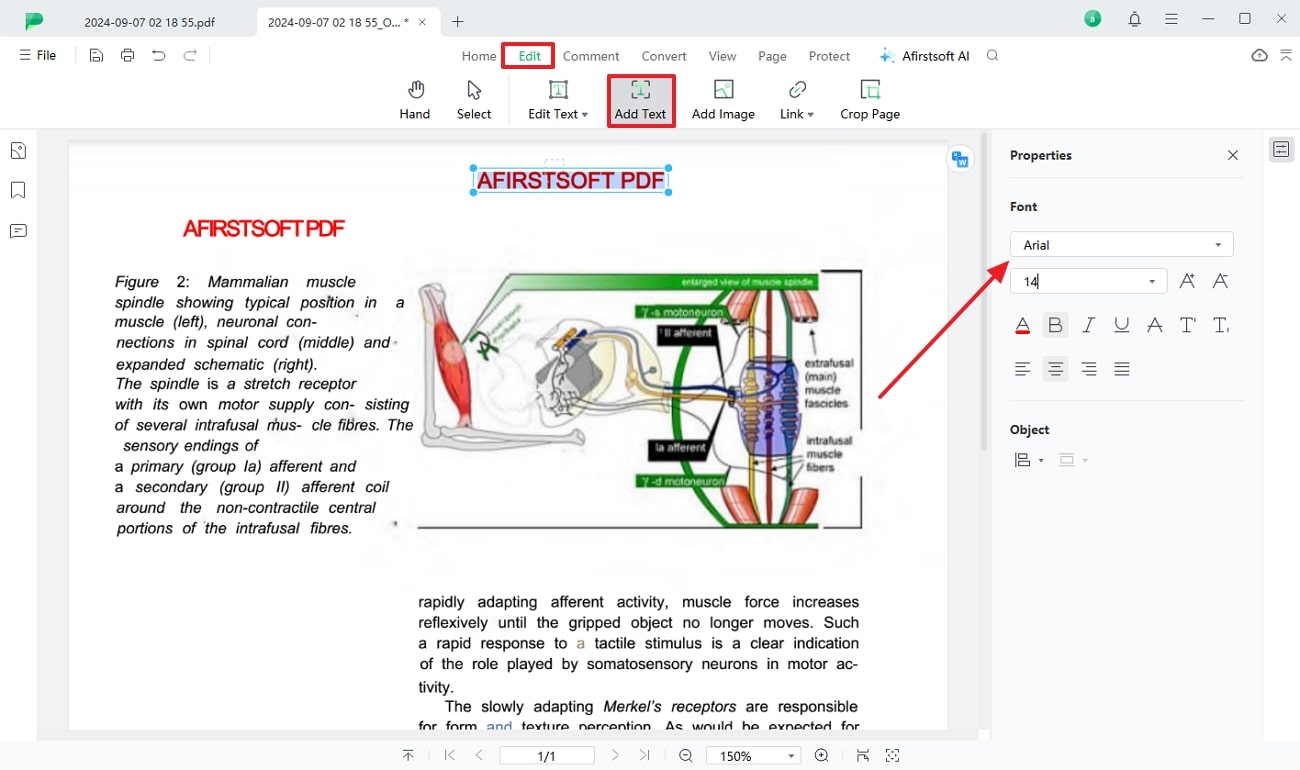
Step 4. Pick Add Text Feature to Create New Text Boxes
After editing the exciting text, you can move forward and select the “Add Text” feature from the “Edit” tab. Moving forward, click on an area you want to add text to, add new text, and adjust the properties according to your requirements.
- 100% secure
- 100% secure
- 100% secure
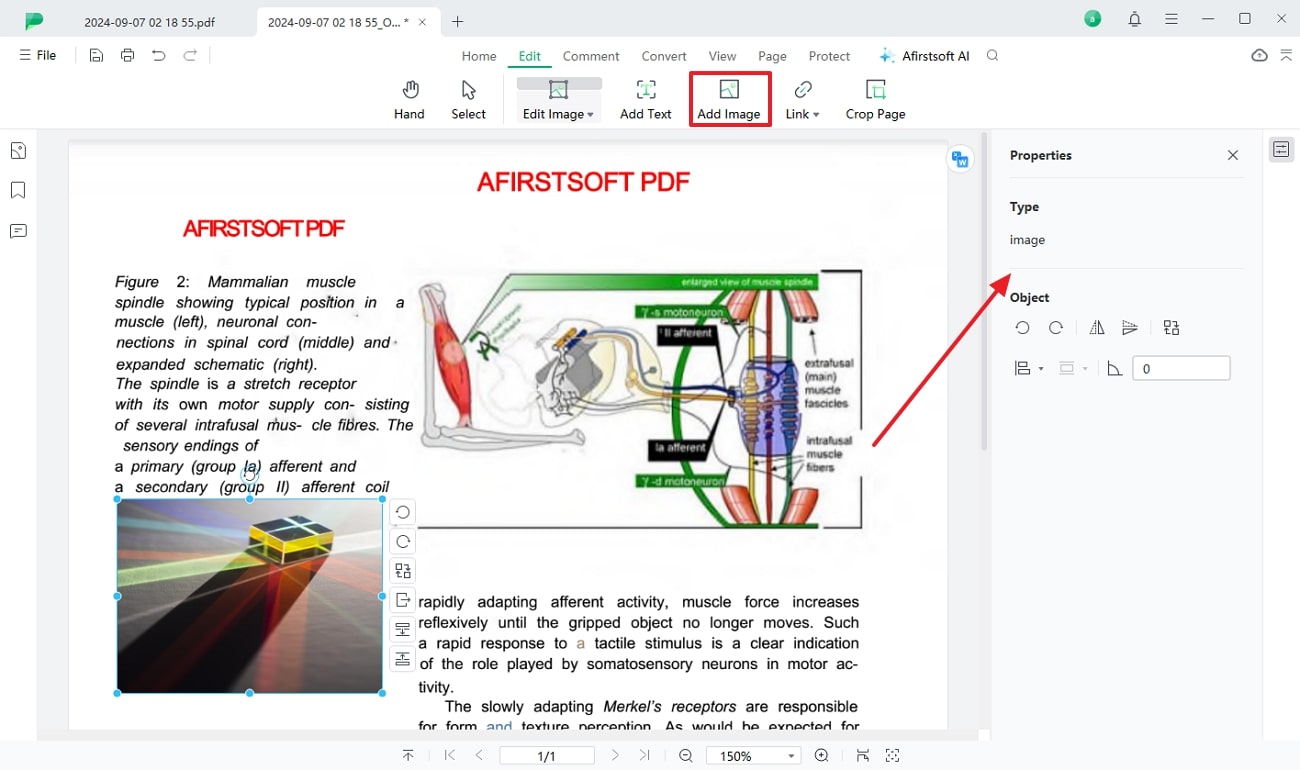
Step 5: Add the Image to the File
Next, click on the “Add Image” feature to add a new picture to the PDF file and edit it according to your needs. Upon inserting this image, you will be able to rotate, flip, or crop the visuals.
- 100% secure
- 100% secure
- 100% secure
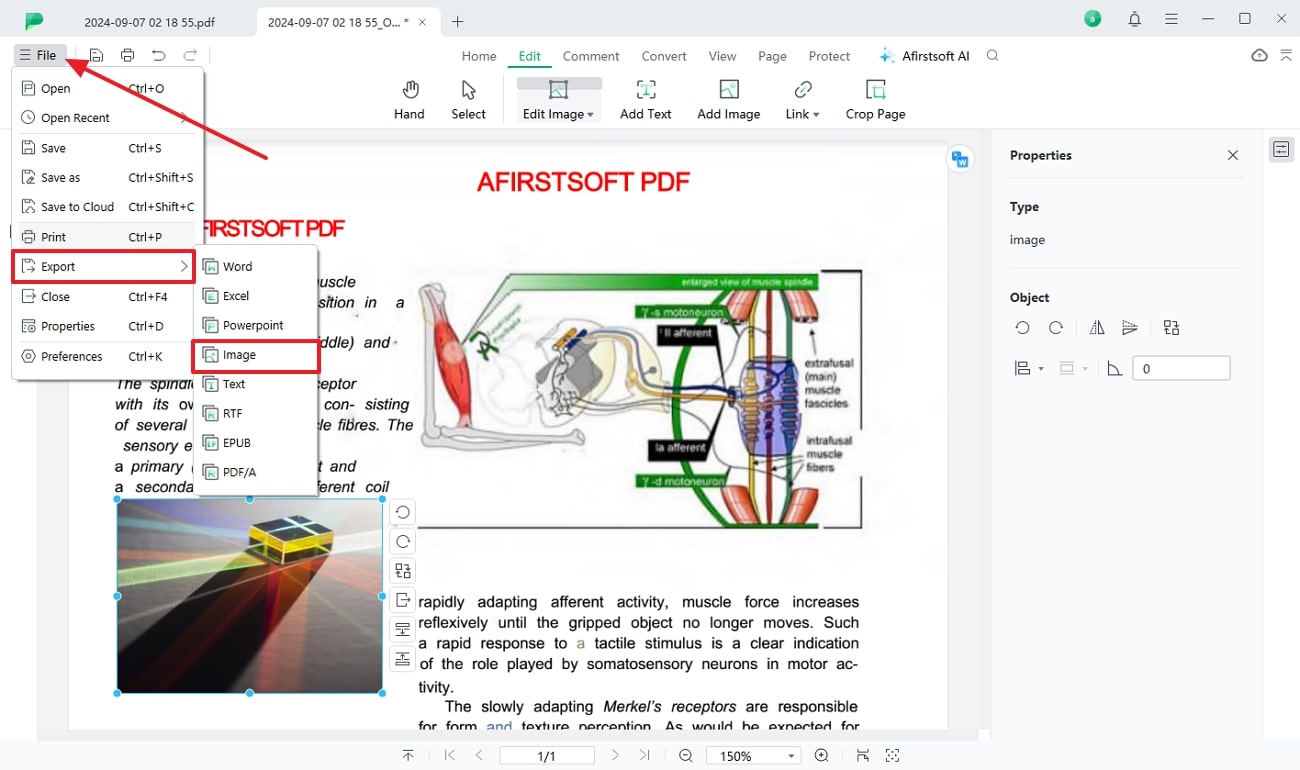
Step 6. Convert the Edited PDF Back to the Image Format
Lastly, select the “File” tab from the far left corner of the screen to open up a drop-down menu. Pick the “Export” option and choose “Image” from the extended menu. This will get you your image back but in a visually enhanced format.
- 100% secure
- 100% secure
- 100% secure
Benefits of Using Afirstsoft PDF
- AI Assistant:Users can chat with their PDF files using the AI assistant feature to summarize, translate, and more.
- Protect PDFs:If you want to share the document with others but want to restrict access to copy, edit, or print, you can set a password to the file.
- Enhance Reading Experience:You can improve the reading experience by adjusting the page size according to your device.
- User-Friendly Interface: Afirstsoft PDF is designed to allow users with no technical experience to navigate the software easily.
Option 2: Google Drive OCR
Google Drive allows users to use the Google Docs tool to edit an image document by automatically applying OCR. It is a free and accessible tool for all users to work on their papers efficiently. This helps users manage their previous files, enhancing the workflow to avoid data loss. Pursue the following procedure to figure out how to edit text on an image using Google Docs’ OCR capability:
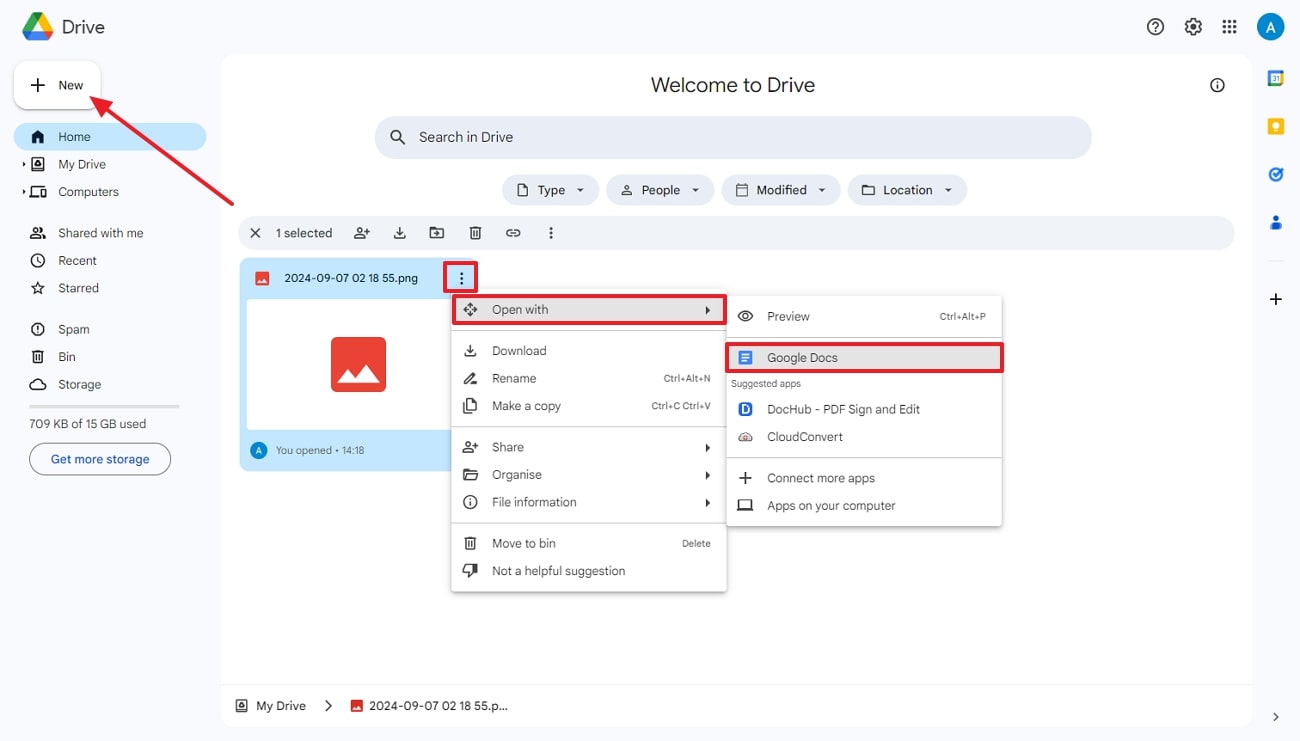
Step 1. Start by logging into your Google account and navigating to the “Google Drive” storage system. Here, click on the “+ New” button to upload the image file and hit the “Three Dots” to open a list after the upload is completed. Then, select “Open with” and pick the “Google Docs” option from the extended list.
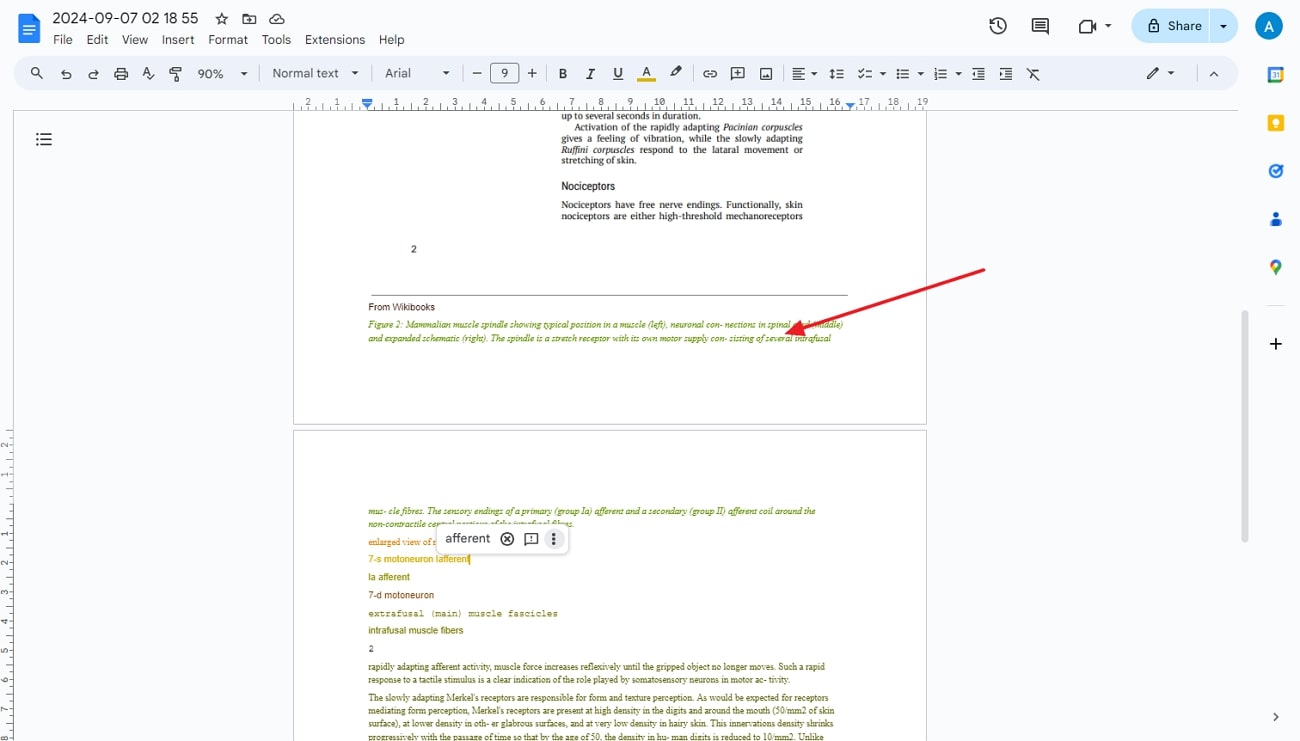
Step 2. As discussed, OCR is integrated into Google Docs, which automatically extracts texts from the image file onto the same document, where you can make edits.
Limitations
The integrated OCR of Google Drive is free but it’s not applicable for handling complex languages, as it can affect the document language.
Part 3. How to Edit Text on Images with Photoshop
Adobe Photoshop allows users to add new text and remove previous text by providing various editing features. You can make seamless photo edits and improve work productivity as it improves the over-design of the image. Users also get the ability to add filters to the image that they have uploaded. Explore the simple steps below to understand how to edit text on an image with Photoshop:
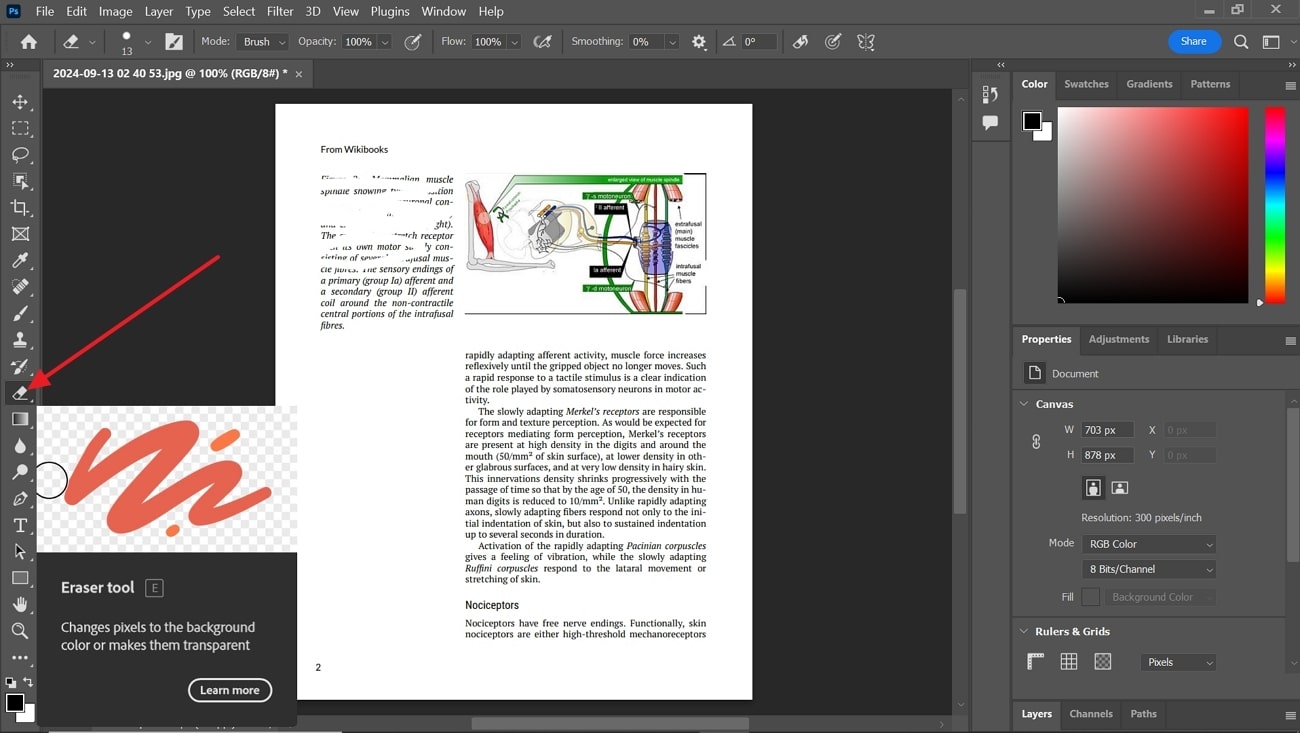
Step 1. As you access your image within Adobe Photoshop, tap on the “Eraser” tool to remove any unnecessary information from the document by simply scrolling the cursor over the text.
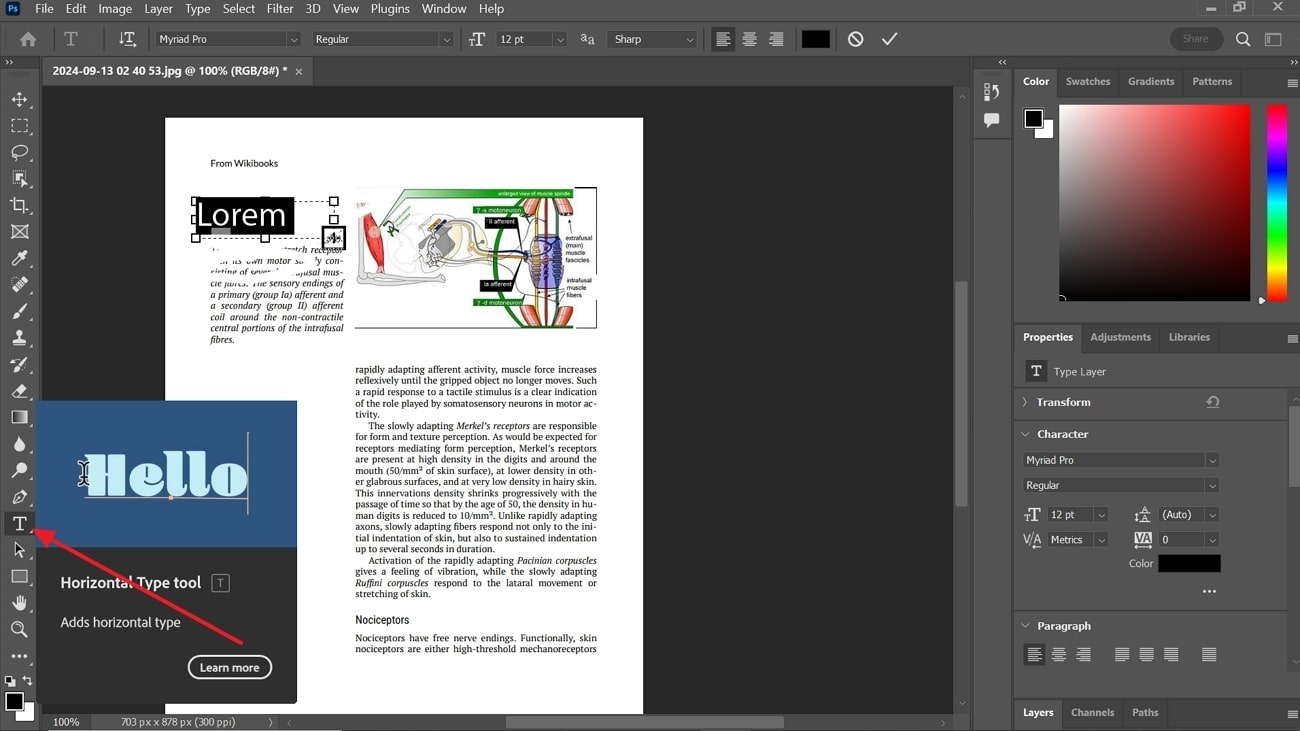
Step 2. Moving forward, navigate to the “Horizontal Type Tool,” which allows users to add new text boxes to replace the text previously removed. After adding the text, you get to change the color, font, and style of the added content.
Limitations
Despite being a well-known tool for performing powerful image manipulation, it lacks the functionality to edit the existing image text.
Conclusion
In conclusion, this article has discussed various methods to help you learn how to edit text on an image. Each technique we discovered in this guide can help multiple individuals in different use cases. If you are looking for a comprehensive and advanced tool with extensive AI-powered features, your top choice should be Afirstsoft PDF.

