Many users struggle with the task of manually inputting information from images. iOS introduced the Live Text feature that allows users to interact with the text directly from photos, screenshots, or the camera in real-time. This is important for extracting a number from a business card or searching for a website from a product's barcode.
Though Live Text is an amazing feature for quickly extracting text from images, there are situations where users might need a more advanced OCR tool for handling complex documents. In such cases, Afirstsoft PDF offers a powerful solution due to its advanced OCR technology. In this article, we will learn how to use Live Text on an iPhone and utilize Afirstsoft PDF for more demanding text extractions.
Part 1. What is Live Text on an iPhone?
Live Text on iOS devices is a feature that allows you to interact with text directly from images or even a live camera. It works by using OCR technology to perform text extraction from photos, live camera views, or even handwritten notes letting users utilize the text for diverse use cases. Once the text is detected, it becomes interactive to enable users to tap on it to select, copy, paste, or share the content.
Moreover, this feature supports real-time integration with the iPhone's camera, allowing users to point the camera at text and interact with it instantly. Additionally, it offers enhanced functionalities, such as translation and information lookup, that enable you to translate text from foreign languages. To explore how to use Live Text on an iPhone for these common use cases, go through the following section:
- Copying Text: You can easily select and copy text from images or screenshots with Live Text. For example, you can utilize this feature to extract text from a receipt or account statement.
- Searching the Web: Once the text is detected in an image, tap on it to perform a web search directly. If you have an image of a product label, you can select the text and tap on the search option to quickly find more details online.
- Calling Phone Numbers:OCR can recognize phone numbers with images, making it possible to tap on them to initiate a call directly. For instance, you can take a photo of a flier with a contact number to instantly call the business listed without needing to manually enter the number.
- Translating Text: The translation feature allows you to translate text found in images directly from your iPhone. After selecting the text in a photo, choose the translate option to see the text in another language.
Part 2. How to Use Live Text on iPhone?
After exploring the OCR capability of iOS devices in detail, you might be looking for ways to enable and utilize this feature for text extraction. Read the next section to learn how to use Live Text on an iPhone by following the step-by-step guide given below:
Step 1. Enabling Live Text
The first step is to ensure that you have enabled the Live Text feature for your camera and photos from the settings. By following these steps, you'll ensure that the OCR feature is properly activated on your iPhone for various uses.
1. Enable Live Text in Camera
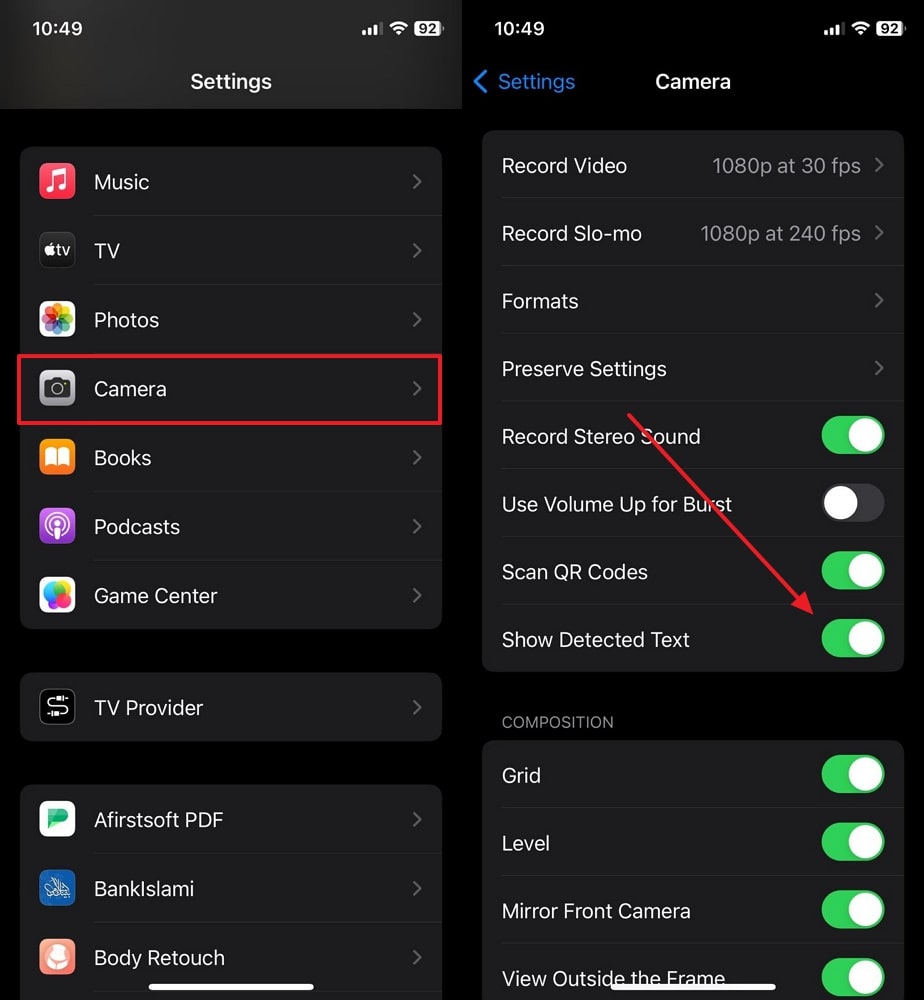
Instructions. Start by tapping the “Settings” app on your iPhone's home screen. Scroll down and select “Camera” from the list of available applications. Locate the “Show Detected Text” toggle switch within the Camera settings and turn it on to enable live text functionality.
2. Enable Live Text for Photos
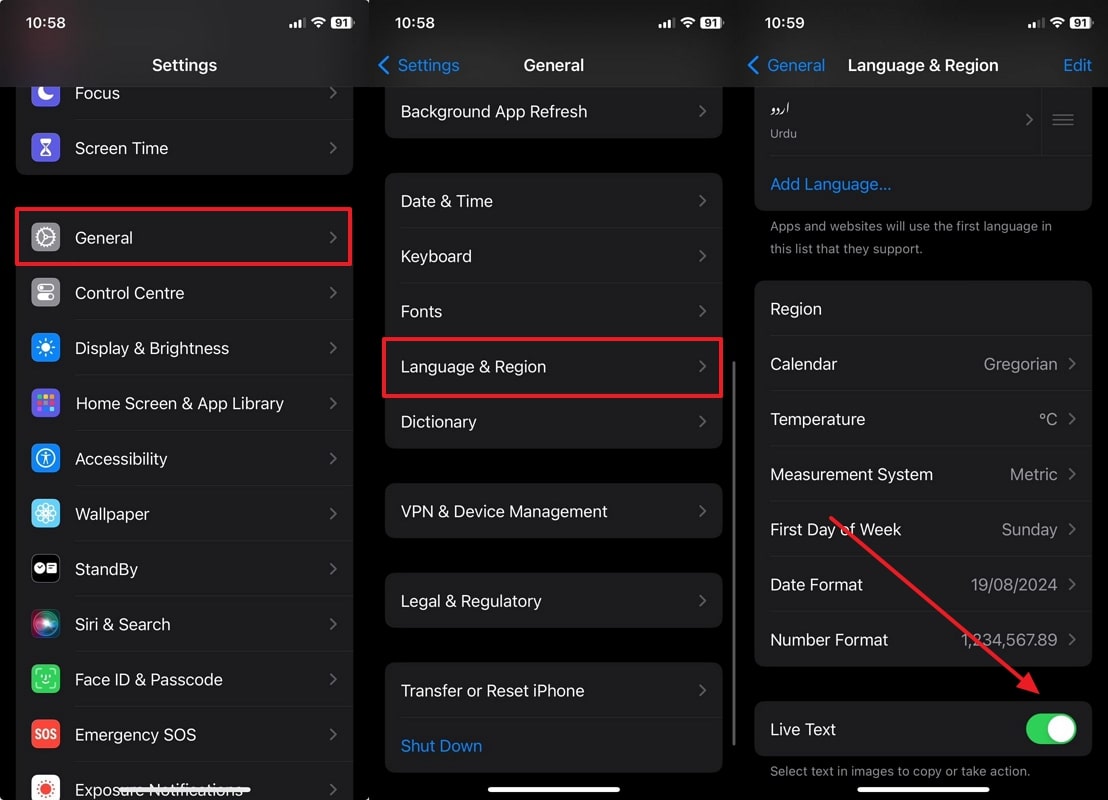
Instructions. Enter the “Settings” application and scroll down to select “General” from the list of settings options. Within these settings, tap on “Language & Region” and enable the “Live Text” toggle switch.
Step 2. Using Live Text in the Camera App
Users often need to extract information from their surroundings, and Live Text in the Camera app provides a convenient way to do this. Here's how you can learn how to use Live Text on an iPhone by following these simple instructions.
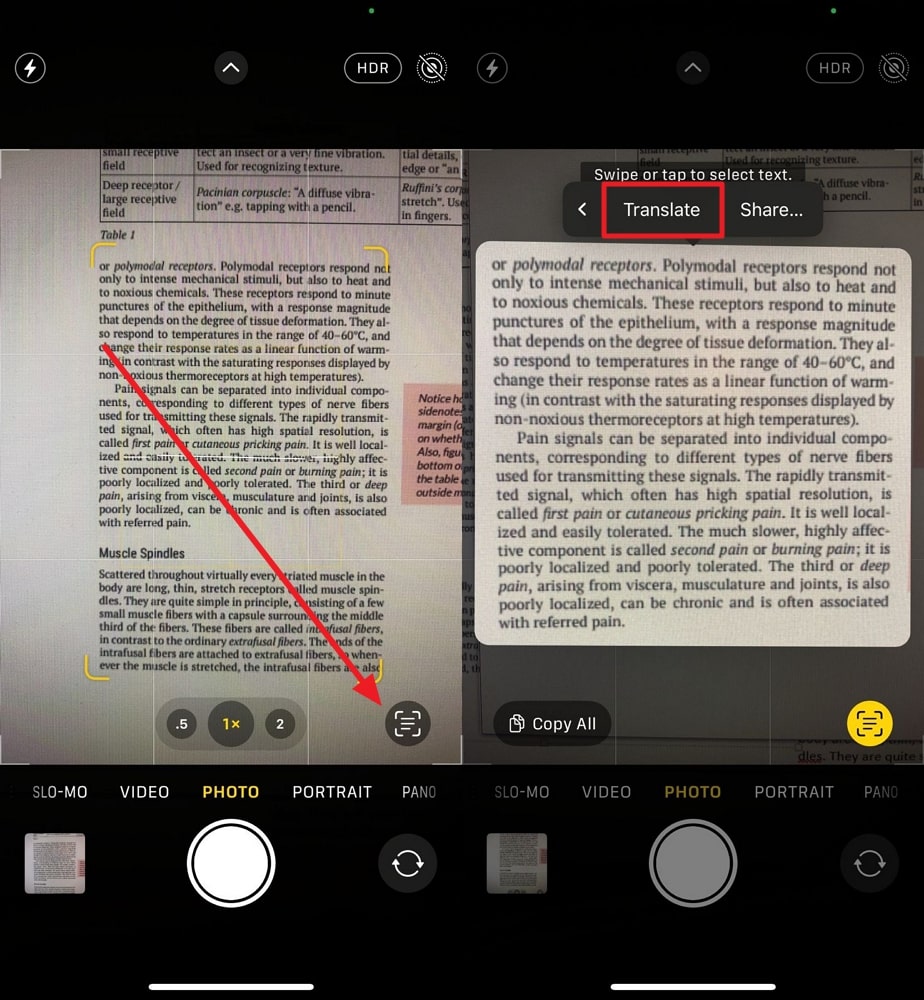
Instructions. Start the process by pointing your camera at the document that contains text. A yellow box will then appear around the recognized text to indicate the OCR detection. Afterward, tap the “Live Text” icon in the bottom right corner of the screen. This action will bring up a small floating toolbar on the top with several options, such as “Copy” and “Translate.”
Step 3. Using Live Text in Photos
The ability to use Live Text in images is important for managing and interacting with textual information contained within your photo library. Refer to the following detailed instructions to learn how to use Live Text on an iPhone.
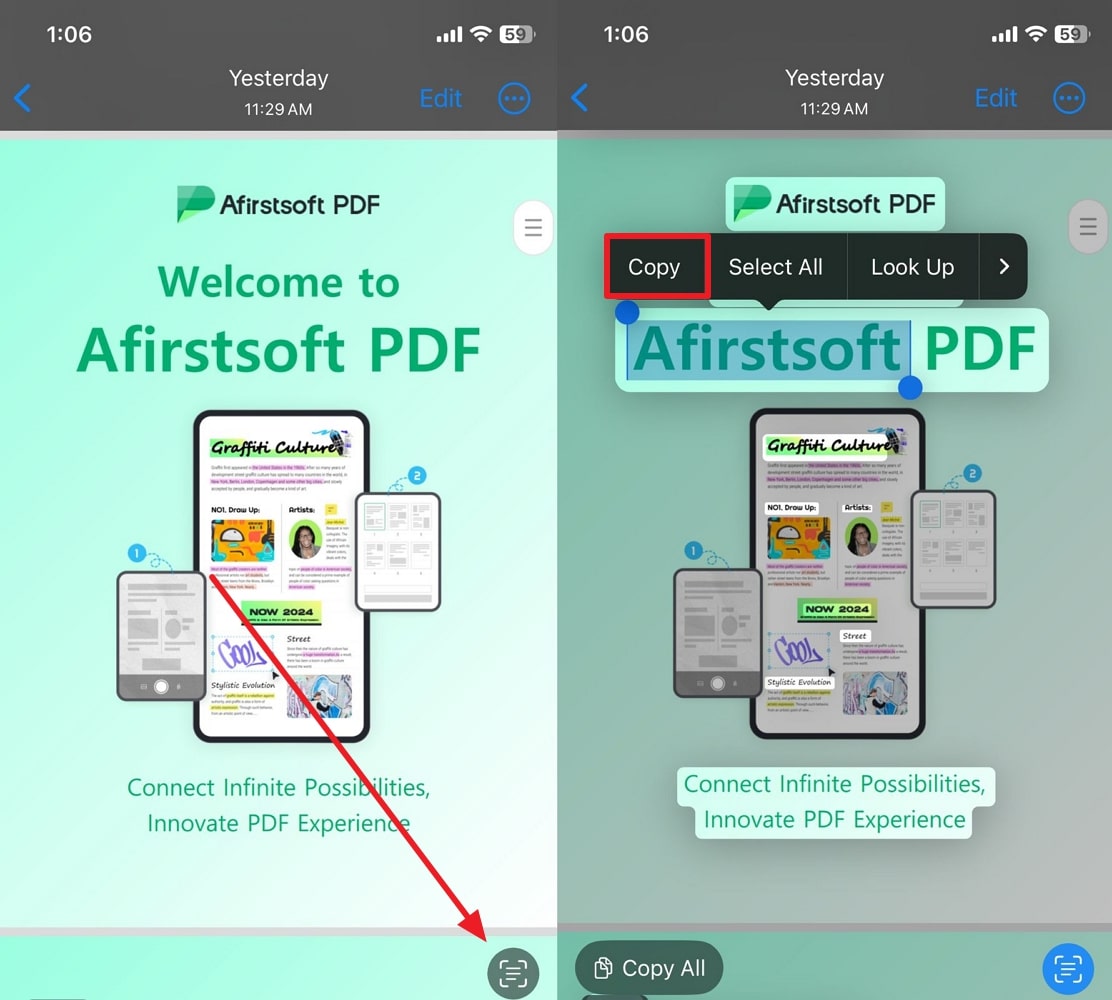
Instructions. Open the “Photos” application and select a photo with text which you want to extract. After opening the image, press the “Live Text” icon that appears over the image to detect the text. Once the text is detected, you can copy the content or translate it to another language.
Part 3. Limitations of Live Text and When to Use Afirstsoft PDF
While Live Text is a powerful tool for extracting the text from images, it does have some limitations. Users might face issues such as difficulty with low-quality images, where the text may be blurry for iOS OCR to accurately recognize it. Complex text formatting can also lead to inaccurate text recognition, especially when the text is presented in uncommon fonts.
Additionally, Live Text might also struggle with non-supported languages that limits its ability to recognize and translate multilingual content. For situations requiring precise text extraction from extensive documents, an advanced OCR tool like Afirstsoft PDF offers a more versatile solution.
Part 4. Afirstsoft PDF: Advanced OCR Solution
For users who are looking for alternatives to how to use Live Text on an iPhone, Afirstsoft PDF offers a user-friendly alternative. Its AI-powered OCR functionality simplifies the process of extracting and managing text from image-based documents without needing to navigate the complexities of Live Text. Additionally, Afirstsoft PDF allows you to specify the exact pages you want to process, which is particularly important for large documents.
This software also has the ability to recognize text in multiple languages. You can select the language of the text you are scanning to improve the accuracy of the OCR process. Moreover, it also offers a range of scan options to customize the text recognition process according to your needs.
Step-by-Step Guide to Using Afirstsoft PDF
Here's a step-by-step guide to using Afirstsoft PDF for using the advanced OCR capabilities for text extraction. Follow these instructions to navigate through the application and utilize its features for best text recognition quality:
Step 1. Create PDF from Your Image File
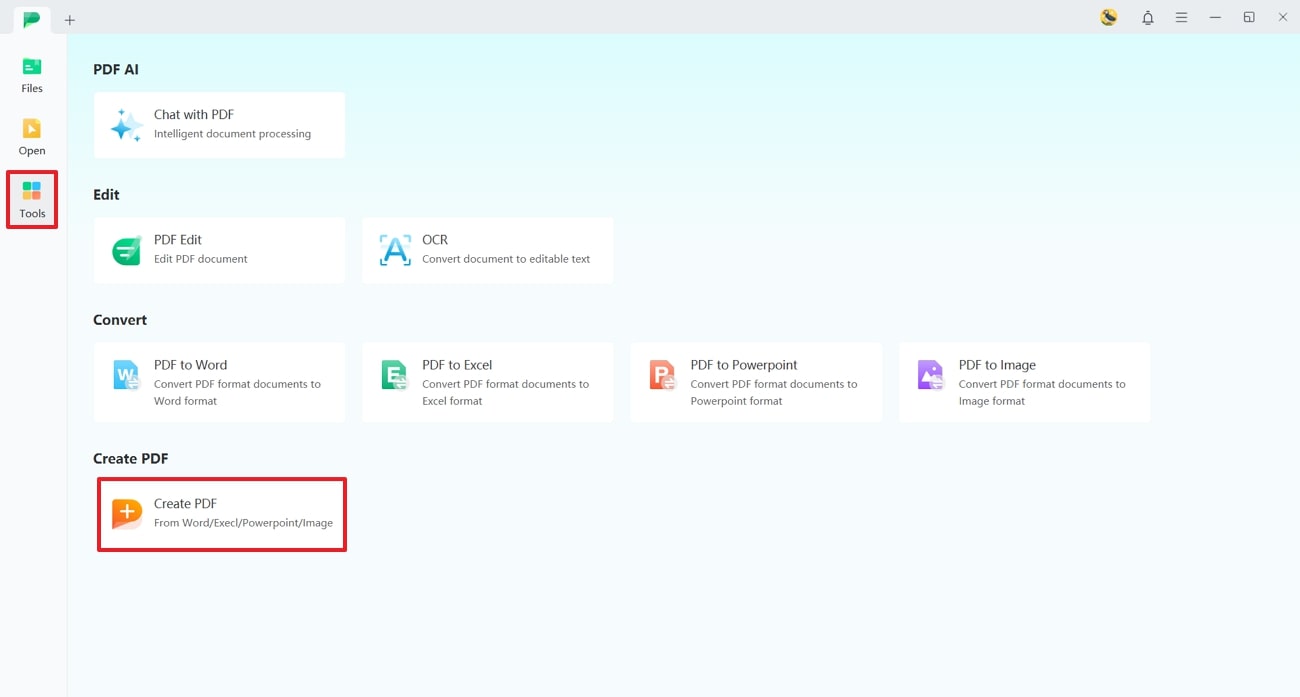
To start the OCR process, open the recent version of Afirstsoft PDF on your device and click on the “Tools” tab from the left-side menu bar. From the list of available tools, select the “Create PDF” feature to open a file explorer window. Choose the image file from your computer from which you want to extract text to convert it to a PDF document.
- 100% secure
- 100% secure
- 100% secure
Step 2. Locate the OCR Feature and Set Parameters
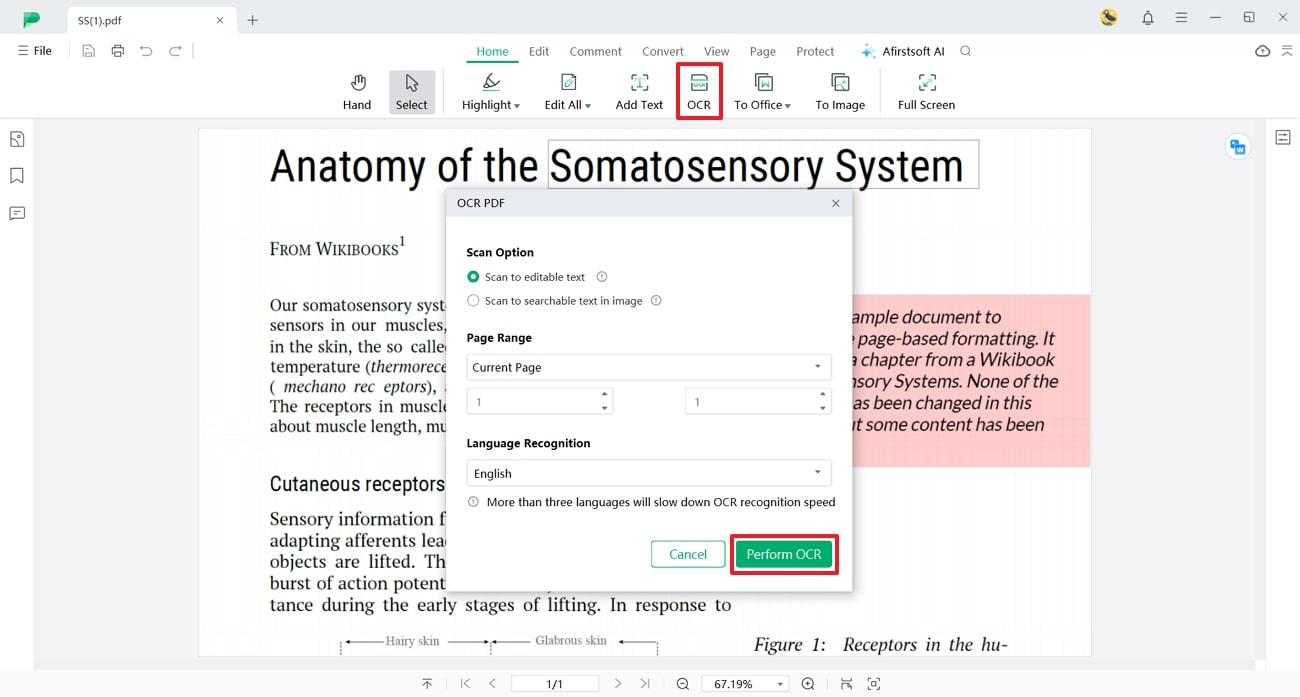
After creating a PDF, the tool will automatically display it within the editing interface. Access the “OCR” feature within the top toolbar to bring up an “OCR PDF” pop-up window, where you need to adjust the OCR settings. You can also select your desired “Scan Option” and “Language” to improve the accuracy of text extraction. After adjusting these parameters, press the “Perform OCR” button to initiate the text recognition process.
- 100% secure
- 100% secure
- 100% secure
Step 3. Export the OCR-Enabled PDF to Text Format
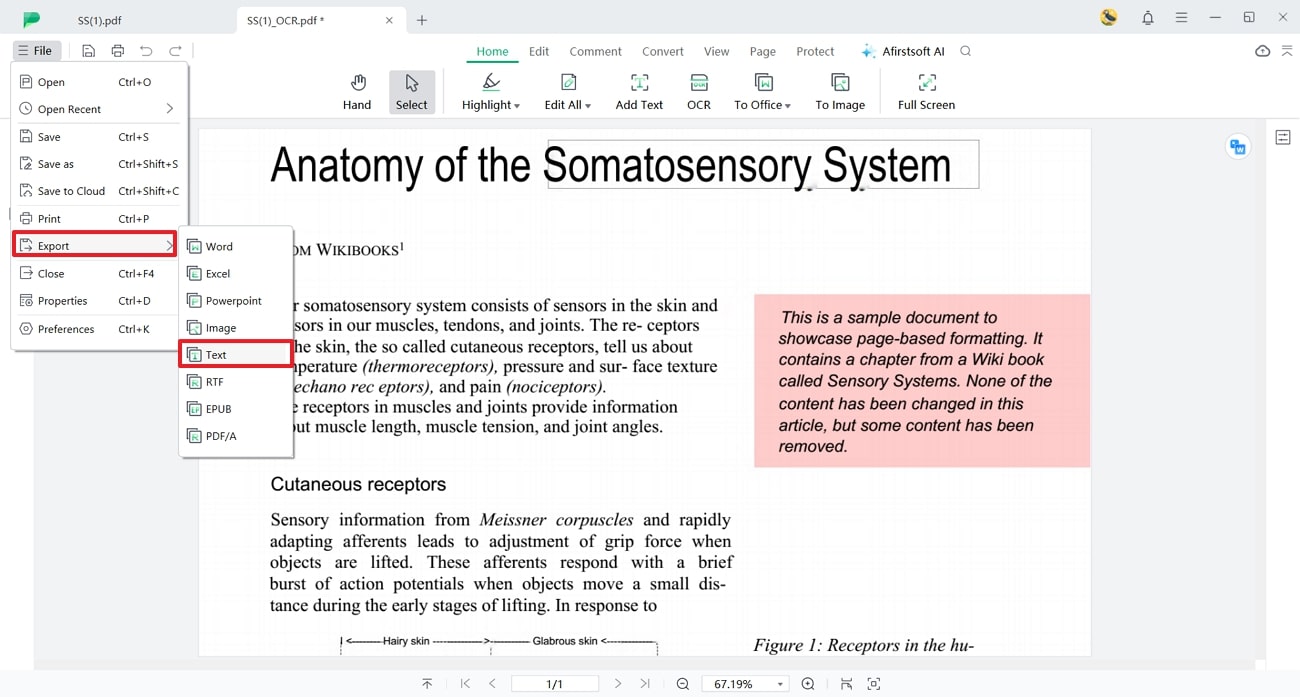
Head to the “File” menu after making all the necessary changes and select the “Export” option from the drop-down menu. After choosing export, select “Text” from the available file formats. This action will direct you to a “Convert” pop-up menu, where you can specify your preferred conversion settings.
- 100% secure
- 100% secure
- 100% secure
Step 4. Adjust Conversion Parameters Across Afirstsoft PDF
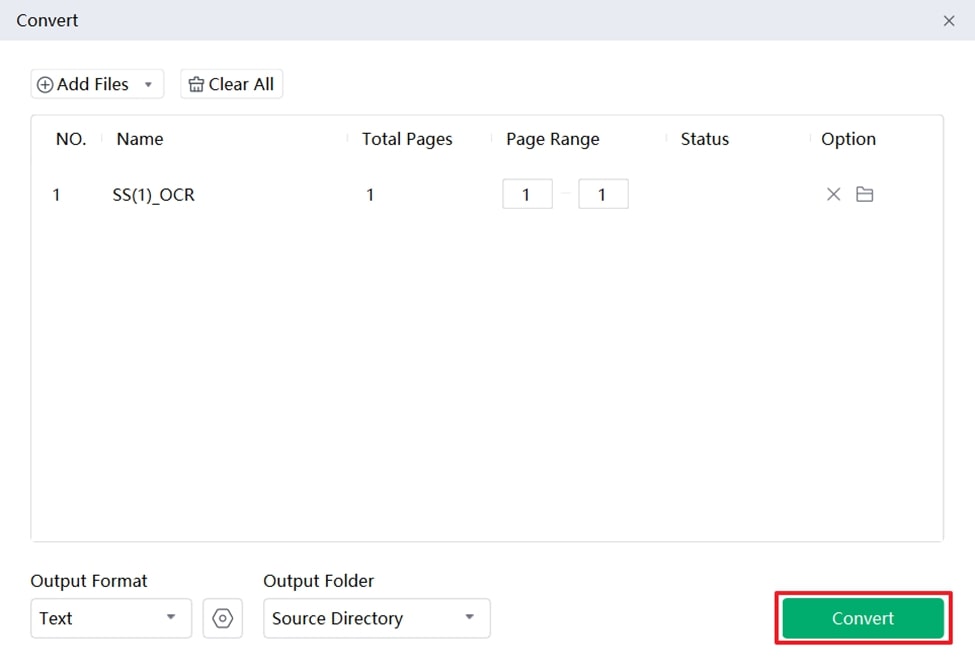
Within the convert menu, set your desired “Page range” if you want to convert only the specific pages. Additionally, specify a designated location where you want to save the converted file under the “Output Folder” section. After you’re satisfied with all the settings, hit the “Convert” button to save the PDF file as a Text document.
- 100% secure
- 100% secure
- 100% secure
Conclusion
Wrapping up learning how to use Live Text on an iPhone is important for managing and interacting with image-based content. While this feature on iOS is beneficial for basic text extraction, it lacks advanced OCR capability to extract text from extensive documents. For more comprehensive OCR capability, tools like Afirstsoft PDF offer enhanced text recognition accuracy and offer a range of customization options.

