People remember Adobe Acrobat Reader as a comprehensive software for modifying and examining PDFs. Sometimes, when it comes to printing important documentation, the error "Adobe the document could not be printed” is displayed. It displays disruption in the printing process for many reasons.
Moreover, it is important that this issue should be managed quickly to ensure efficient printing of documents to smoothly execute the legal and official processes. This article will address the causes and discover workable ways to fix the “Adobe Acrobat Reader the document could not be printed” issue.
- 100% secure
- 100% secure
- 100% secure
Part 1. Common Reasons for "Adobe: This Document Could Not Be Printed" Problem
You can find various reasons why the “Adobe Reader document could not be printed” error message occurs. Understanding these reasons can help you efficiently look for a solution and fix the issue with time. The following key points highlights effective reasons why the “Adobe document could not be printed” is appearing on your screen.
- Outdated Printer Drivers: It is quite possible that the printer drivers across the computer are outdated or corrupted. Issue with drivers can be a direct lead to compatibility errors between the software and printer.
- Insufficient Memory Storage:Printers also store file data, and if large or complex files are printed, they can shut down or slow down the printing process. Moreover, due to insufficient storage, you are unable to print any necessary documents.
- Incorrect Preference Settings: Adobe Acrobat has various preference settings that help you control your document print. Therefore, if the settings are configured incorrectly in some way, then the printing process can be stopped.
- Corrupted or Damaged Document: If none of the above reasons cause the “Adobe Acrobat document to not be printed” issue, then the PDF itself is corrupted. The corruption could have occurred during the creation process or been caused by viruses or malware.
- Temporary Files Accumulation: The operating system can accumulate various temporary tiles and cache over time that interfere with its performance. Therefore, it can lead to conflicts within the software and printing errors.
- 100% secure
- 100% secure
- 100% secure
Part 2. 7 Methods to Fix the "Adobe Acrobat: The Document Could Not Be Printed” Error
When trying to print crucial PDF documents, you get the message that Adobe Reader documents cannot be printed. This is quite frustrating to encounter, as it halts the entire process, which needs an immediate fix. We’ve come up with the top 7 methods that can be used to fix the “Acrobat: The document could not be printed” error.
Solution 1. Alternative PDF Printer - Afirstsoft PDF
If your PDF printer cannot print the required PDF documents you want to print, there are various solutions to fix that. One of the fastest solutions is to use an alternative to the PDF Printer, and that is the Afirstsoft PDF Printer. This tool can quickly help you print PDF files while maintaining file quality and layout style. To optimize the printing process, you can pick other advanced printing options, such as print mode, pages, and more.
With Afirstsoft PDF Printer, you can efficiently resolve the "Adobe Acrobat the document could not be printed" error. Besides that, this tool makes it easy to edit, annotate, and convert your PDF before printing it out. Therefore, let's explore the steps of Afirstsoft PDF Printer to learn how to print PDFs without having any trouble:
Step 1. Open Afirstsoft PDF Printer on Your Computer
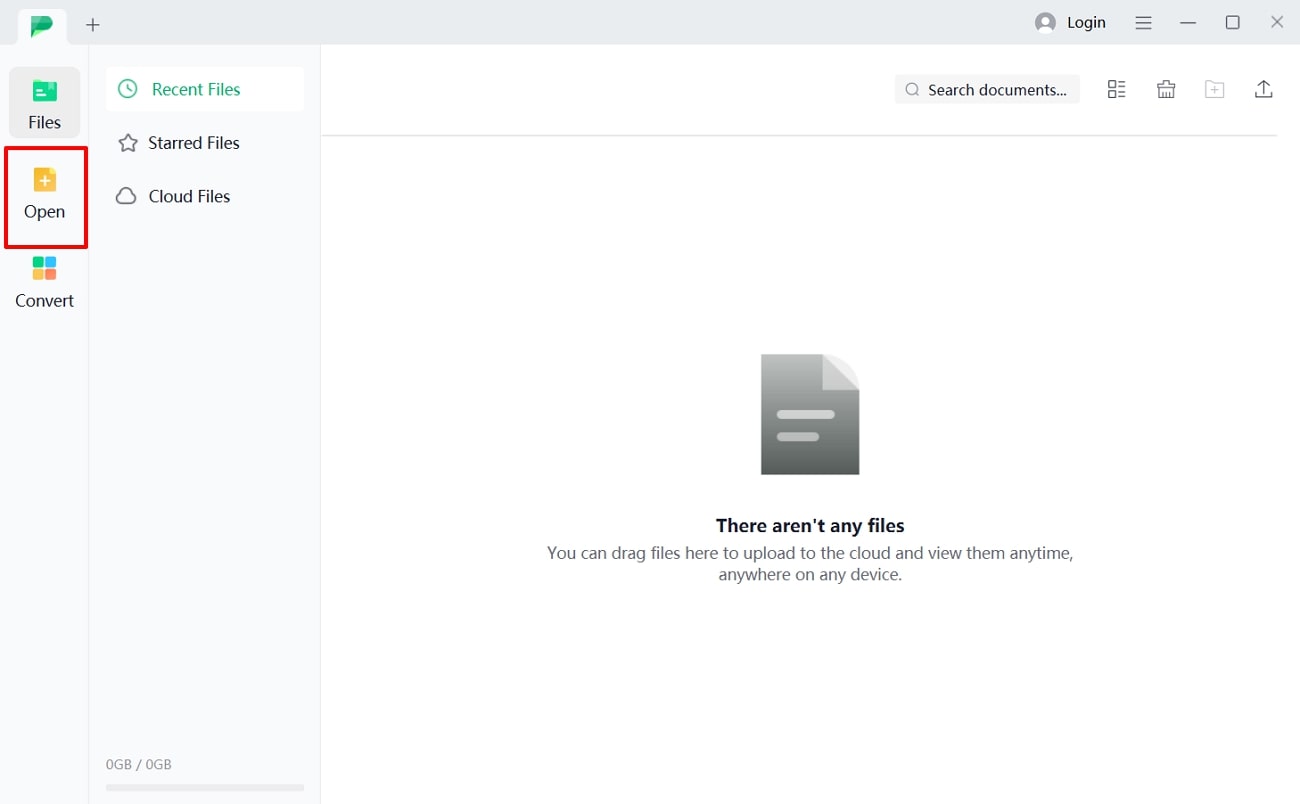
Download and install the Afirstsoft PDF Printer on your PC and open the main interface once installed. After that, from the left-side panel, click the "Open" icon and import the PDF document that wasn't printing with Adobe Acrobat.
Step 2. Access the Print Settings
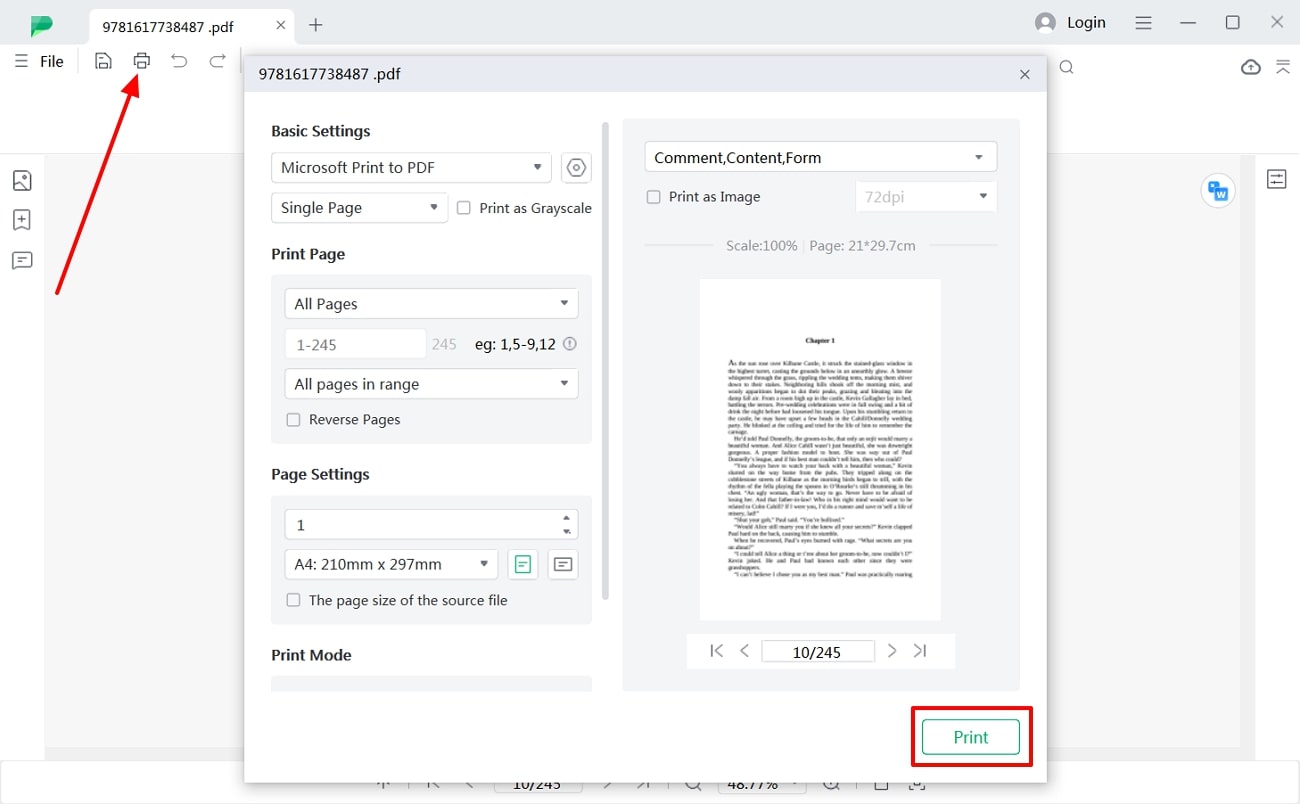
Now that you have added the PDF file head over to the top toolbar and click the “Print” icon to access its printing settings. A new window will appear on your screen with various printing options that you can choose from. Now select the appropriate printer, pages, their dimensions, and print mode according to your needs. Once you are done customizing the print settings, press the “Print” button to start the printing process.
- 100% secure
- 100% secure
- 100% secure
Solution 2. Update Your Printer Drivers
The "Adobe Reader document could not be printed" message also appears when you have not updated your printer for a long time. An outdated printer can cause severe problems with your files and lead to issues where you cannot print your PDF document. Therefore, follow these steps to keep your printer driver updated to avoid future printing error messages:
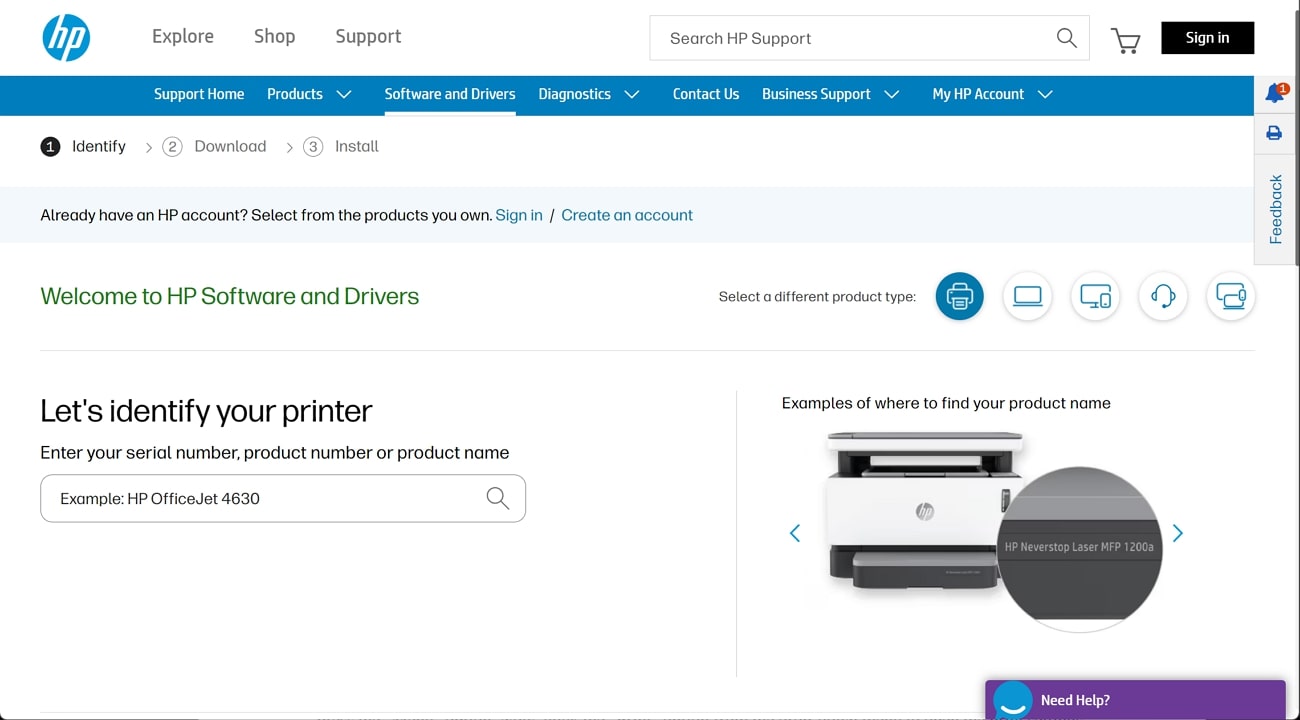
Instructions. Navigate across your printer's Software and Drivers page and type its name to look into its drivers. After downloading the latest drivers available, install them and see if they operate properly.
Solution 3. Print PDF as an Image
If Adobe Acrobat is unable to print your PDF, then you can try printing the document as an image. Sometimes, the PDF might contain complex forms of data or fonts that show the “Adobe Reader document could not be printed” error message. Therefore, Adobe can help you print the PDF as an image. Now, let’s look at the following steps to learn how to print the PDF as an image:
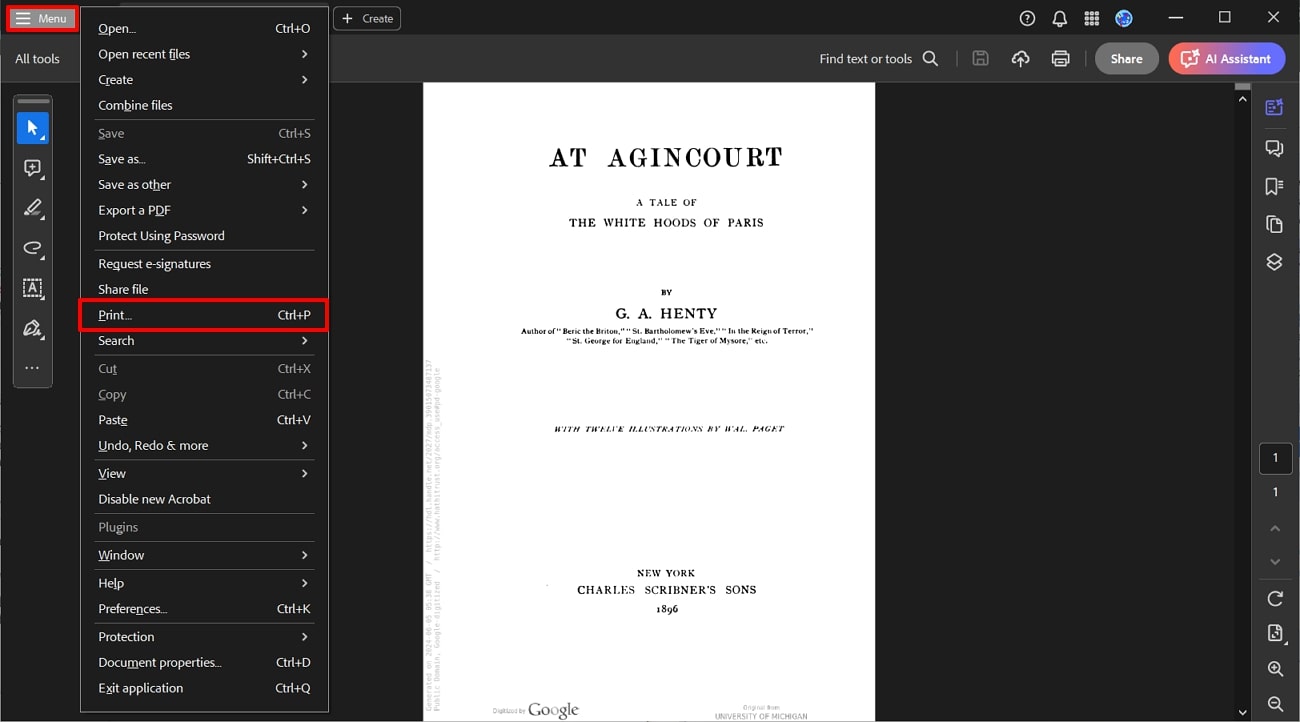
Step 1. After launching the Adobe Acrobat Reader app, use the “Open File” button to import your PDF. As you’ve added the file, move across the top-left corner and select “Menu.” Use the “Print” option from the drop-down menu to open the printing settings.
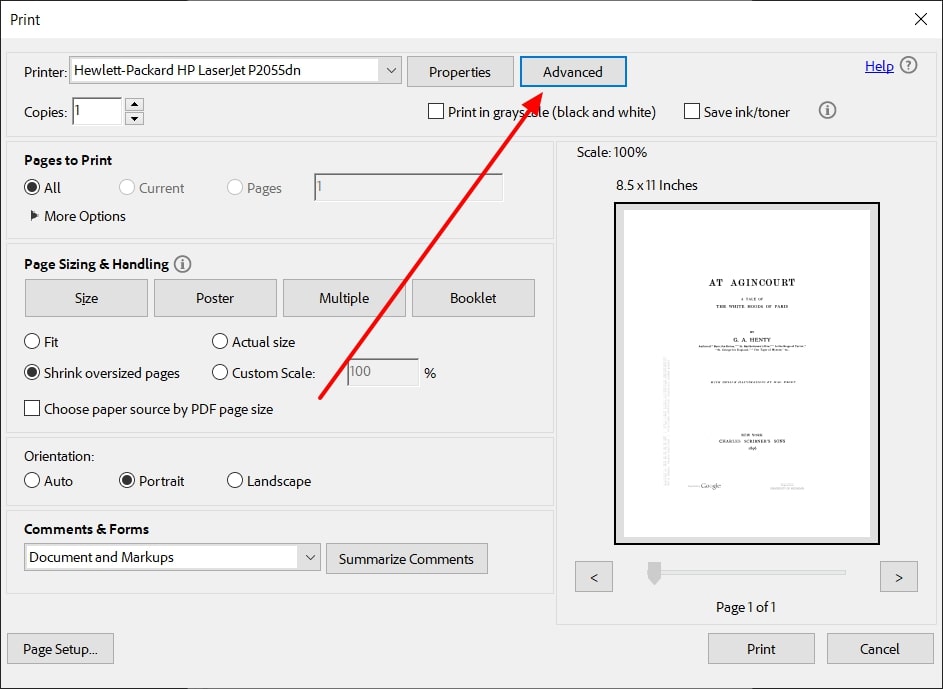
Step 2. Once the print settings open, hit the “Advanced” settings button beside the printer and properties options. A new window will open with advanced printing options where you can choose to set the PDF as an image.
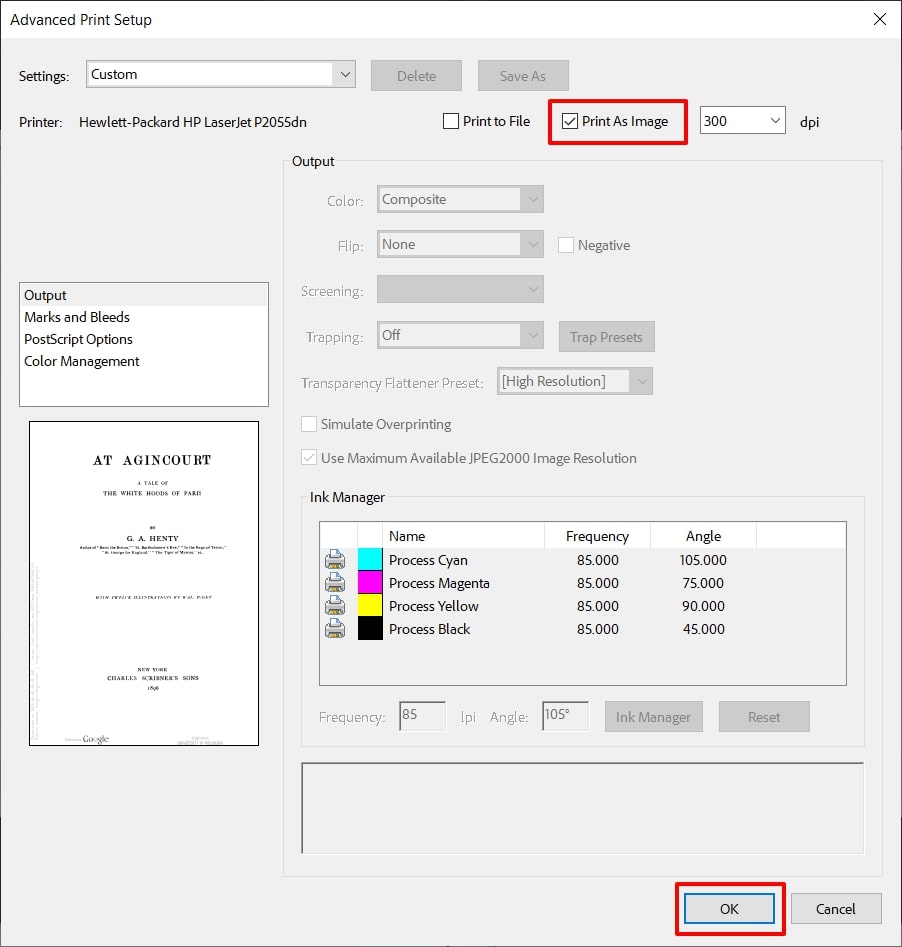
Step 3. On the Advanced Print Setup window, find the “Printer” name, and right beside the printer’s name, you’ll find the image option. Now, check the “Print As Image” option and then click the “OK” button to confirm the printing option. After that, you can print your PDF document as an image.
- 100% secure
- 100% secure
- 100% secure
Solution 4. Reinstall Adobe Acrobat Reader
It is quite possible that your Adobe Acrobat Reader is corrupted or some of the files are damaged, which is causing issues in handling PDFs. This problem can also be displayed in the “Adobe Reader document could not be printed” message. Read out the following instructions for figuring out how to reinstall the previous versions of Adobe Acrobat:
Step 1. Head to the left bottom corner of your desktop screen and click the “Window” icon to extend the bottom-up menu. Here, find and right-click the “Adobe Acrobat” app to open a drop-down menu with different options. From the available options, hit the “Uninstall” option, and this will open the Apps settings.
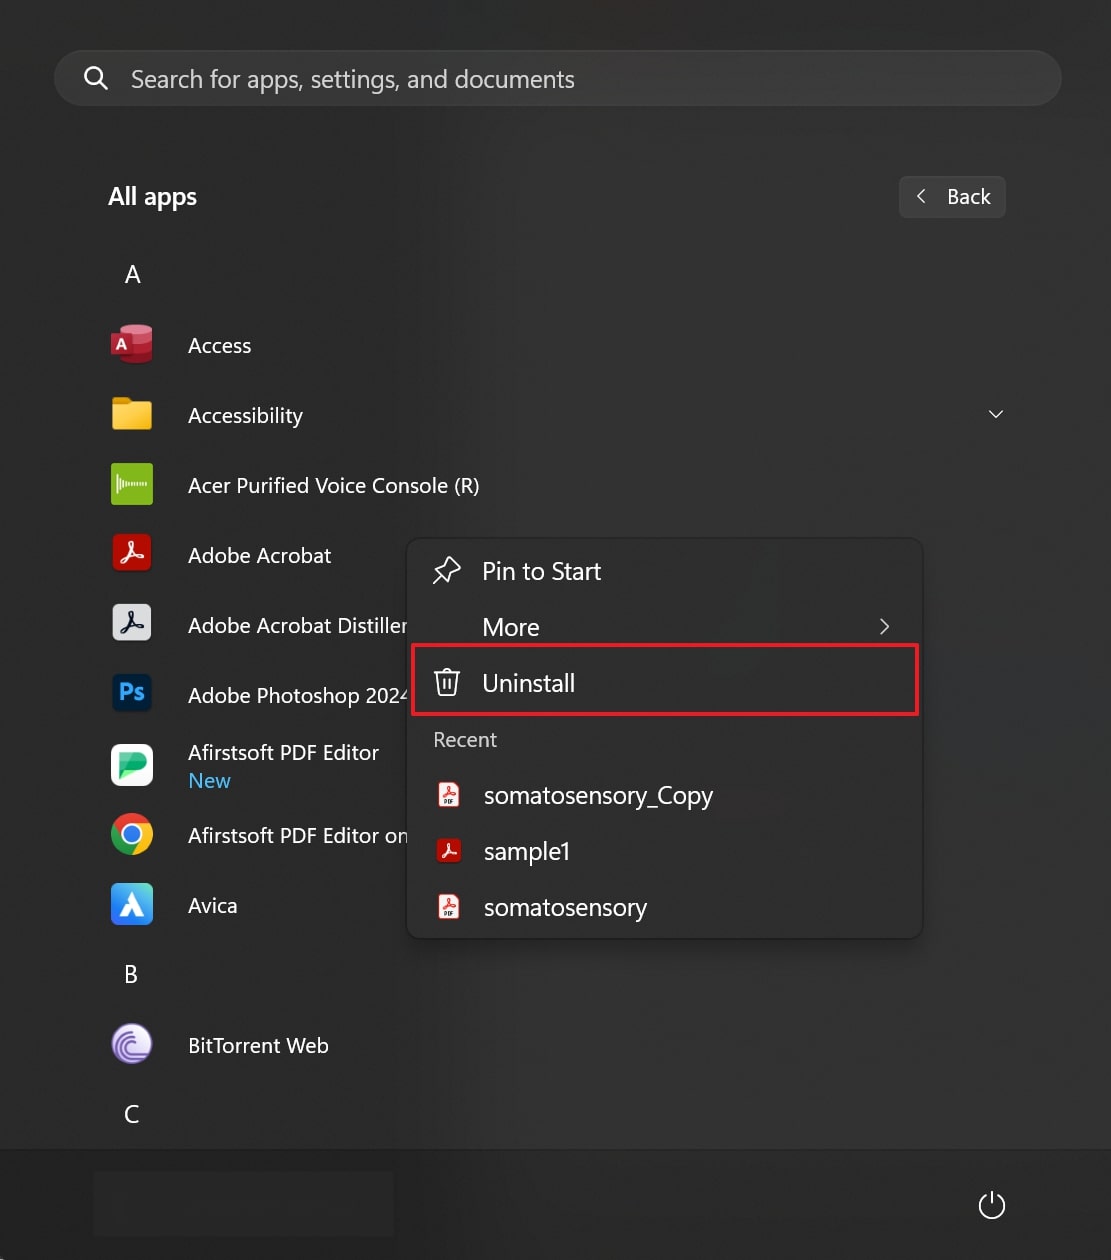
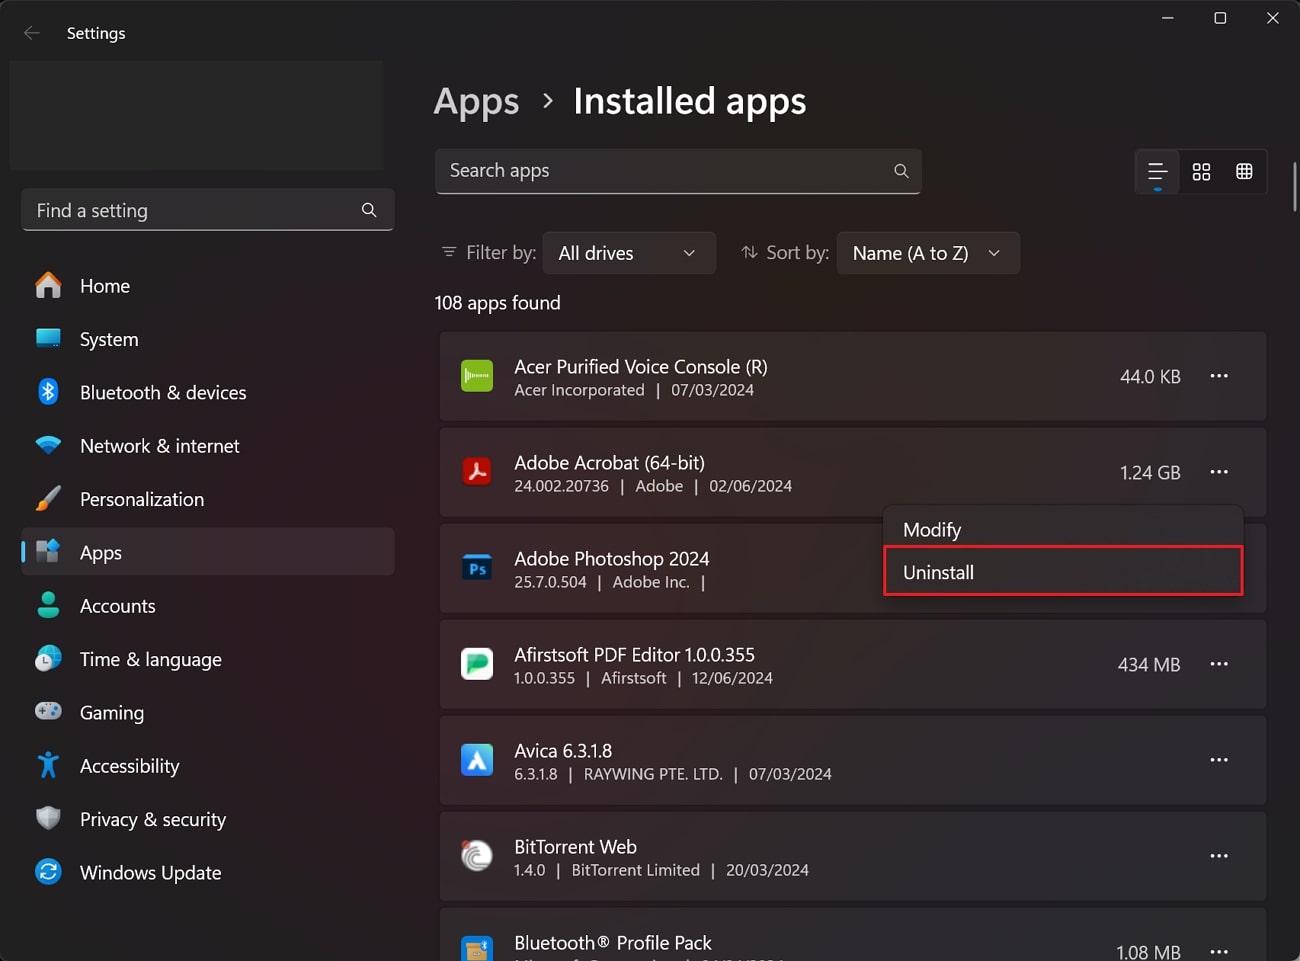
Step 2. From the App settings, find the "Adobe Acrobat" and tap on the "Three Dots" option in front of it. Select “Uninstall” from the options available to uninstall Adobe from your computer. Continue to re-install the latest version of this software from the official website.
Solution 5. Update Computer System
If, for some reason, updating the printer drivers doesn't work and you still can't print your PDF files. Then, you can completely update your computer system to print documents with Adobe Acrobat. By updating the system, all your applications and the printer get updated. Therefore, the following steps are here to guide you on how to resolve the "Acrobat Reader: the document could not be printed” issue:
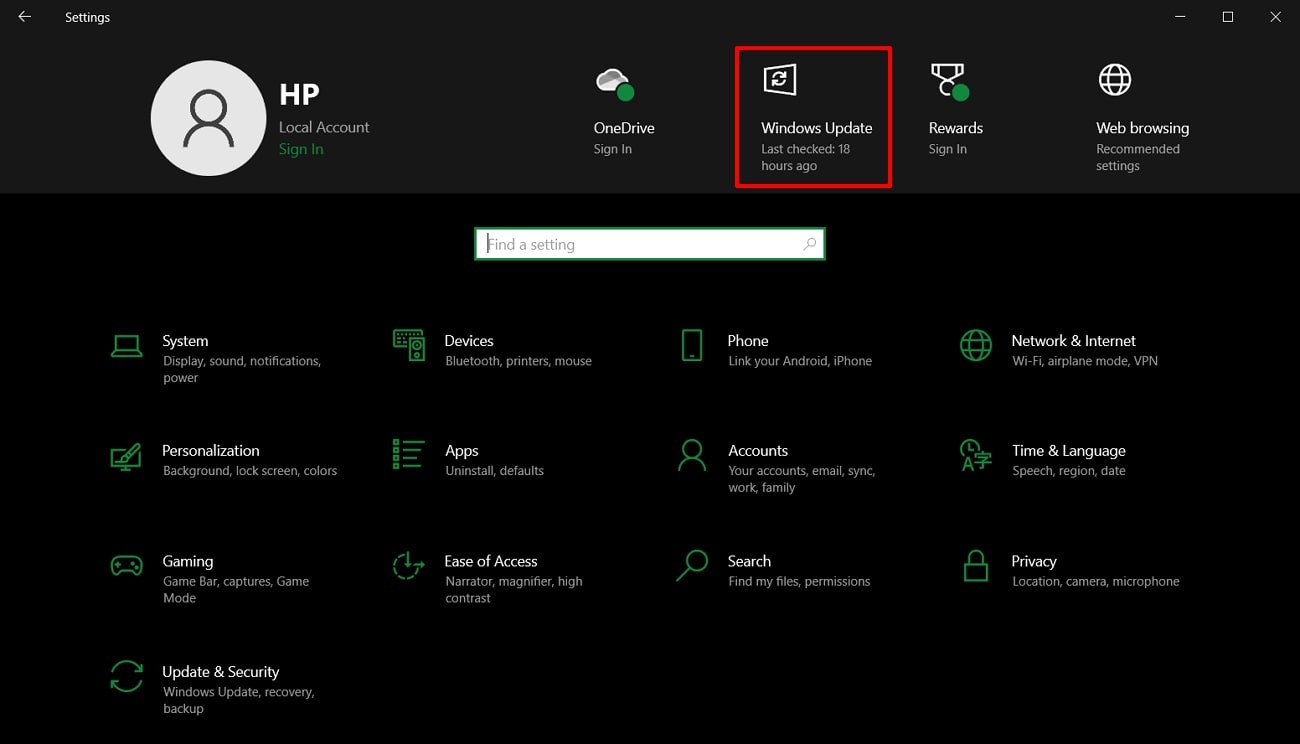
Step 1. From the “Start” button on the computer, launch the Settings app using the “Gear” icon. As you progress into the Settings app, discover the update option present on the search bar. Select the “Windows Update” option, which navigates you to another window.
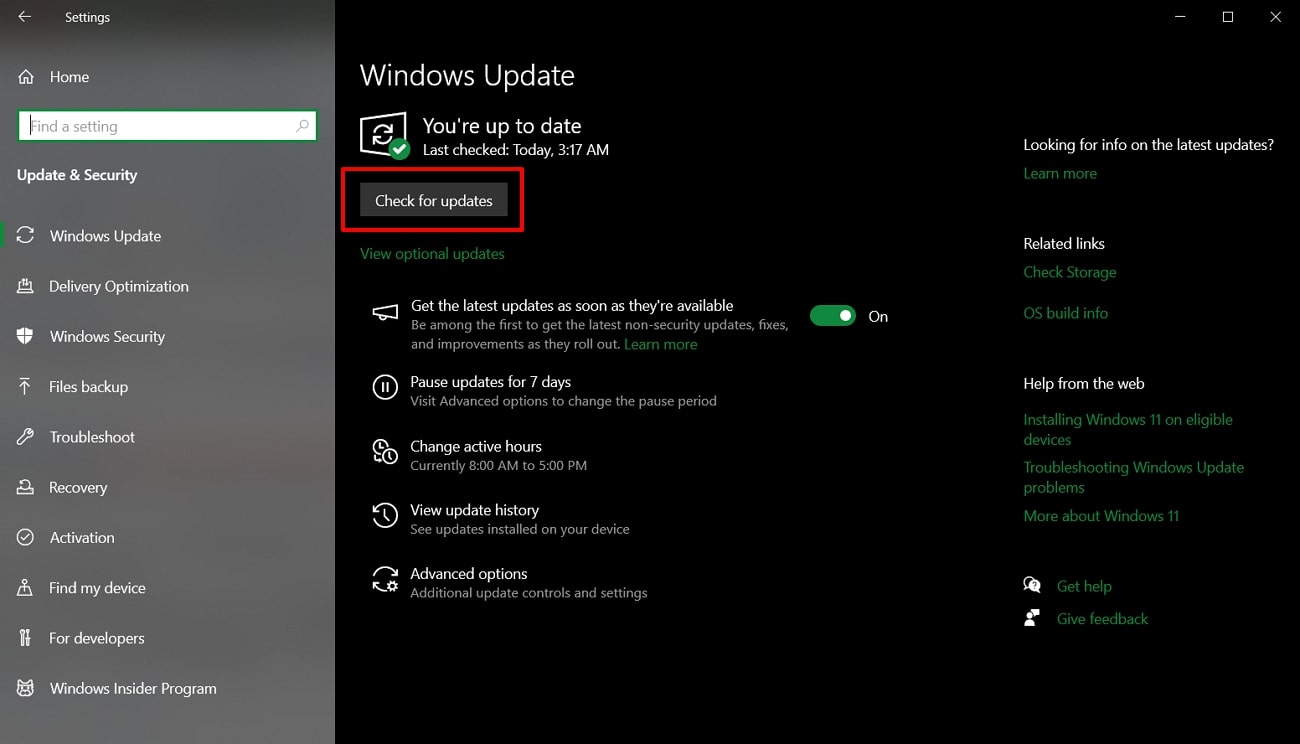
Step 2. From here, press the “Check for Updates” button, and the system will automatically check for any OS updates available. When it finds various updates, install them and let your system restart after the updates are done. After that, you can access the printing option in Adobe Acrobat and print out important PDF files.
Solution 6. Remove PDFs from the Print Queue
When encountering the "Acrobat Reader the document could not be printed" error, one effective solution is to remove the accumulated PDF from the print queue. This helps reset the printing system and eliminate complex printing errors. Now, follow the given simplified step to remove unwanted PDFs from the printer queue:
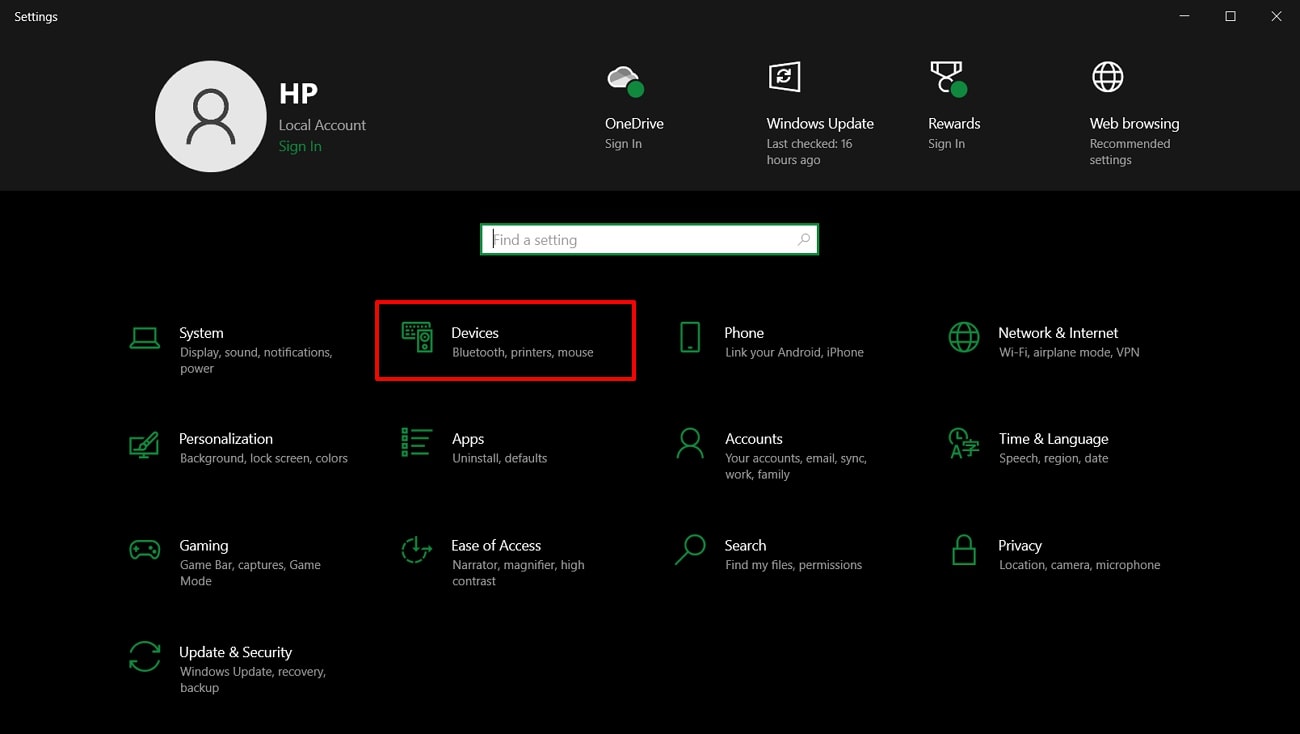
Step 1. Begin by navigating toward the bottom left corner of the screen. From here, press the “Start” window icon and then click the “Settings” option. After that, click the “Devices” option from the available settings options.
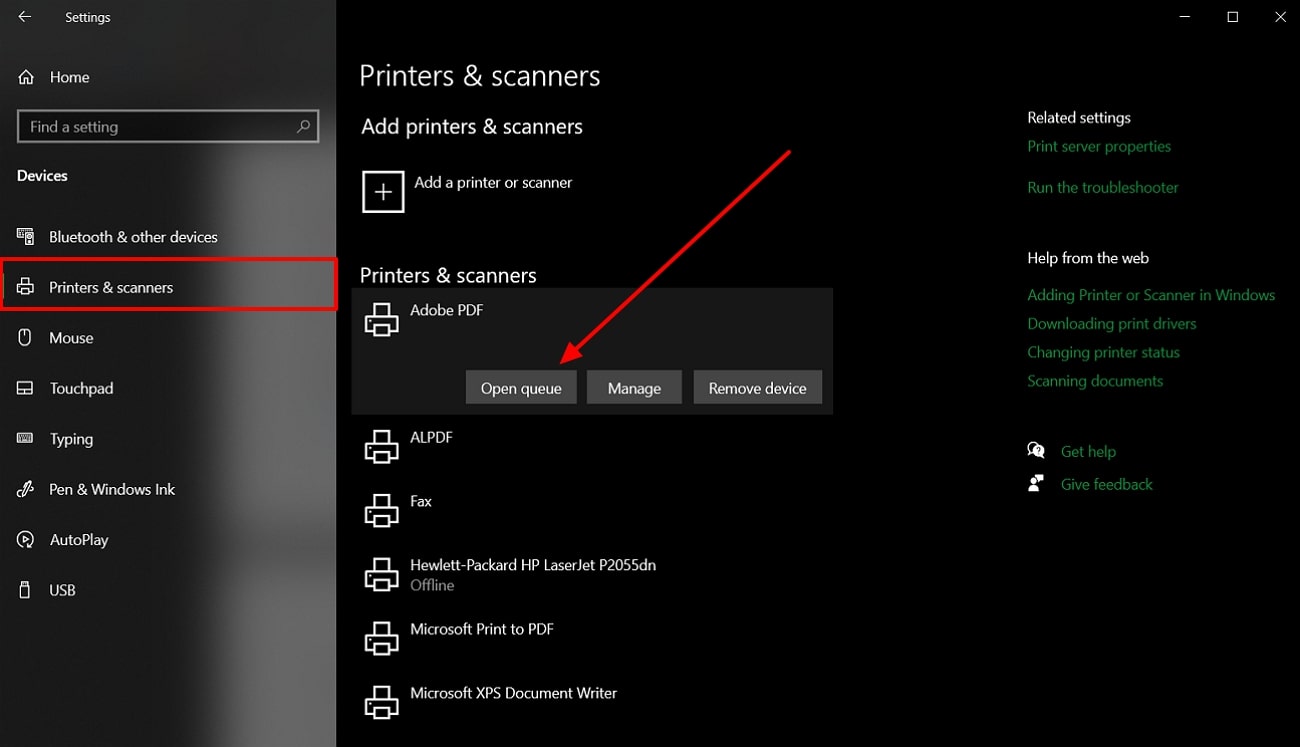
Step 2. Once the Devices settings open, select the “Printers & Scanners” option, and a list of printers will appear on the left. Now, choose the appropriate printer and right-click on it to open further options. From here, press the “Open Queue” option, and it will display a small pop-up window.
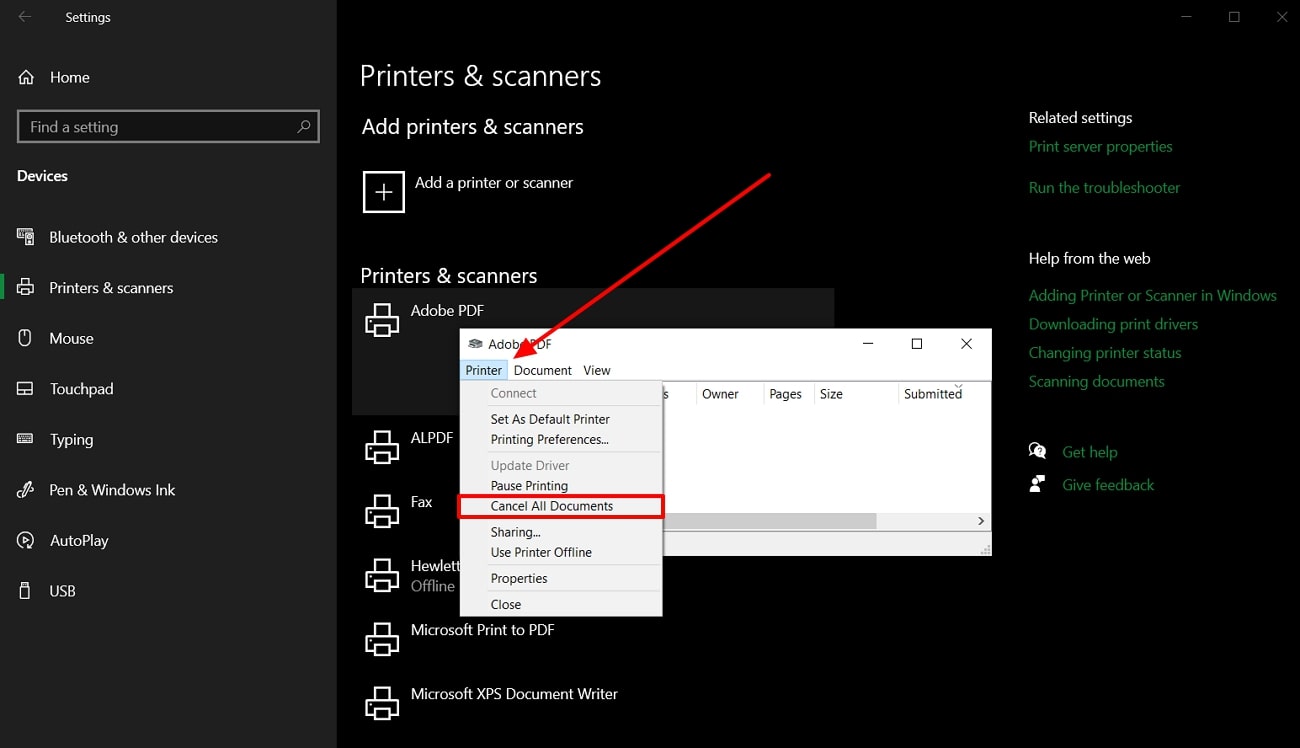
Step 3. When the small screen opens, press the “Printer” tab from the top toolbar. From the drop-down menu, click the “Cancel All Documents” option to clear the print queue.
- 100% secure
- 100% secure
- 100% secure
Solution 7. Convert the PDF Document
There are many cases when the PDF itself is damaged, which is why the “Acrobat: the document could not be printed” message keeps showing up. Therefore, you can convert the PDF document using the Adobe Acrobat convert feature to resolve this problem. It lets you choose various formats from Word to Image without any inconsistencies in the file. The following are the comprehensive steps that will guide you on how to convert a PDF file using Adobe Acrobat:
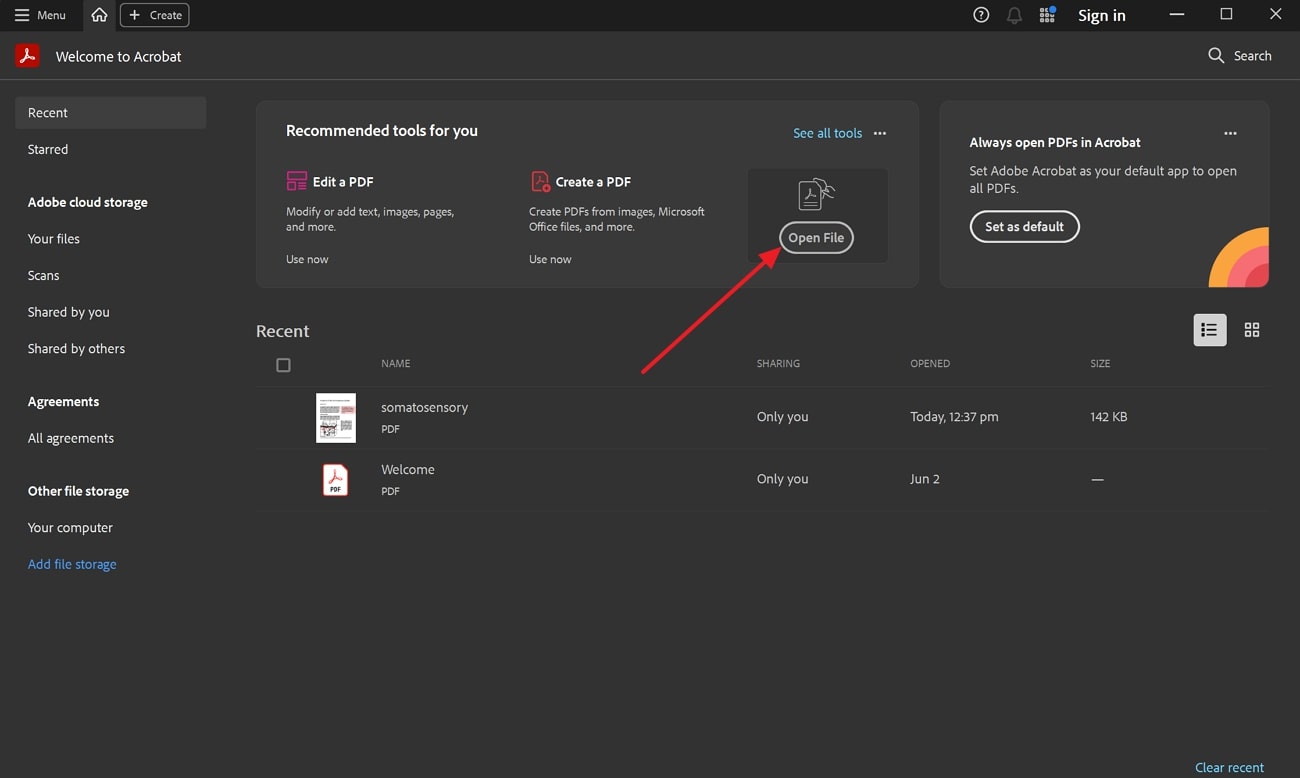
Step 1. Access the Adobe Acrobat software on your computer, and from the main interface, click the “Open File” button. Now, choose the PDF file that does not print in PDF form, and press the “Open” button to add that file.
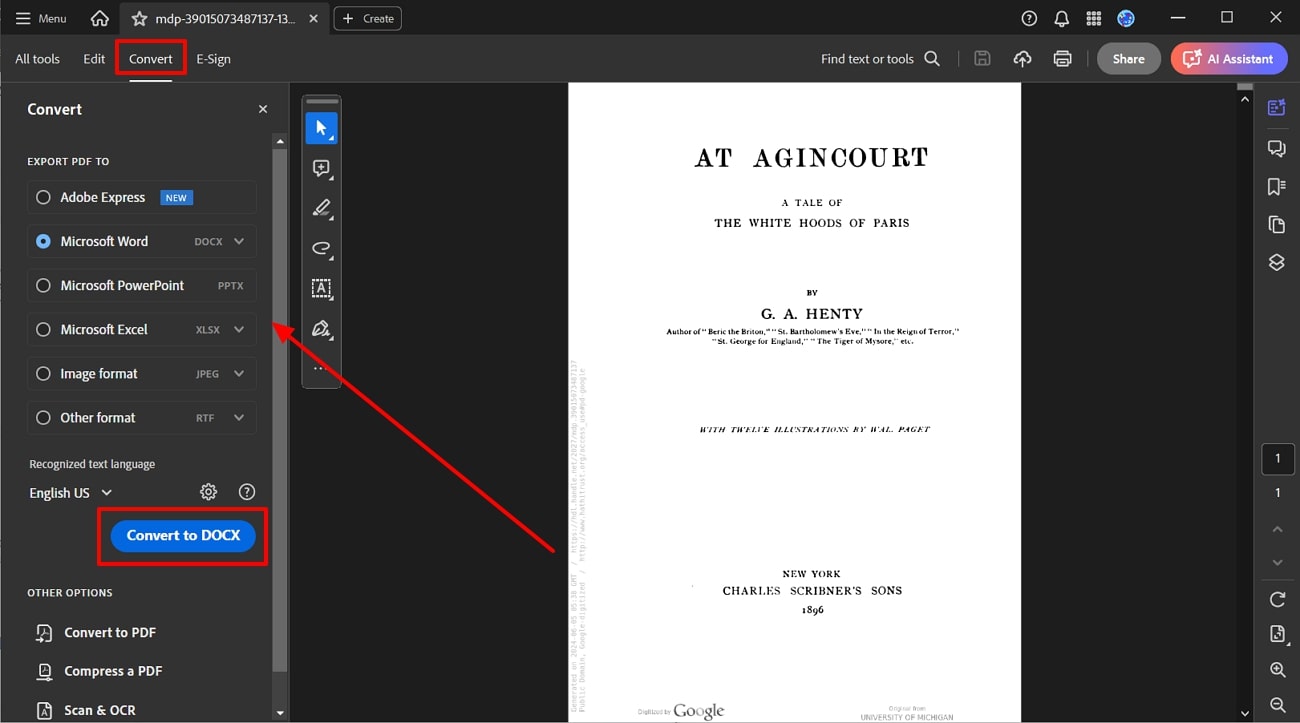
Step 2. Once the document is imported, go to the top toolbar and press the "Convert" tab to extend its options on the left side of Adobe Acrobat. From here, you can choose any file format you wish to convert the PDF file into and click the "Convert to…" button to start the conversion process.
- 100% secure
- 100% secure
- 100% secure
Part 3. Tips to Prevent the "Adobe Reader: Document Could Not Be Printed" Error
It is crucial to prevent the "Adobe Acrobat Reader: Document Could Not Be Printed" error in the first place to ensure smooth document handling. Therefore, you can utilize the following tips and tricks to prevent such an issue from happening again. Moreover, these tips will help you by providing efficient and uninterrupted PDF management and printing.
- Check PDF’s Integrity: Users need to ensure the PDF file is not corrupted or damaged by opening it in different PDF readers. If the file is corrupted files in any way, it can cause printing issues, so using reliable sources for downloading PDFs can prevent such problems.
- Adjust Security Settings: If you verify and adjust the security settings of the PDF to allow printing, it will not cause any printing issues. Therefore, ensure you don't accidentally enable the printing option in the permission security settings.
- Update Adobe Software: Keeping Adobe Acrobat Reader updated to the latest version can significantly solve the "Acrobat: The document could not be printed" issue. That is why regular updates can fix bugs or compatibility issues that reduce printing errors.
- Restart the System: Another option to fix the print issue is regularly restarting your computer to clear temporary glitches and free up space by clearing caches and temporary files. Moreover, keeping the system running too long can cause conflicts between the software and the printing system.
- 100% secure
- 100% secure
- 100% secure
Summary
Ultimately, we learned various common causes of the "Adobe Acrobat Reader: Document Could Not Be Printed" error. Therefore, to fix the issue, we discovered 7 comprehensive and easy-to-follow solutions that resulted in fixing the problem. However, with the Afirstsoft PDF Printer, you not only fix the Adobe printing problems but also make them editable.
That is why you should keep in mind that there are several solutions to fixing this issue and distinct reasons that disturb it. Thus, follow the prevention tips we provided in the last part of the article to prevent this issue from occurring.


