PDFs are the format of choice for sharing and storing documents in today's digitally-driven world. Whether it is a professional report, an e-book or your business presentation — PDF ensures that the content remains intact no matter which platform you view them from. But what if you need to dynamically manipulate your PDF files? Shapes can come in handy here. The shapes needed either to give emphasis on important content or assist readers through complex data, they also added a dash of creativity in your documents such as arrows which help keep fluids read the paragraph without getting lost because its directivity clearly points out where you have come from and leads another avenue. Did you ever realize that adding a mere arrow or circle to your PDF can actually transform it and keep the person who is reading this route in their memory?
Shapes in PDFs: A Better Way to Fill your Documents with the Power of Shapes
They are not just there for amusement or decoration, but shapes provide very strong capabilities to improve the functionality of your PDF. You are reviewing a contract right now, there is something that you give this to your client and mark some clauses for him or her. Maybe you are creating a presentation, and you want to lead the attention of your viewers towards specific data points. And by giving shape to these, you can simplify them as well, making the tasks even effective., and
The Tools You Need: Start With The Right Tools
Before we get into the step-by-step process of adding shapes, you need to know not all tools were created equally. In the PDF editing market, renowned contenders like Adobe Acrobat, Light PDF and Smallpdf are top of mind. These three tools each have a standalone set of features for drawing shapes and making annotations, which we'll go over more in depth in this article.
Part 1. The Fundamental Role of Shapes
Step Up Your PDF Game: Why Adding Shapes Makes Sense
Shapes in your PDFs isn't only related to the looks, but is essential for many other reasons like clarity, organization and communication. Arrows (and similar shapes) can point the reader to important information that they may otherwise skip over. Box and circle out the key areas to be more accessible; make documents easier for users of screen readers. Shapes are also a key tool to improve the overall look and performance of your PDFs.
From Rectangles to Arrows: Exploring Versatile Shape Options
Shapes in PDFs come in many forms—rectangles, arrows, circles, lines, and more. Each has its own unique purpose:
- Rectangles: Perfect for highlighting blocks of text.
- Arrows: Ideal for pointing out details or guiding the reader’s flow.
- Circles and Ellipses: Great for focusing on specific points or areas.
- Lines: Useful for underlining or separating sections of content.
Knowing which shape to use and when can make all the difference in how your PDF is perceived.
Part 2. Mastering Shapes in Adobe Acrobat
Getting Started
Open and Ready: Accessing Your PDF and Shape Tools
To begin adding shapes in Adobe Acrobat, you’ll need to open your desired PDF document. Navigate to the Menu and select Open, then choose your document. Once your file is open, locate the Draw Freehand Tool in the floating quick tools menu on the left side of the screen. This tool will be your gateway to adding various shapes to your document.
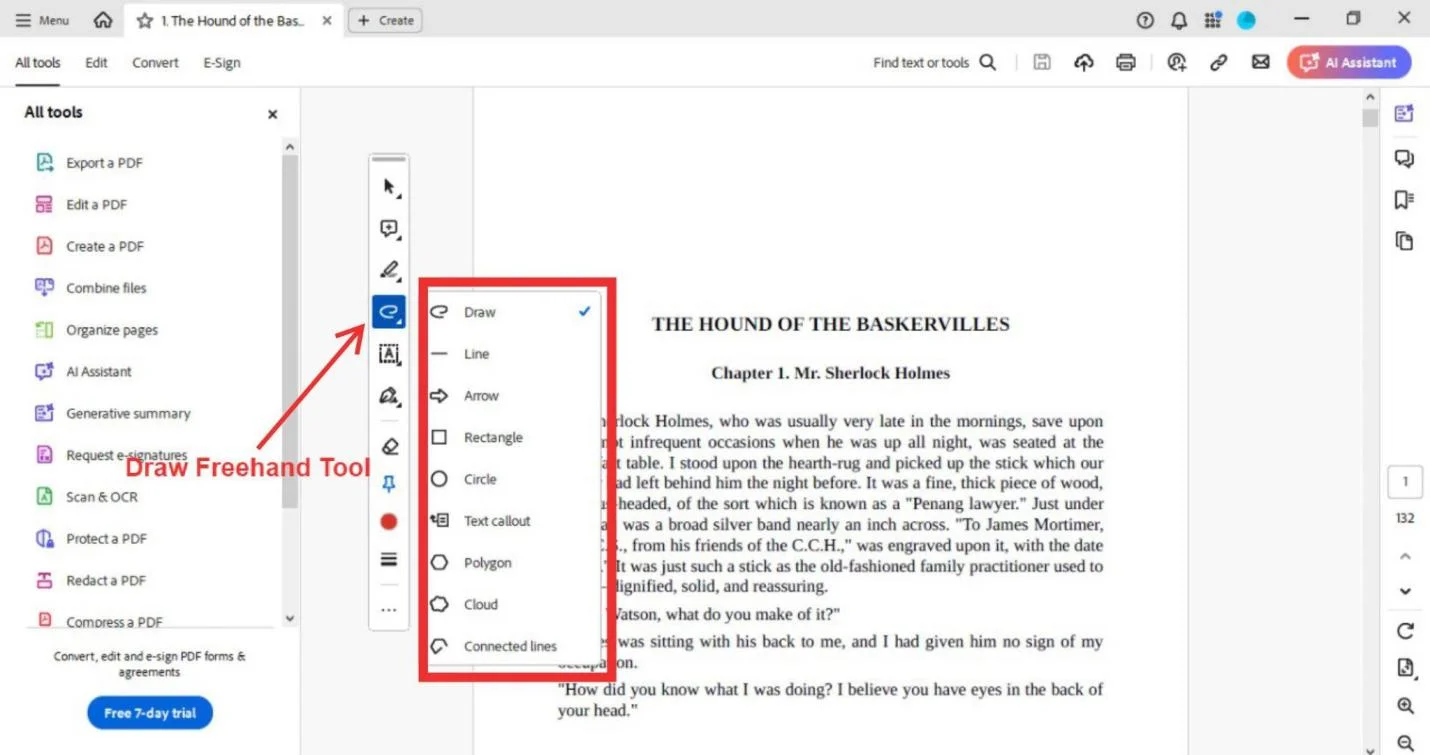
Your Shape Toolbox: Exploring the Draw Freehand Tool
Adobe Acrobat offers a versatile set of shape tools, including lines, arrows, rectangles, circles, text callouts, polygons, clouds, and connected lines. Each of these shapes can be customized to suit your document’s needs, providing flexibility and precision in your editing.
Crafting Your Shapes
Precision Placement: Tips for Placing Shapes Exactly Where You Want Them
Once you've selected your desired shape, drag your cursor over the part of the document where you want the shape to appear. Adobe Acrobat's interface makes it easy to position your shape with accuracy, ensuring that your document looks polished and professional.
Customizing Like a Pro
Supercharge Your Annotations
Right-clicking on any shape will open a menu of options. Select Open Pop-Up Note to add annotations, or click Delete to remove the shape and any associated comments. You can also reply to comments, delete threads, and set the status of your annotations as Completed, Canceled, Accepted, or Rejected. This level of control allows for detailed feedback and communication within your document.
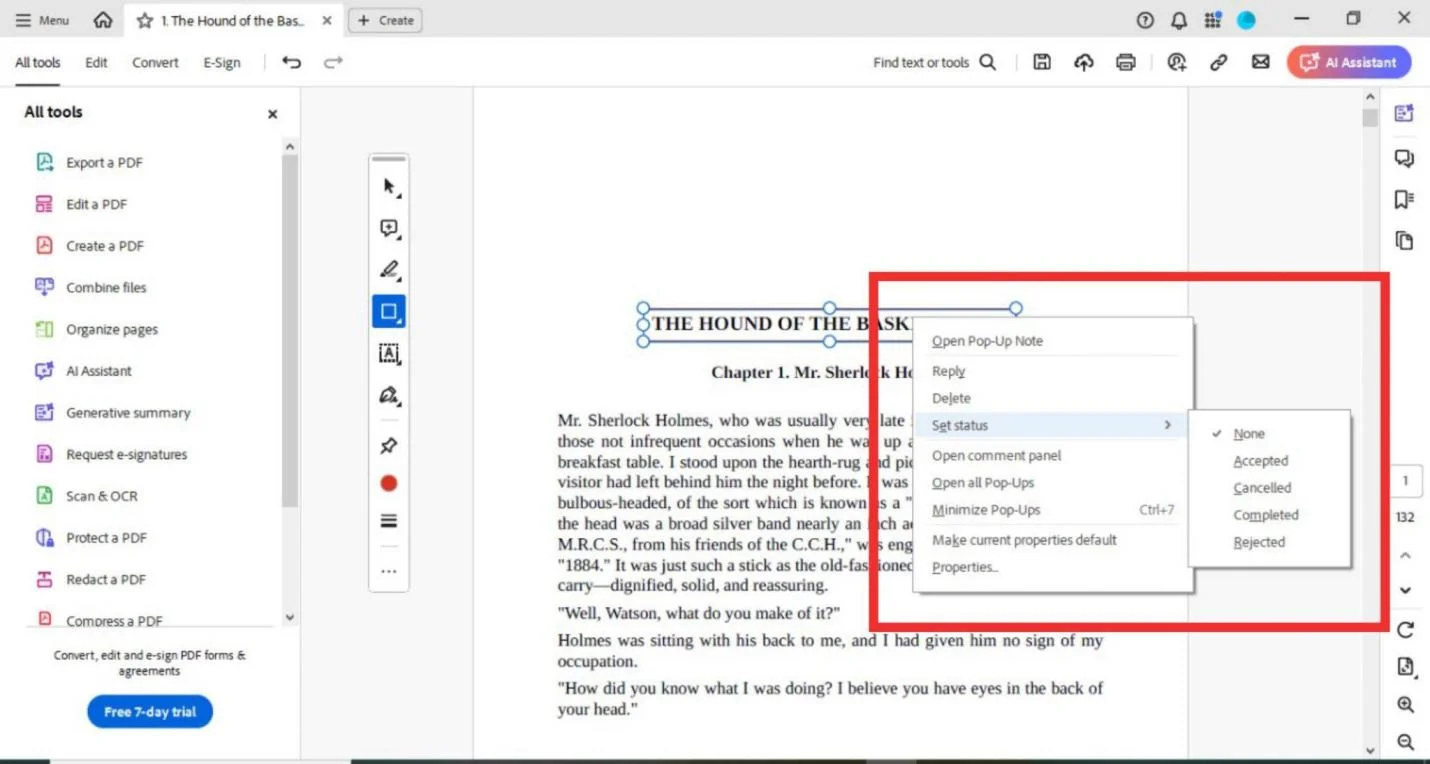
Personalize Your Shapes: Tweak Style, Color, Opacity, and More
Customization is key when working with shapes in Adobe Acrobat. By right-clicking on a shape and selecting Properties, you can adjust the shape's border style, color, opacity, and thickness. You can also fill the shape with color to make it stand out even more. For recurring projects, you can set these properties as defaults by checking the Make Properties Default box.
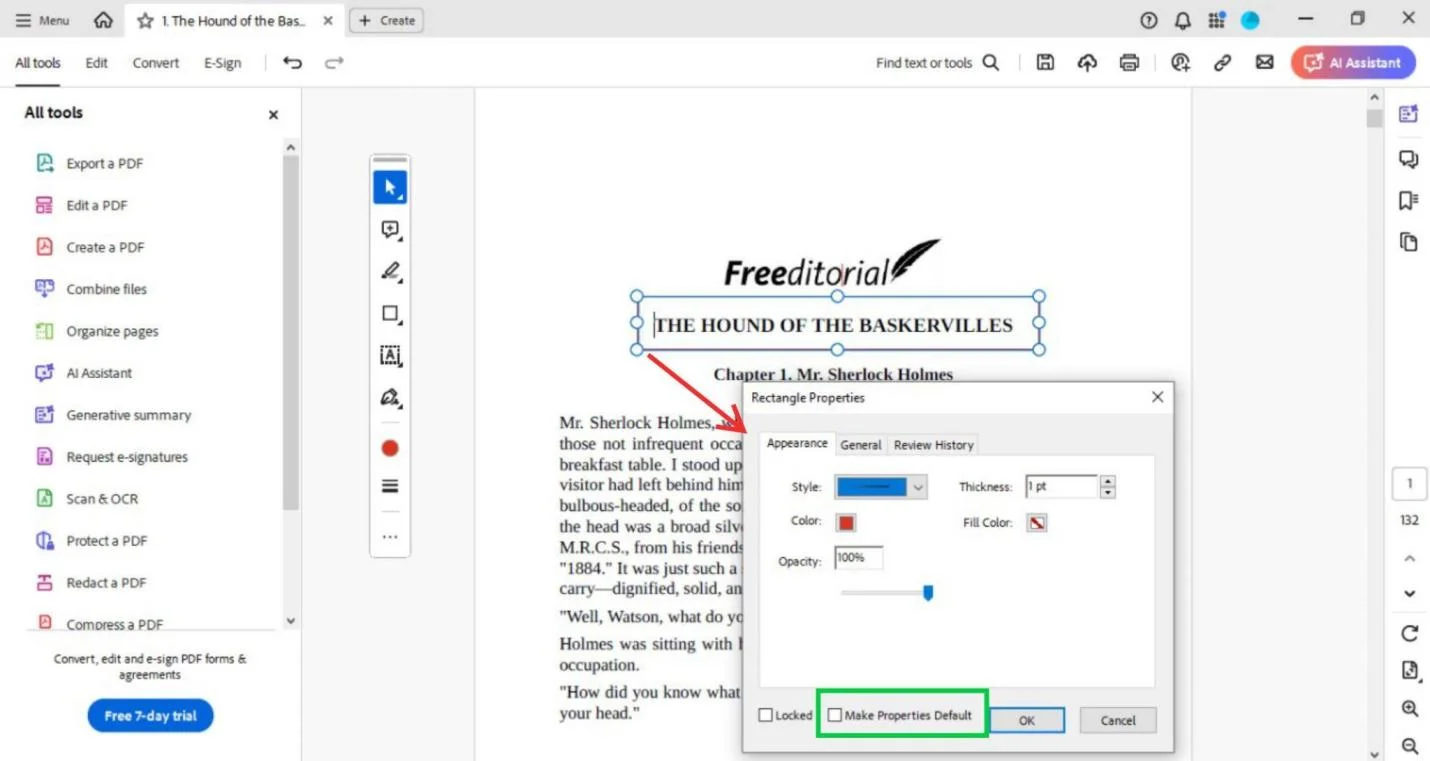
Make It Yours: Setting Default Properties for Future Projects
Want to save time on future projects? Adobe Acrobat allows you to set your customized shape properties as the default. This means that every time you add a shape, it will automatically follow your preferred settings, ensuring consistency across all your documents.
Part 3. Simple and Effective: Adding Shapes with Light PDF
Quick Access
Open Your Document in Seconds
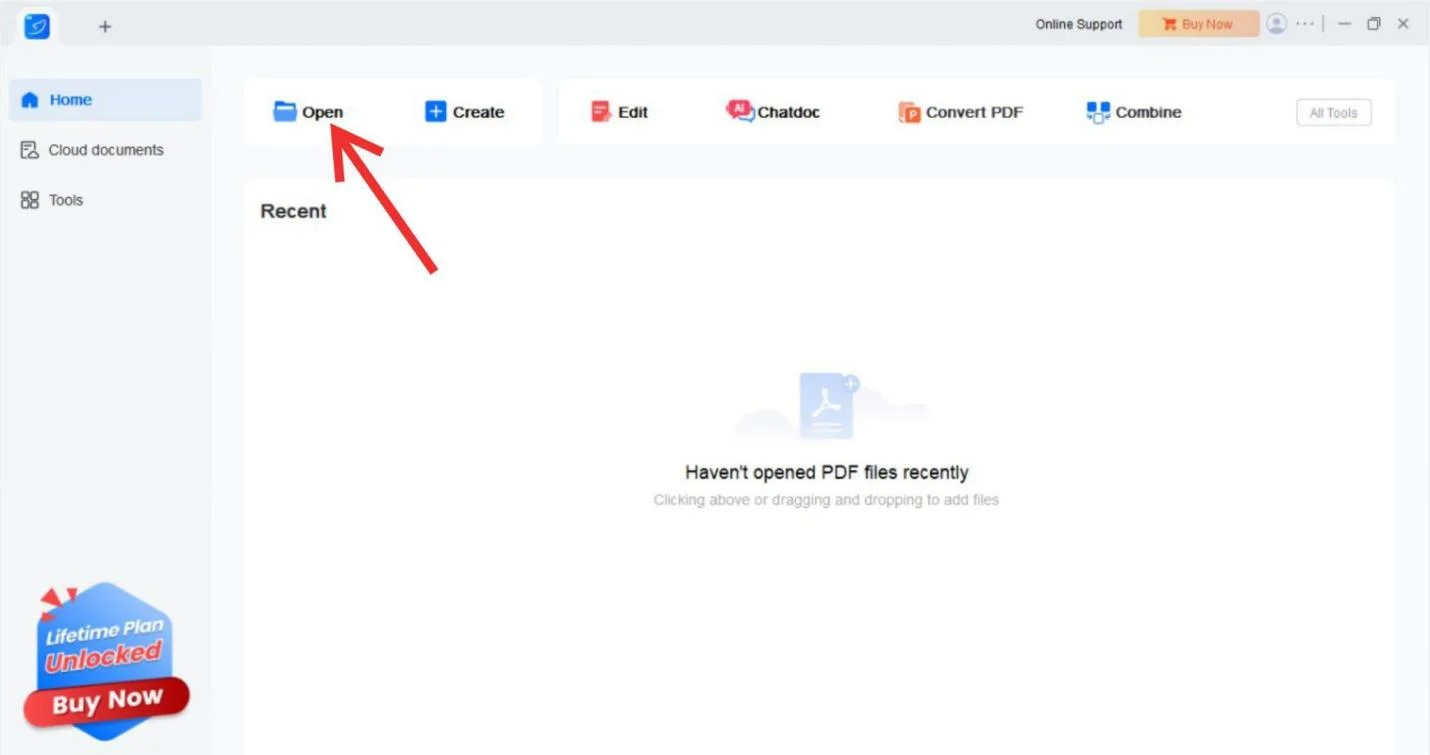
Light PDF makes it incredibly easy to get started. Open your desired document by launching the software and clicking open, and you'll be ready to start adding shapes in no time.
Find Your Shape Tools: Using the Comment Tab
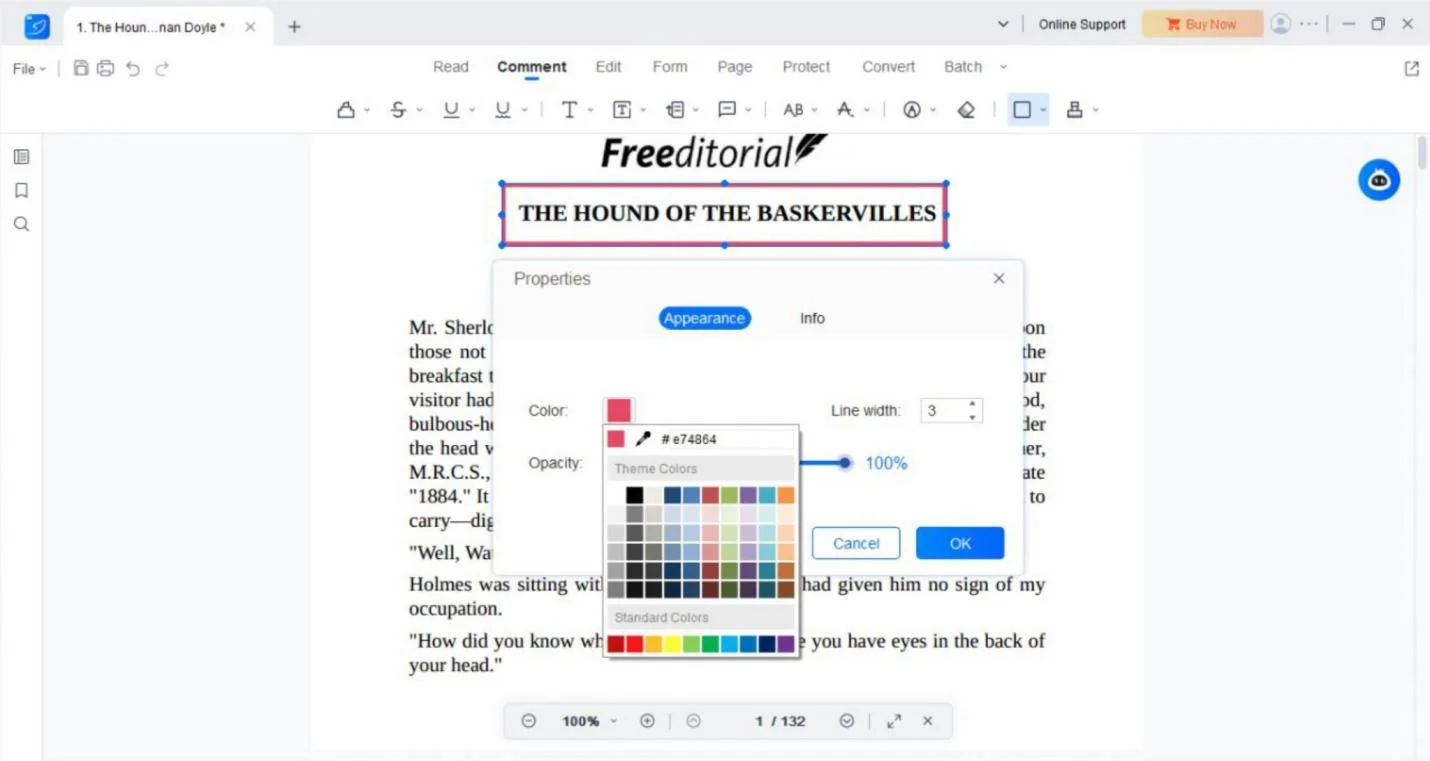
In Light PDF, the shape tools are located under the Comment tab. You'll see a small rectangle icon with a drop-down arrow in the toolbar. Click on it, and you'll have access to a variety of shapes, including arrows, lines, rectangles, and circles. These tools are perfect for quickly adding visual elements to your document.
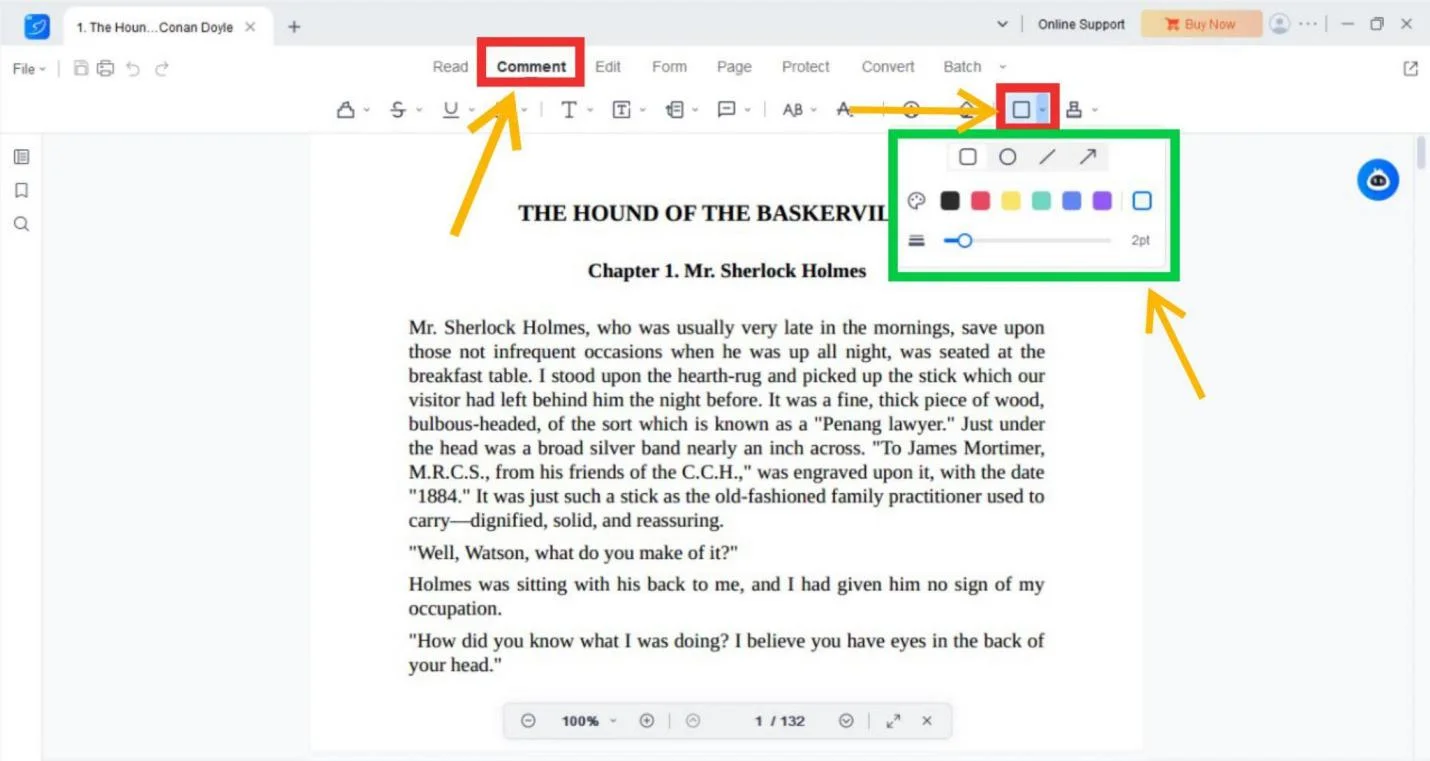
Shape It Up
Effortless Placement: Drag and Drop Shapes
Once you've selected your shape, simply drag and drop it onto your document where you need it. Light PDF’s intuitive interface makes this process smooth and hassle-free, allowing you to focus on perfecting your document.
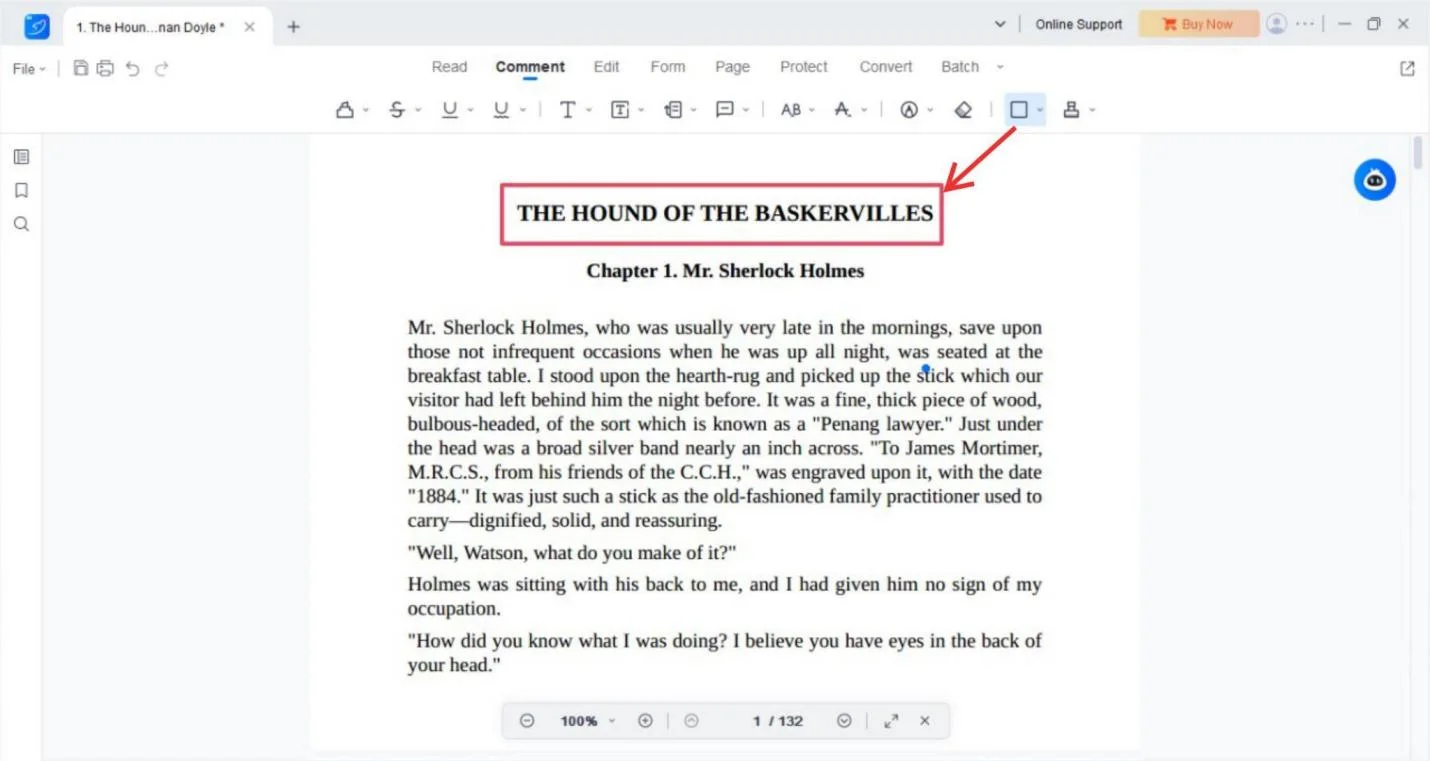
Fine-Tune Your Edits
Annotate with Ease: Adding Comments and Adjusting Visibility
Right-clicking on any shape in Light PDF will allow you to add comments through Pop-Up Annotation. You can also show or hide your annotations as needed. Adjusting the shape’s color, thickness, and opacity is straightforward, and if you need to remove a shape, you can do so by clicking Delete.
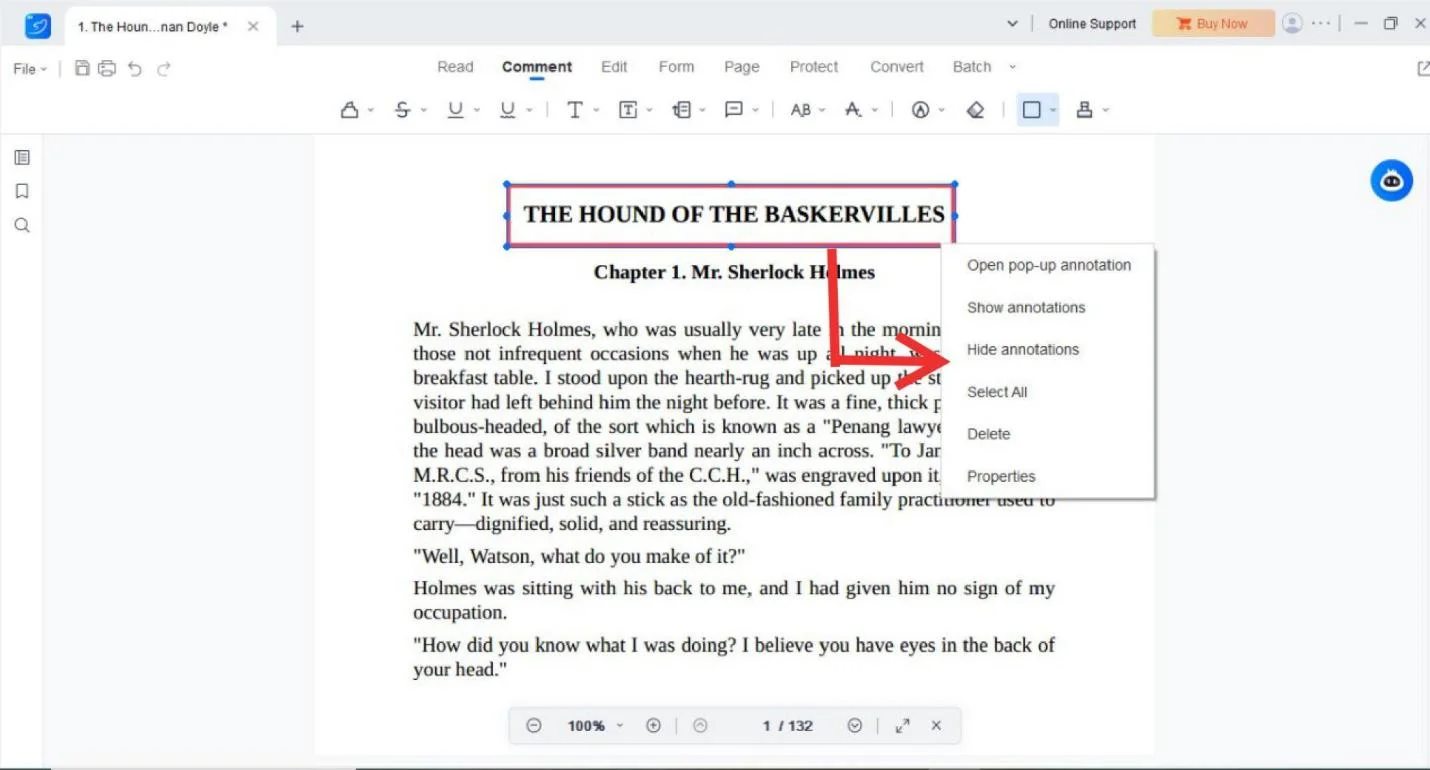
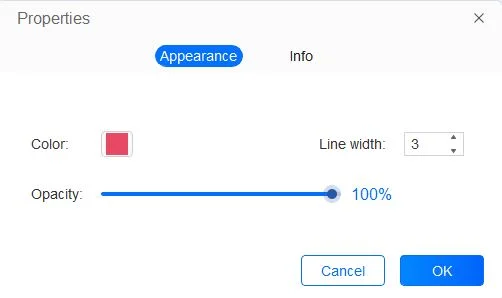
Perfecting Your Shapes: Custom Colors and Deleting Shapes
Light PDF provides a range of customization options. You can select custom colors, adjust thickness, and manage opacity levels to ensure your shapes match your document’s style. If you make a mistake or no longer need a shape, removing it is as simple as a right-click and selecting Delete.
Part 4. Fast and Friendly: Adding Shapes in Small PDF
Easy Setup
Get Started Quickly: Using the Tools Menu
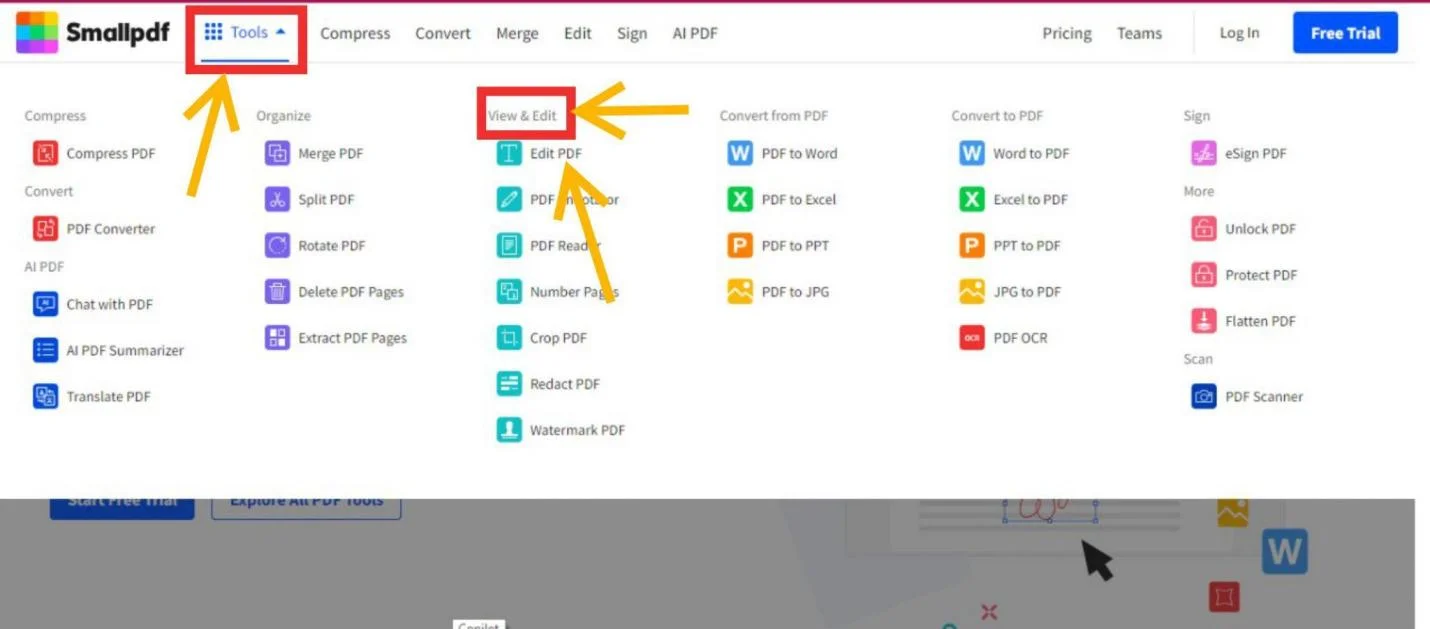
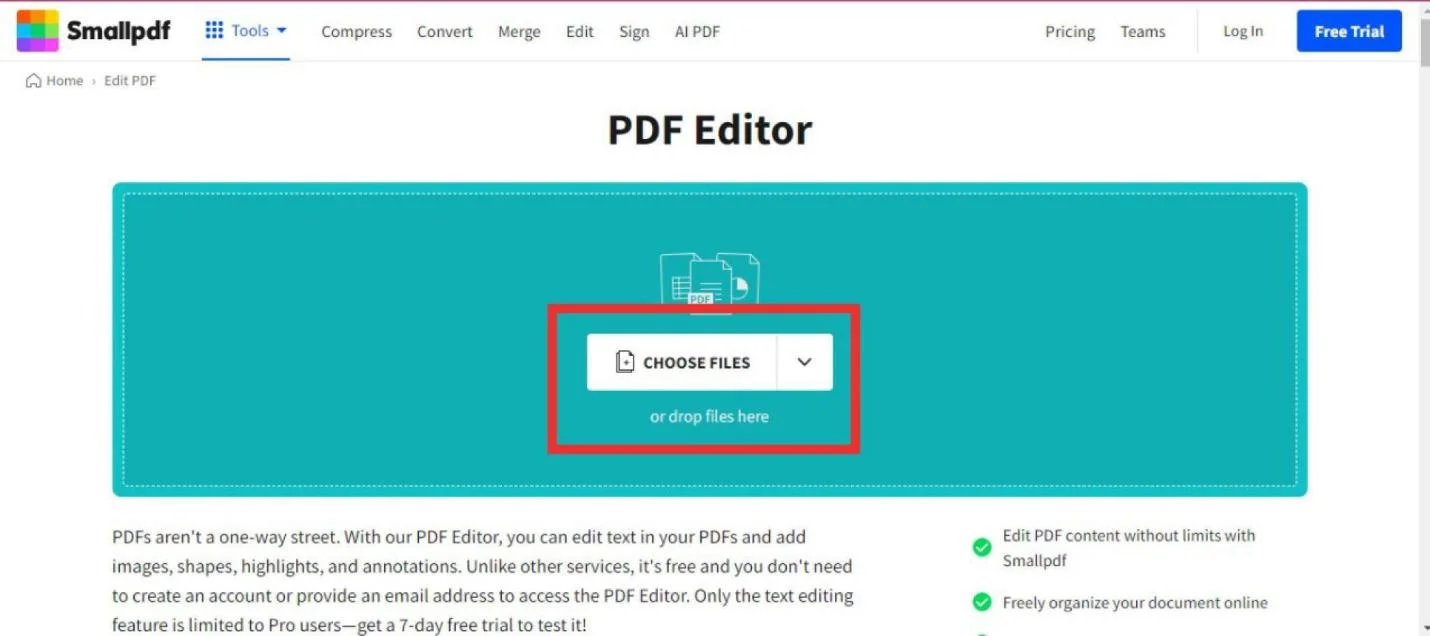
Small PDF streamlines the process of adding shapes to your PDF. Begin by clicking on the Tools tab at the top of the screen. From the drop-down menu, select Edit PDF under the View and Edit section. Once you're there, click Choose Files and select your desired document.
Shape Selection Made Simple: Arrow, Line, Rectangle, and Ellipse
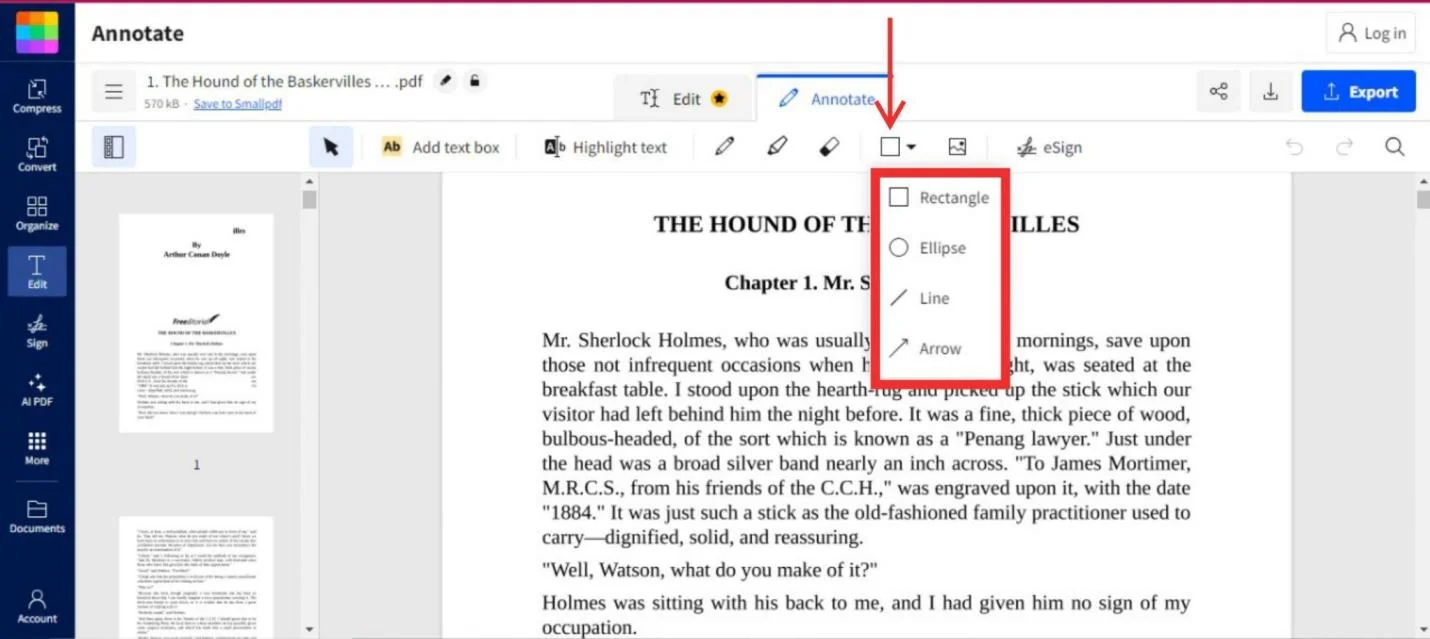
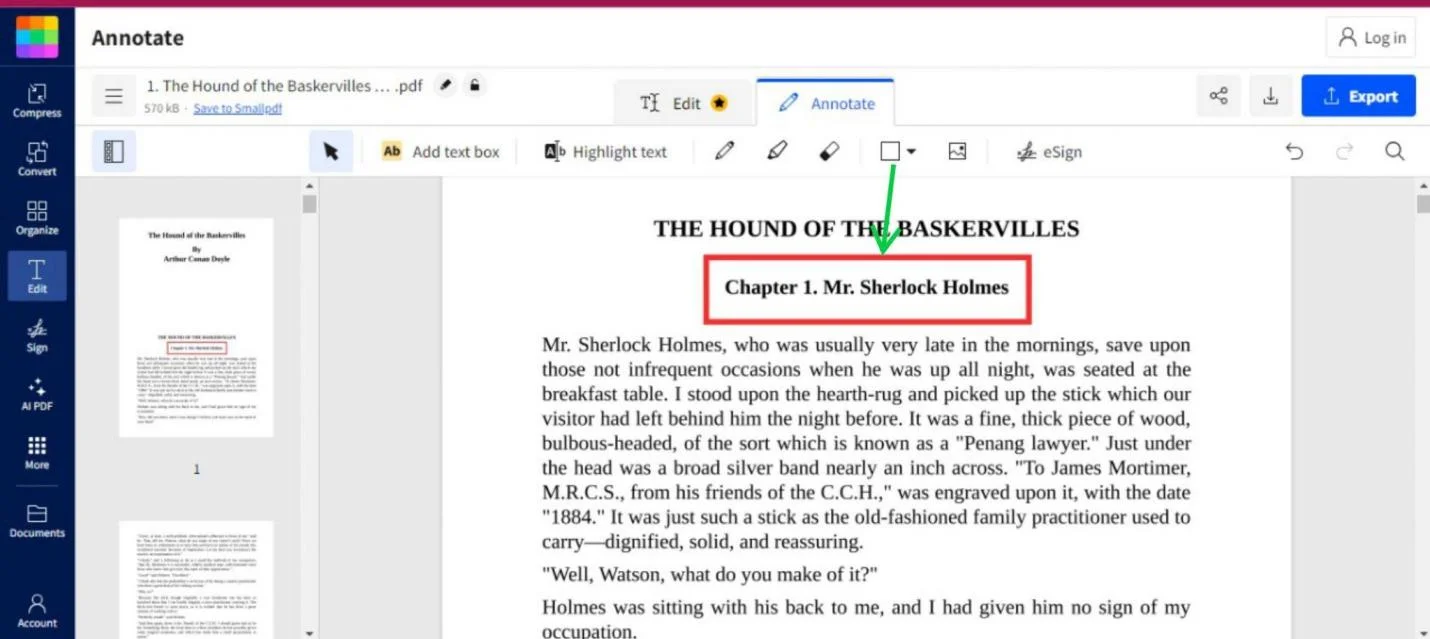
Under the Annotate tab, you'll find a small rectangle icon with a drop-down arrow. Clicking on this will reveal a collection of shapes, including arrows, lines, rectangles, and ellipses. Small PDF makes it easy to choose and apply the right shape to your document.
Shape Placement Made Easy
Drag and Drop Delight: Placing Shapes with Precision
Once you’ve chosen your shape, drag the cursor over the section of your document where you want the shape to appear. Small PDF ensures precise placement, helping you create a polished and professional document.
Advanced Customization
Design Your Way: Adjust Colors, Opacity, and Thickness
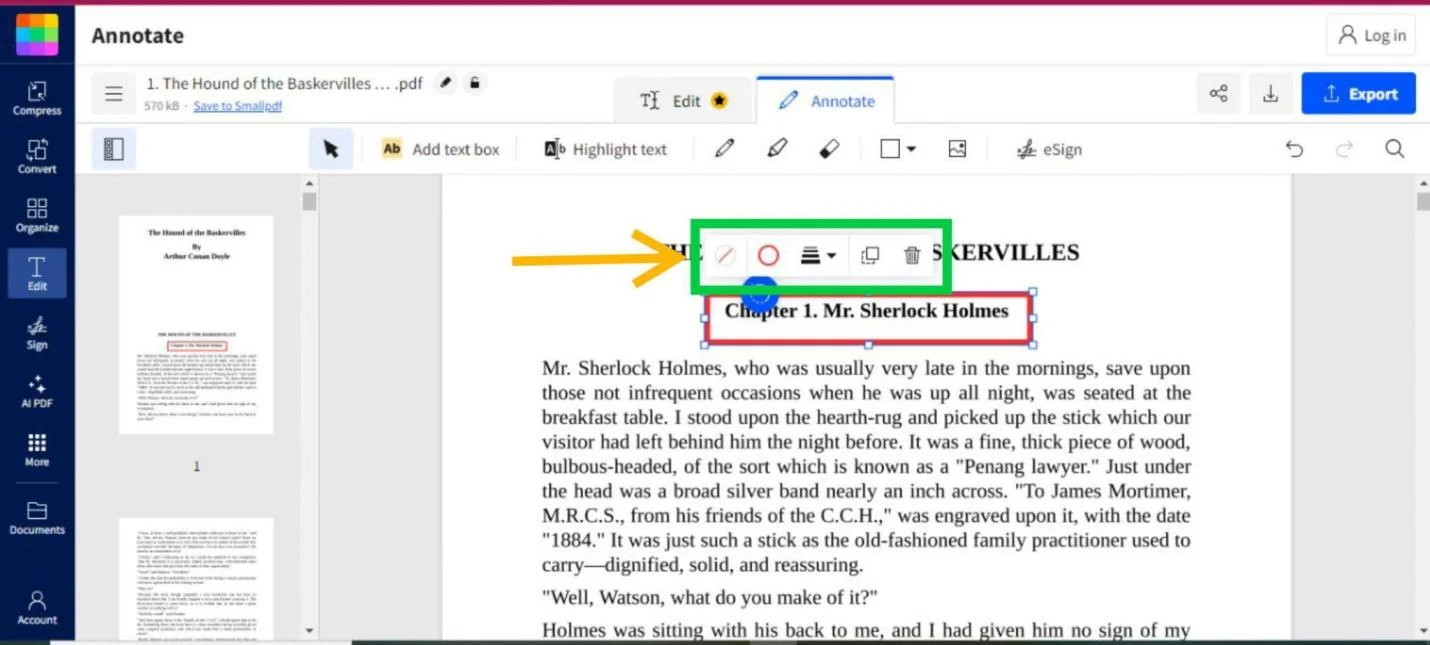
Small PDF offers a range of customization options for your shapes. As soon as a shape appears on your document, a small panel will pop up, allowing you to change the background color, outline color, opacity, and thickness. You can also duplicate the shape or delete it if necessary, ensuring you have complete control over the final look of your document.
Part 5. Best Practices for Shape Success
Shape Smart: Choosing the Right Shape for the Right Purpose
The key to effective shape use in PDFs is knowing which shape to use for each purpose. Arrows effortlessly direct attention from one point to the next, rectangles efficiently box in lengthy explanations, and circles effectively focus on individual highlights. Choose your shapes purposefully to elevate the readability and impact of your document.
Keep It Clean: Tips for Maintaining a Stylish yet Organized PDF Layout
While shapes can greatly enhance your PDF, it's important not to go overboard. An excess of shapes will clutter your document and distract from the core content. Aim for balance—employ shapes judiciously to underscore important information without overwhelming the audience. Leverage consistency in attributes like color and thickness to tie disparate elements together coherently.
Annotation Advantage: Maximizing the Influence of Your Shapes
Adding annotations opens up another avenue for enriching shapes. By attaching notes and remarks, you provide supplementary context and steering to help readers. Whether you're offering feedback on a draft or clarifying data points, annotations allow your PDF to become more engaging and informative. Leverage them judiciously.
Maintain Uniformity: Crafting a Cohesive Piece
Consistency is paramount when deploying shapes across multiple pages or documents. Maintaining standardized styles—such as identical colors, opacity levels, and thicknesses—lends your document a polished look that strengthens professionalism. This uniformity also assists readers in navigating more easily as they acclimate to the established visual cues.
Using Layers Strategically: Arranging Illustrations for Transparency
When your file contains multiple graphics, using layers as an approach is advised to organize them properly. This practice proves especially invaluable in complicated PDFs like floor designs, diagrams or complex reports. By situating graphics in layers, you can control their visibility and ensure the most essential illustrations are easily distinguishable from the background. Tools such as Adobe Acrobat enable you to govern layers productively, confirming that your file remains clear and simple to understand.
Color-Coding for Better Visual Interaction
Color-coding denotes an authoritative technique for improving the visual interaction of your file. By allocating different colors to different kinds of data, you can facilitate readers to differentiate between diverse sections or statistics. For example, you might utilize red to underline mistakes, green for approvals, and blue for informative notes. Be certain that your color selections are instinctive and consistent throughout the file.
Capitalizing on Composition Combos: Enhance Complex Visualizations
Sometimes, a lone graphic won't sufficiently convey your message helpfully. In such scenarios, merging illustrations can aid in creating more elaborate visualizations. For instance, you can employ a rectangle to highlight a segment of text and then add an arrow to direct the reader's concentration to a distinctive point within that segment. Combining graphics allows you to create more detailed and informative visualizations that improve the overall transparency of your file.
Considering Accessibility: Making Sure Everyone Can Benefit
When incorporating forms into your PDFs, it's essential to take accessibility into account. Ensure that any forms you include do not hamper the document's readability for people with visual impairments. For instance, stay away from using pale colors on white backgrounds, as they may be hard to discern. Additionally, think about including text explanations for forms, particularly if the forms are integral to comprehending the content. This practice guarantees that all users, regardless of whether they rely on screen readers, can fully engage with your document.
Part 6. Tool Showdown: Comparing Shape Editing Options
Feature Face-Off: Adobe Acrobat vs. Light PDF vs. Small PDF
While all PDF editing programs allow insertion of shapes into documents, their individual attributes make certain solutions best suited for specific needs. Adobe Acrobat, with its vast array of customization possibilities, proves exceptionally valuable for intricate projects demanding nuanced configuration. For those prioritizing simplicity above all else, Light PDF and its cleanly intuitive interface can’t be beat. However, for those seeking a balanced blend of usability and strong functionality, Small PDF’s thoughtful design marrying ease of use with robust editing options remains the standout choice.
|
Feature |
Adobe Acrobat |
Light PDF |
Small PDF |
|
Customization Options |
Extensive |
Moderate |
Moderate |
|
Ease of Use |
Moderate |
High |
High |
|
Shape Variety |
High |
Moderate |
Moderate |
|
Annotation Features |
Extensive |
Basic |
Basic |
Pros and Cons Unveiled: Strengths and Weaknesses of Each Tool
|
Tool |
Pros |
Cons |
|
Adobe Acrobat |
Highly customizable, extensive shape options |
Complex interface, challenging for beginners |
|
Light PDF |
User-friendly, quick access to tools |
Limited customization options |
|
Small PDF |
Simple and intuitive, great for quick edits |
Limited shape variety |
Part 7. Wrapping It Up
Adding basic shapes to static documents offers readers an engaging experience. Whether utilizing Adobe Acrobat's drawing functions or Light PDF's shape tools, these applications transform dreary files into interactive resources. By thoughtfully positioning and personalizing forms, you take dull PDFs and enliven them with visual markers that elucidate complex ideas and organize nested information. For the adept editor, shape placement becomes an art form that elevates ordinary documents to polished presentations.
Though these tools are amazing for shape-editing, Afirstsoft PDF has a full suite of features like; highlights, annotation, converting and more on top. Afirstsoft PDF Offers User-friendly PDF editing and professional tools. No matter if you are a student, professional or business owner – Afirstsoft PDF will let you create exclusive documents.
Try Afirstsoft PDF today and elevate your PDF experience to new heights!
Part 8. FAQs
- There are free online tools that can add shapes to PDFs. Can you use them?
Of course. Adobe Acrobat's free version (as well as other tools like Light PDF and Small PDF) provide rudimentary shape and annotation functions. Low-level tools that are suitable for simple tasks are accessible: they can be used by users who don't need more advanced features.
- How do I edit or remove shapes in PDF?
Editing or removing shapes within a PDF depends on the particular tool. In the free version of Adobe Acrobat, right-click on a shape and select Properties to edit it, or Delete to remove it. Light PDF and Small PDF are similar, allowing you to right-click on shapes for such operations as changing color, thickness, or opacity, or clicking Delete to remove them altogether.
- What are the limitations when you add shapes to PDFs?
That depends on what tool you use. Although the free version of Adobe Acrobat can add and edit shapes, some advanced features -such as extensive customization and annotation management- may be restricted to the paid version. Low-level tools, such as Light PDF and Small PDF, also offer primitive shape options but may not have advanced features found in high-end versions.
- Can I add custom shapes to a PDF?
All PDF editors, including the free version of Adobe Acrobat, provide standard shapes - such as rectangles, arrows, circles, and lines. Adobe Acrobat has freehand drawing tools that can offer more customization, while for heavier needs or true custom shapes, external design software may be required. Low-level tools such as Light PDF and Small PDF concentrate on predefined shapes with basic customization.
- How can I make my shapes and annotations visible to others?
Whatever changes made to a PDF, be sure to save. In Adobe Acrobat, make sure that the Comment panel shows annotations and save any changes made. Light PDF and Small PDF may also allow for shape visibility, but always be sure to save the document and confirm that annotations are not hidden.


