Whenever you’re preparing study notes, reviewing some professional documents, or working on a project with your team, highlighting the text on the PDFs can help you draw attention to the content that matters the most
That’s where annotation tools like Nitro PDF make things simple and help you quickly highlight key points throughout the document.
To guide you through the process, we’ll explore the steps on how to highlight In Nitro PDF so you can markup your PDF documents like you’ve been doing this for a long time.
Part 1. How To Highlight in Nitro PDF
Nitro PDF, with its simple and easy-to-navigate UI, allows you to quickly highlight texts to mark important data, make revisions, or organize your PDF files effortlessly.
Let’s go through the step-by-step process on how to highlight text in Nitro PDF:
- Go to the official Nitro PDF website, click Try For Free, provide the required details, and select Start Your Free Trial to download the file. Then, open the Downloads folder on your PC and click the installation file to install the software.
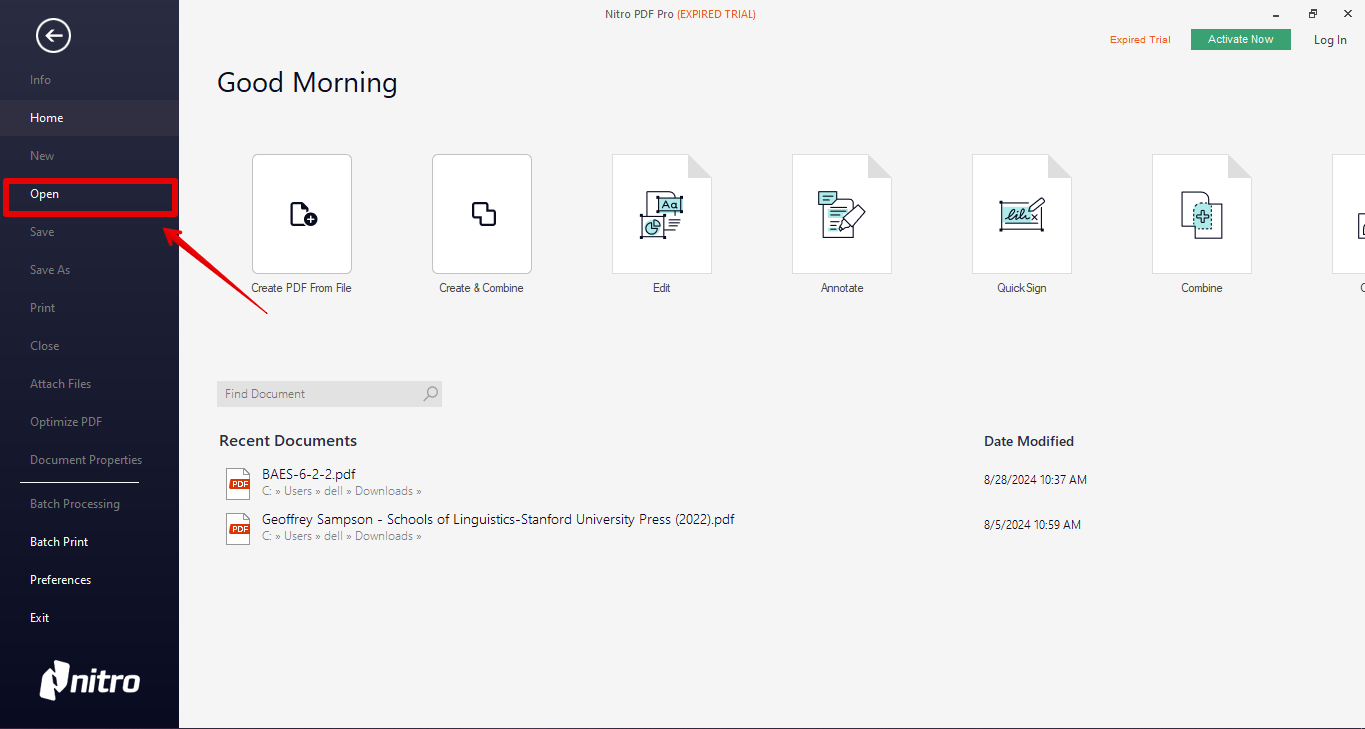
- Next, right-click the PDF file and choose Edit With Nitro PDF Pro. Alternatively, open the software on your PC and click Open in the left toolbar to launch the Open window. Here, go to the folder where you’ve saved the PDF, select it, and click Open.
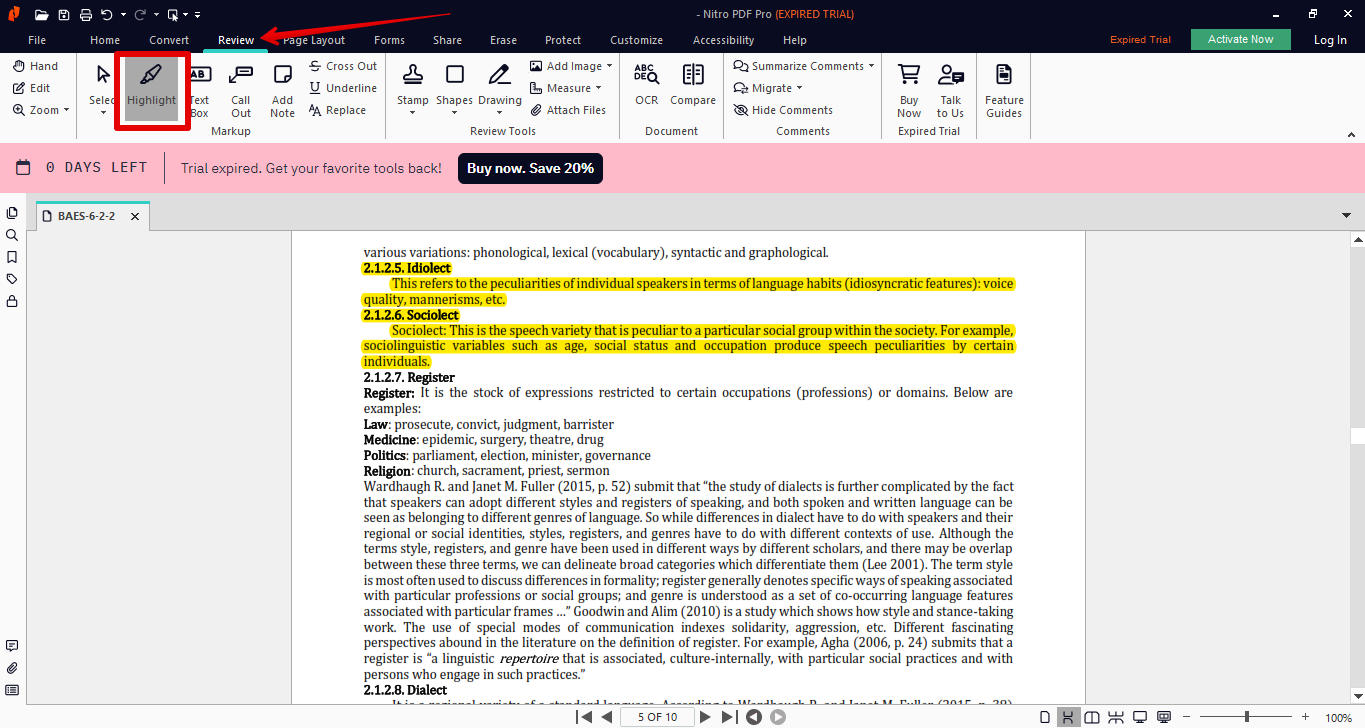
- Go to the Review tab from the top toolbar and click Highlight or press Ctrl+Shift+2 to activate the highlighter. Now, select the text on the file to highlight.
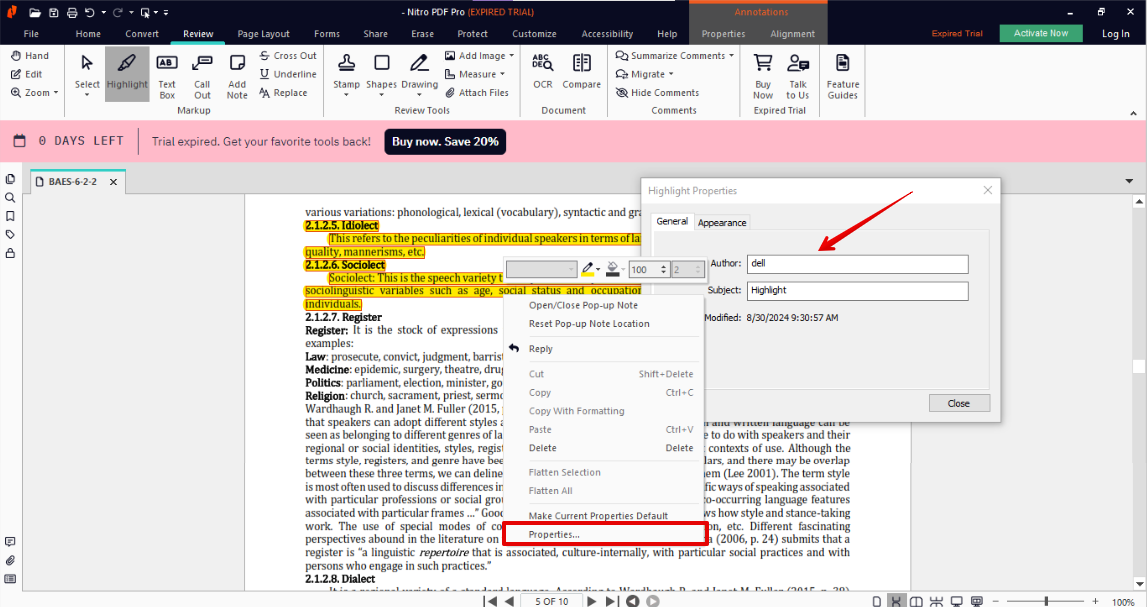
- You can also right-click the text, choose Properties, and change the author or checkmark Locked to lock the highlight in the General tab. Next, go to the Appearance tab in the Properties window and drag the slider to adjust the transparency of the highlight.
Part 2. How to Change Highlight Color in Nitro PDF
You can change the highlight color in any PDF file in two different ways while using Nitro PDF for annotations.
Method 1: Change the Color of One Highlight
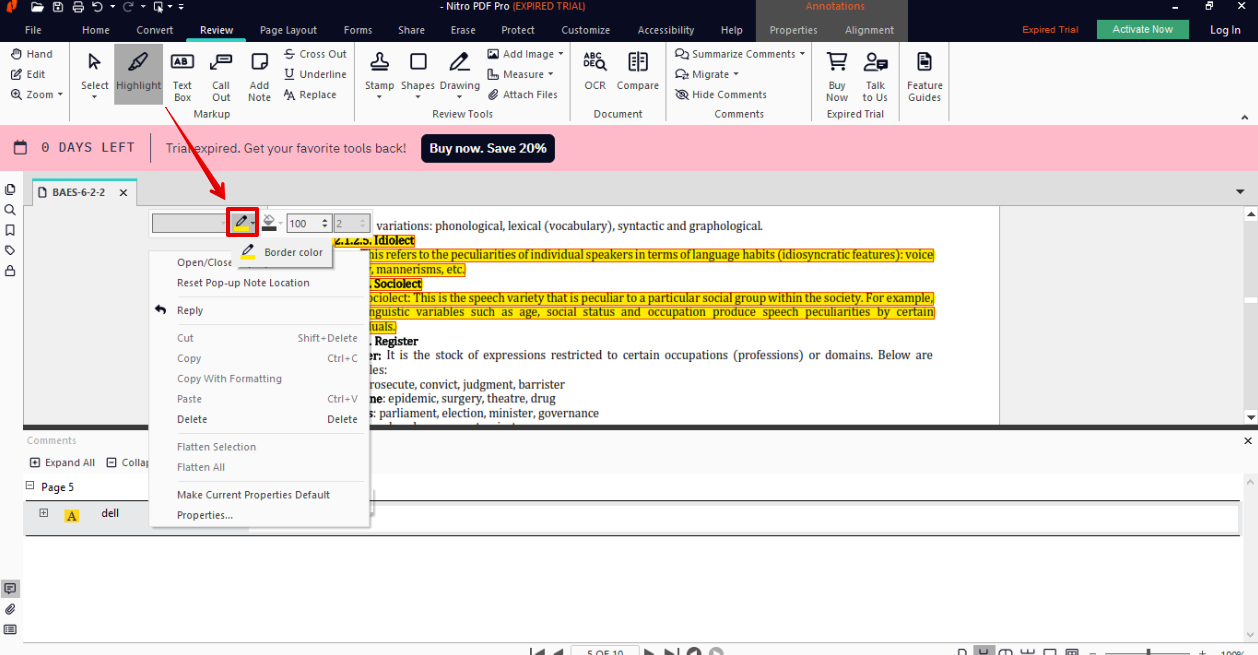
- Open your PDF file in the Nitro PDF app and click the highlighted text to access the Annotation option in the menu ribbon.
- Click Properties under Annotations, and choose Border Color. Otherwise, right-click the highlighted text and choose Border Color at the top of the menu to select the shade you prefer.
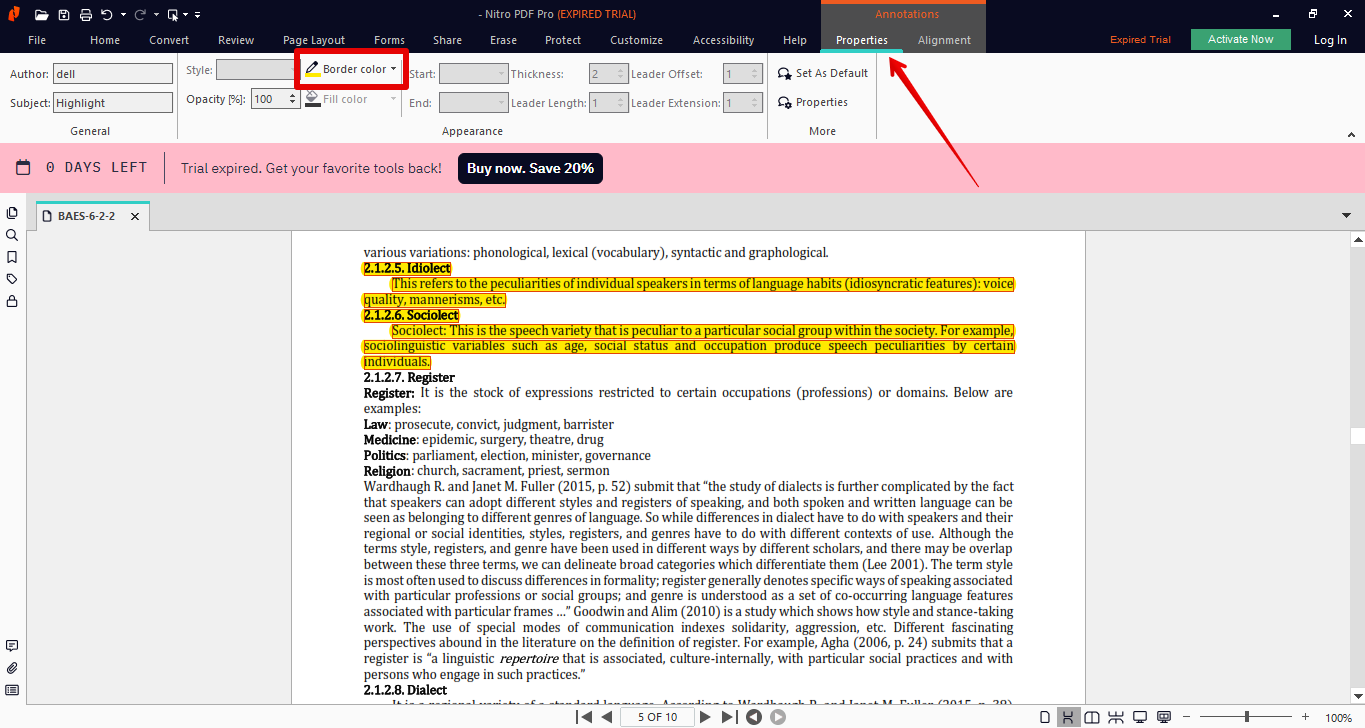
- You can also click More Colors and select the Eyedropper to choose the hue from anywhere on your PC interface.
Method 2: Change the Color of All Highlights
- After importing your PDF to Nitro PDF, click the Chat Bubble icon at the bottom corner of the left sidebar to open the Comments panel.
- Press the Shift key (on the keyboard), hold it, and click all the highlight markups one by one to select them.
- After that, right-click on the selected markups, select the Border Color option, and choose a color you want to apply.
Part 3. How to Remove Highlight in Nitro PDF
Sometimes, you need to remove highlights from your PDF file to declutter it and prepare it for final submission or printing. Luckily, Nitro PDF offers an easy way to quickly get rid of single or multiple highlights.
Here are the step-by-step instructions for this process in Nitro PDF:
- Open Nitro PDF and click Open in the left toolbar to import your PDF file.
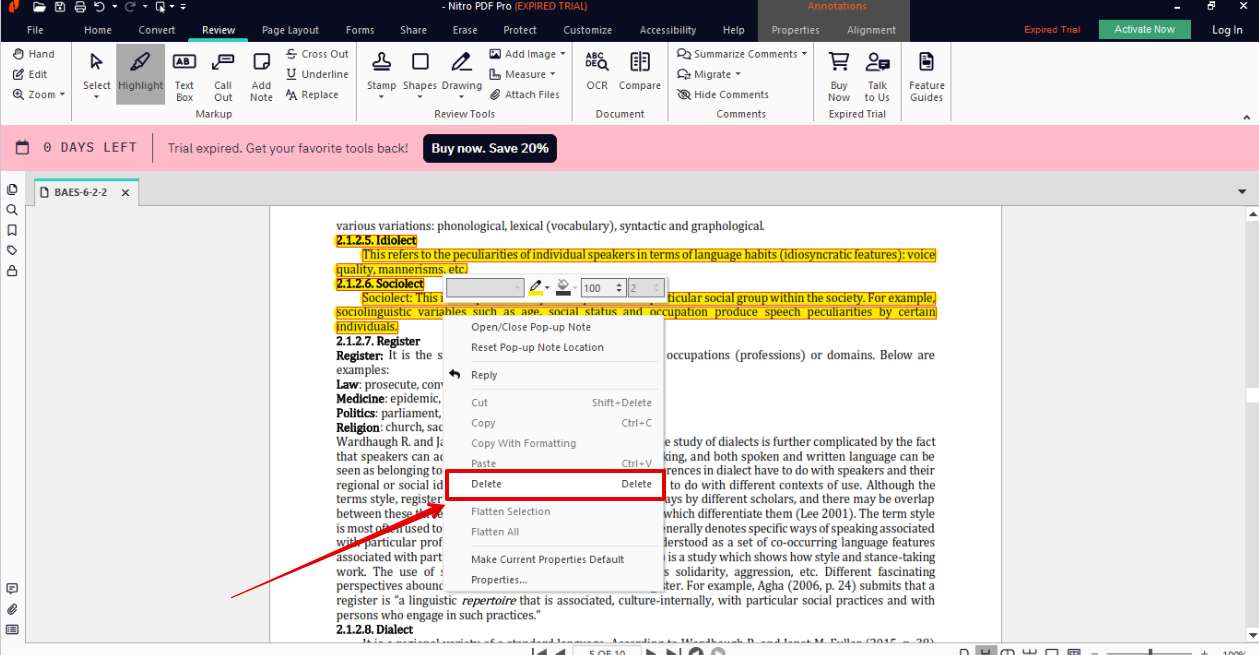
- Go to the page where the highlight markup is added to your file, right-click it to open the context menu, and select Delete from the menu. This will immediately remove the highlight section of the text from the content.
- To remove all highlight markups in one go, click Chat Bubble (bottom left of the screen)to open the Comments panel. Here, you'll see a list of all the annotations, including highlights.
- To sort them by type, click "Sort" at the top of the Comments pane and select "Type."
- Then, press & hold Shift on the keyboard and select all the Highlights one by one in the panel. Right-click the selected markups and choose Delete from the menu to remove all the highlights.
Yup, It’s that easy!
Part 4. Adding Comments to the Highlighted Text in Nitro PDF
Highlighting the text parts in a PDF is an excellent form of annotation, but you can achieve more by adding comments to add context to your highlights and make your document more informative. This is especially useful for reviewing, editing, or collaborating on a project.
Doing this is so easy in Nitro PDF. Here are the steps:
- Open Nitro PDF on your computer and click Open in the left toolbar to load the PDF file you wish to work on.
- If you haven’t highlighted the text yet, go to the Review tab, click Highlight, and select the text on the file.
- After that, right-click the highlighted section to open the context menu, choose Open/Close Pop-up Note, and a sticky note box will appear on the side of the document. Simply type your note or comment in the box.
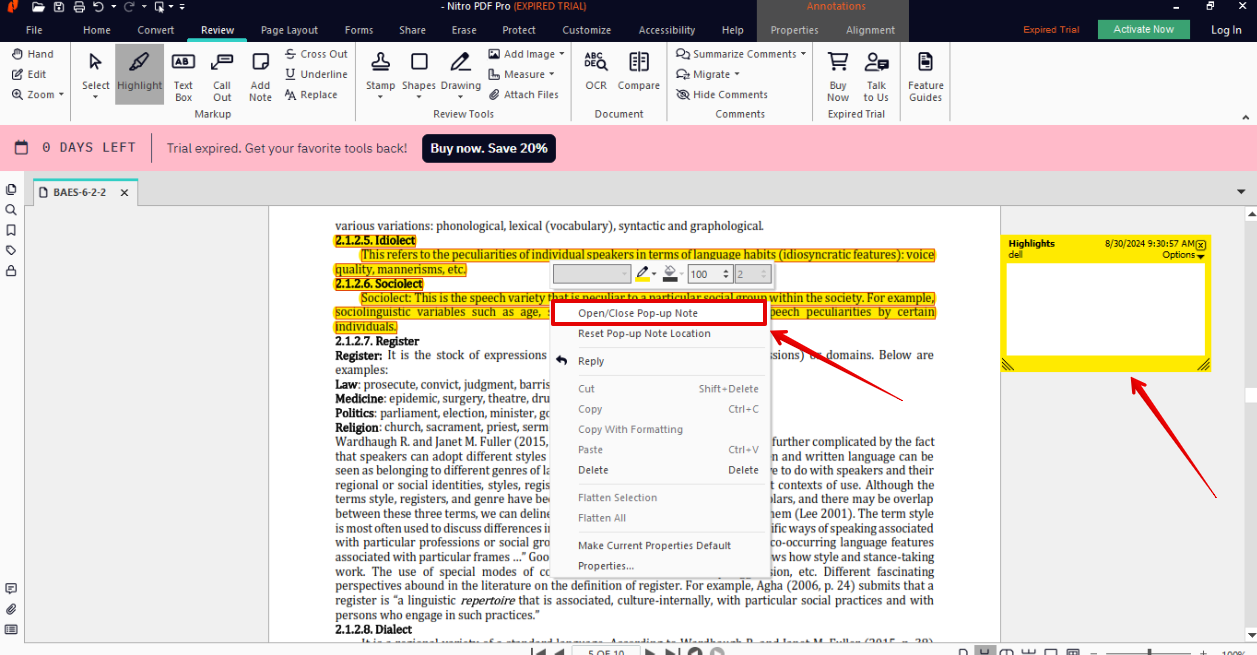
- The comment will now be linked to the highlighted text and will be visible on the right side of the file.
If you want to link a single comment to multiple highlights, do these steps:
- Click the Chat Bubble icon to open the Comments pane at the bottom of the screen and sort the markups based on Type.
- Then, press & hold Shift on your keyboard, select multiple highlights, and right-click them.
- Choose Close/Open Pop-Up Note and add your comment to it.
Part 5. Highlighting Text on Scanned PDFs in Nitro PDF
Quite often, you can scan documents as PDFs and then input text without any problem. However, you sometimes face an issue when you can’t highlight any part of the text on these files in Nitro PDF.
In this case, the problem can be that the Nitro PDF does not consider text as actual text but as an image that resembles text. Here’s the workaround for this annoyance:
- Go to Review > Shapes and then pick a shape you want to use in the highlight.
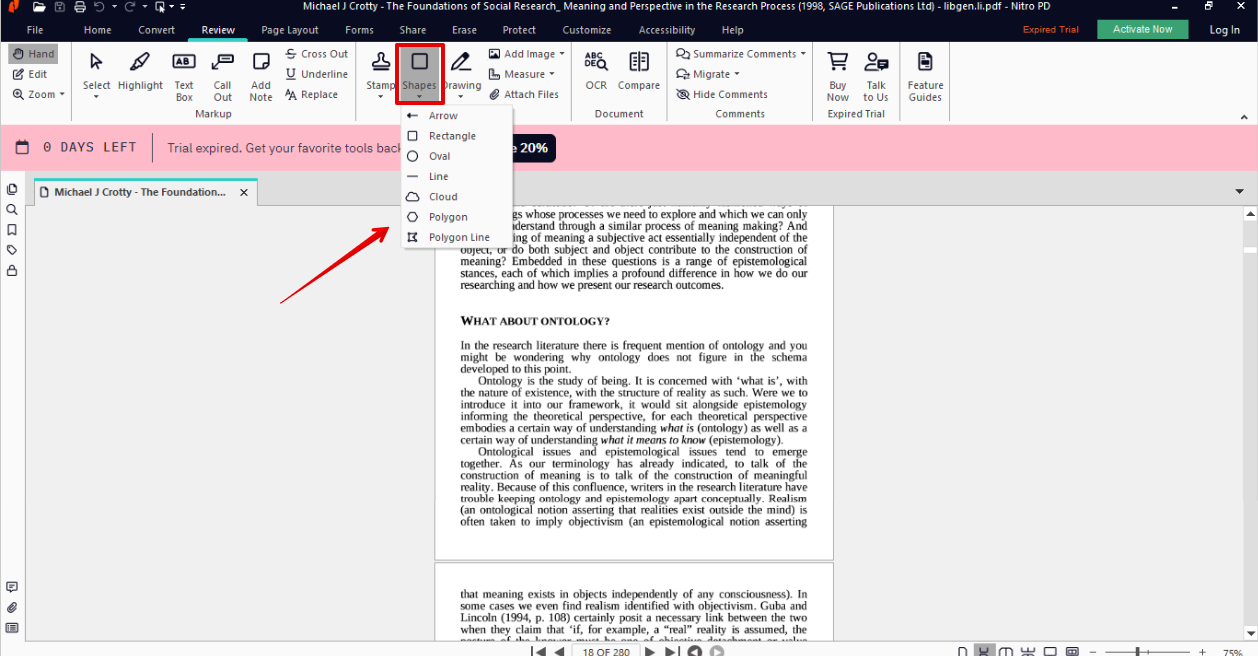
- Then, create a selection with the Shape tool.
- Next, open the properties of the Shape.
- Select the Line and Fill Color under Appearance, and change the opacity to 50%.
- Finally, try to highlight and see if this helps.
If this fails to work, try to run the OCR again on the file and update the Nitro PDF version; hopefully, this will resolve the highlight glitch.
Part 6. How to Highlight in Nitro Pro PDF iOS App
Nitro PDF supports iOS devices, which is great, by the way, because you can annotate PDF documents on the go this way on your iPhone or iPad.
Let’s explore the step-by-step instructions for highlighting text in the PDF documents using the Nitro PDF iOS app:
- Open the App Store and search for the Nitro PDF app.
- Tap GET to install it on your iPhone or iPad.
- Now launch the Nitro PDF app and open the PDF on it.
- Tap the Annotate tool on the top-right corner, and the highlight option will open with the default Yellow color.
- Tap next to the highlight pencil icon and change the color of the highlighter by choosing any shade.
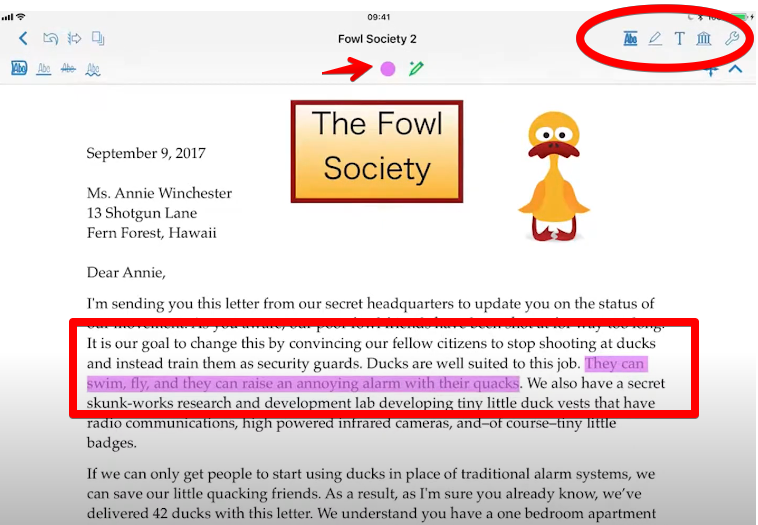
- Go to the area you want to annotate and drag the text on the screen to highlight the text.
- If you highlighted too much, tap the Undo button and start from scratch.
Part 7. Afirstsoft PDF - The Best Alternative to Nitro PDF Highlight Tool
Nitro PDF is an excellent app for highlighting text in PDF documents; however, if you are looking for a cheaper and more effective alternative, Afirstsoft PDF helps you highlight any section of the PDF with multiple colors and sticky notes with less effort.
Here are the easy step-by-step instructions to highlight any part of your PDF document quickly to make the review process as smooth as it gets.
Step 1. Install Afirstsoft PDF on Your Windows or Mac PC
The first step is to head to the Afirstsoft PDF web page on your computer. Select the Products menu in the top menu bar, choose either the Windows or Mac version, depending on your PC, and click Free Download.
Now wait for the software to download, then open the Downloads folder and click on the installer to start installing the program. You’ll have to select Yes in the pop-up window to give Afirstsoft PDF the necessary permissions it needs, accept their TOS, and click Install.
Step 2. Open PDF in Afirstsoft PDF
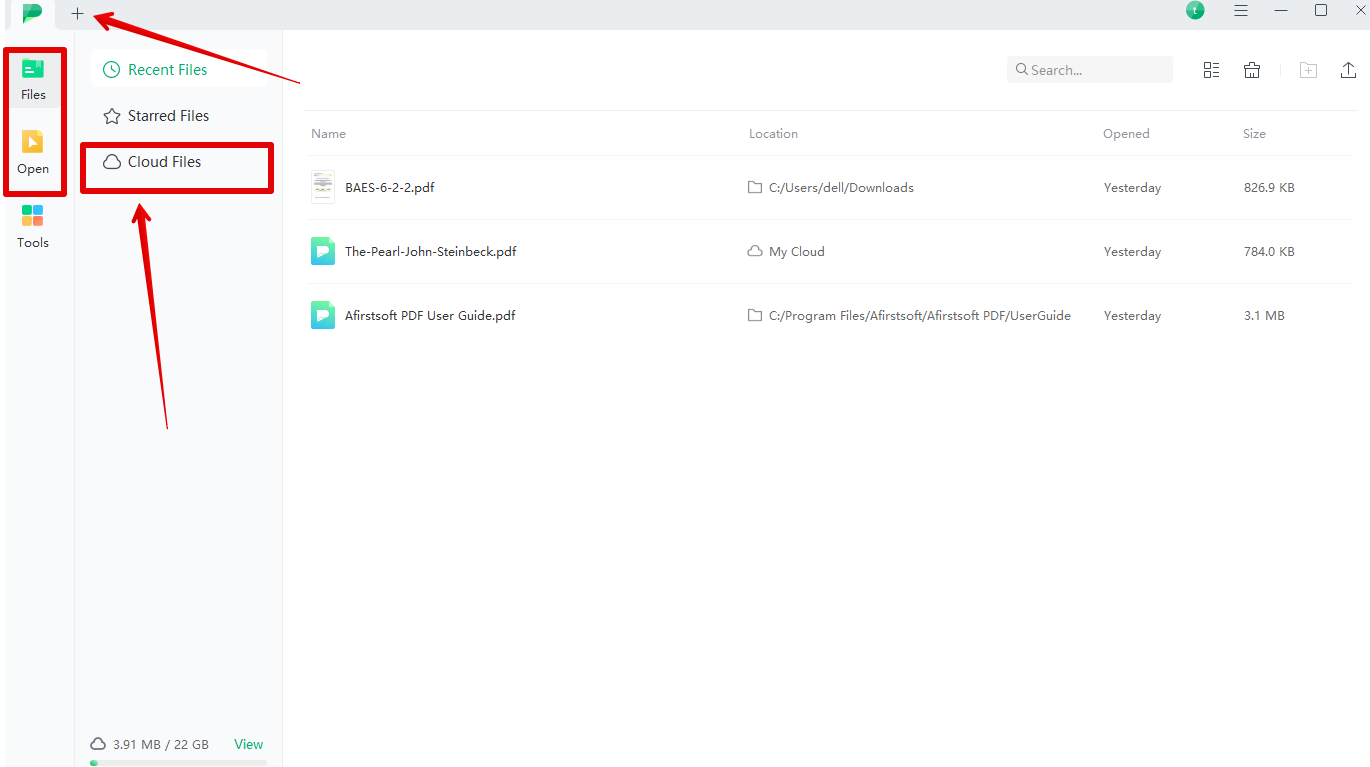
The next step is to launch the Afirstsoft PDF software on your PC and click Open or + in the top left menu to import your PDF file from where you saved it into the dashboard. There’s another way!
Simply right-click the PDF file, select Open with Afirstsoft PDF, and it will automatically open in the editor.
In case the PDF file is saved in Afirstsoft PDF Cloud, click Files (left sidebar), click Cloud Files, and select the PDF to open it.
Step 3. Highlight Text in the PDF Document
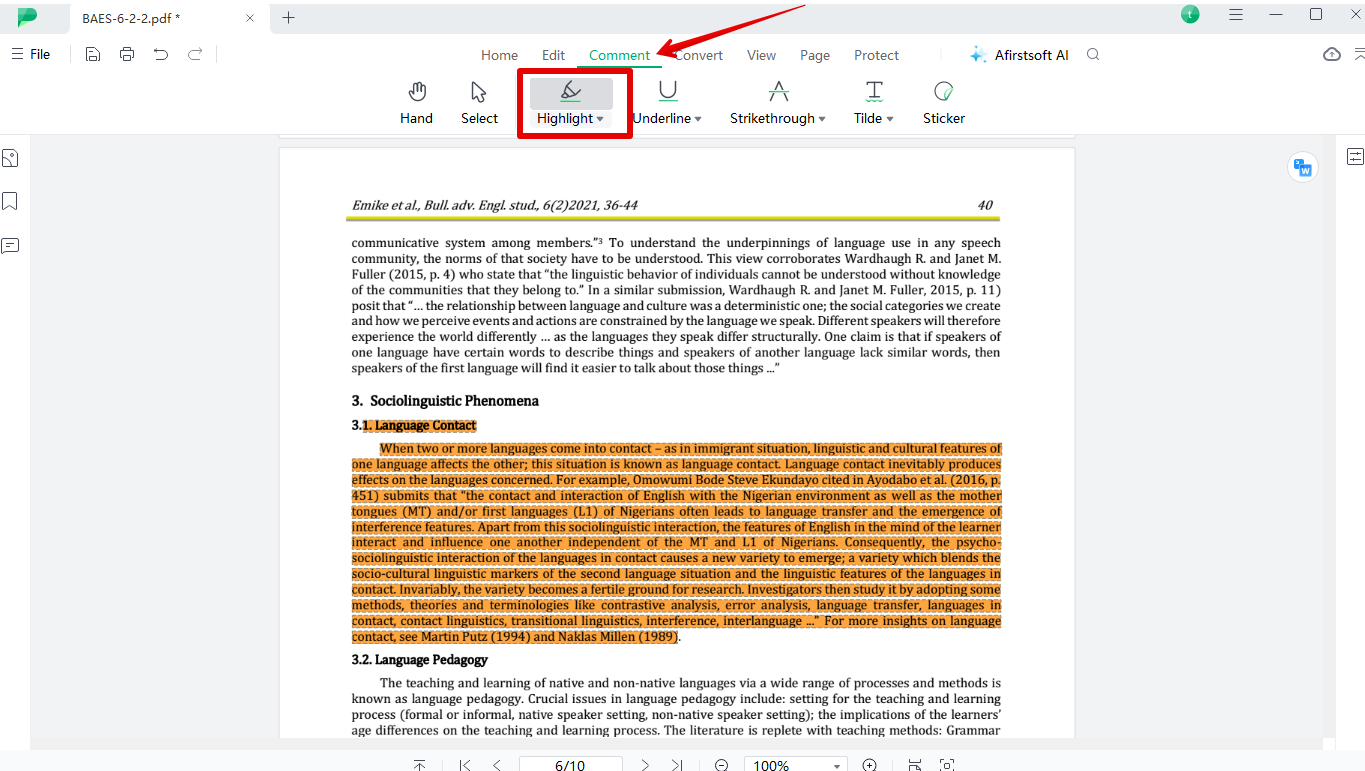
Now comes the fun bit. If you see at the top of the toolbar, there would be a Comment option; click on it. Click Highlight, scroll to the section of the PDF, and select it with the cursor to highlight it.
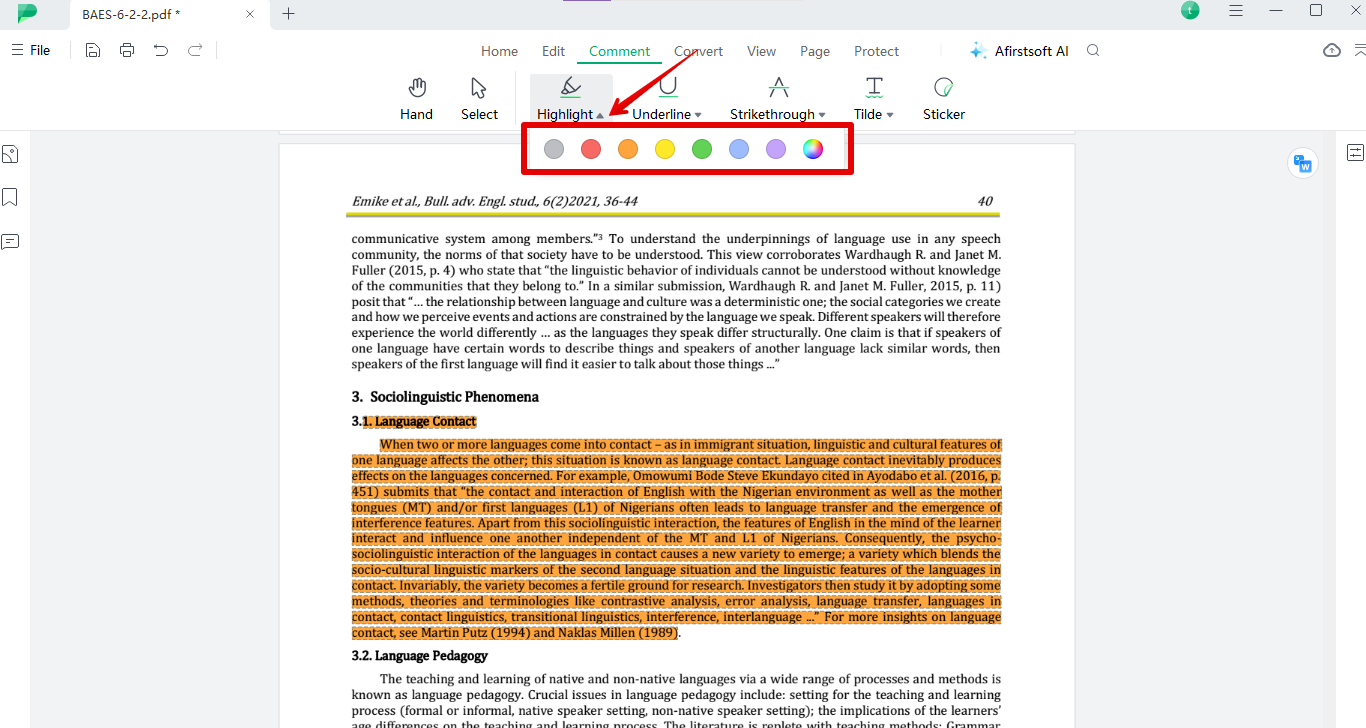
If you want to do multiple highlighted annotations, you can do this with different colors. To do this, click the small arrow next to the Highlight option, choose a color or create a new shade from the custom palette, and again select the part of the text to highlight it. Do this to other text sections and that’s about it!
There’s one more thing you can do!
You can add comments to the highlights to explain what needs to be done in the particular section. Doing this is super simple. Click the highlighted section to select it, then right-click and select Open Pop-up Note, type in your suggestions or feedback in the form of comments, and press Enter to attach it as a sticky note.
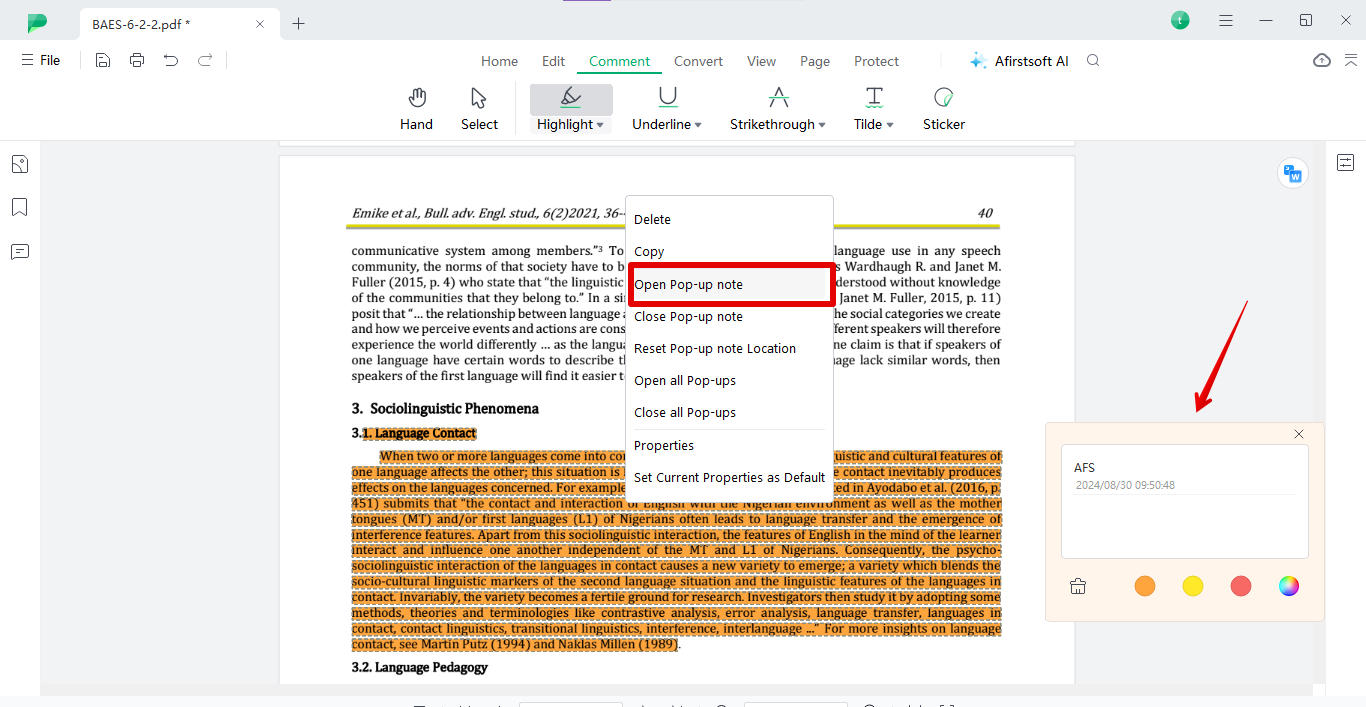
You can do this for each highlighted annotation to interact with the PDF for a better reviewing process.
Part 8. Conclusion
In conclusion, knowing how to highlight in Nitro PDF, regardless of what device you are using
But sometimes, it can be overwhelming for beginners to go through some of the Nitro PDF options, especially when changing the color of the highlighter or highlighting scanned documents. If this is the case with you, Afirstsoft PDF offers a simple UI with a Highlight tool clearly showing on the top toolbar to help you annotate PDF documents in a matter of minutes.

John Smith
Editor-in-Chief
With 10 years of experience in the office industry, John Smith is a tech enthusiast and seasoned copywriter. He likes sharing insightful product reviews, comparisons, and etc.
View all Articles >