Programmers often find themselves needing different devices or programs to handle various projects and information. Then they wonder how they can run Mac programs on Windows without violating Apple's licensing agreement. In this case, users can learn about various methods to help them run Mac apps on Windows.
One of the most recommended methods is the use of a cross-platform compatibility tool that synchronizes both programs at the same time, providing you maximum streamline workflow. In this article, we’ll also go through various reasons to run Mac programs on Windows along with other effective methods.
- 100% secure
- 100% secure
- 100% secure
Part 1. Why Would You Want to Run Mac Programs on a Windows PC?
Software engineers are always seeking to find the best software with advanced features for their tasks that they can run on multiple platforms. Both Mac and Windows are desirable operating systems, each with its own unique traits and characteristics. However, some people would prefer to run Mac applications on Windows as it provides multiple benefits to the user. The following are some of the key reasons why someone would run Mac software on Windows:
File Compatibility: There are various projects that are handled and managed only by the Mac-specific program. These projects can range from encoding and illustration to documentation and designing. However, if you want to continue working on such projects, you can use Mac software on Windows and run these projects there.Hardware Utilization: Although macOS operates better than Windows, Windows is still the world's leading operational system because you can customize the hardware components according to your requirements. Moreover, you can get better customization tools with Windows than with macOS. For this reason, people prefer to use Mac apps directly on Windows to take advantage of the advanced hardware components.Access Mac-Exclusive Software: Professional editing, illustration, and video editing software are only available on Mac. Therefore, if you are an editor and designer, you can run Mac software on Windows without buying a new MacBook.User Engagement: Another reason to run Mac apps on Windows is user experience, as many users prefer using the Windows interface, features, etc. Additionally, understanding how each application works on both programs also helps streamline work.
Part 2. Is it Possible to Run Mac Applications on Windows?
Yes, you can run Mac applications on Windows, and it is easier than you might expect. There are specific methods that can be used to run Mac-centered software on Windows. You might think that Mac applications are only designed to run on Mac as they are licensed by the Apple agreement.
However, there are no bad outcomes if you use various macOS apps on Windows without Apple's permission. Using these methods can also provide you with a degree of functionality and compatibility because not all applications are available on Windows.
Part 3. How to Run Mac Apps on Windows Using a Virtual Machine?
As briefly mentioned above, you can run Mac applications on Windows, and several reliable methods are available for this purpose. Among them are virtual machines such as VMware and VirtualBox, which can help you run multiple operating systems on your computer.
Virtual machines such as VirtualBox provide a virtual environment of a Mac on a Windows PC, making it easy to switch between operating systems. However, achieving a Mac setup on a Windows PC is not a simple task. It requires technical skills and a thorough understanding of the process. Yet, if you're up for the challenge, you can delve into the following comprehensive guide:
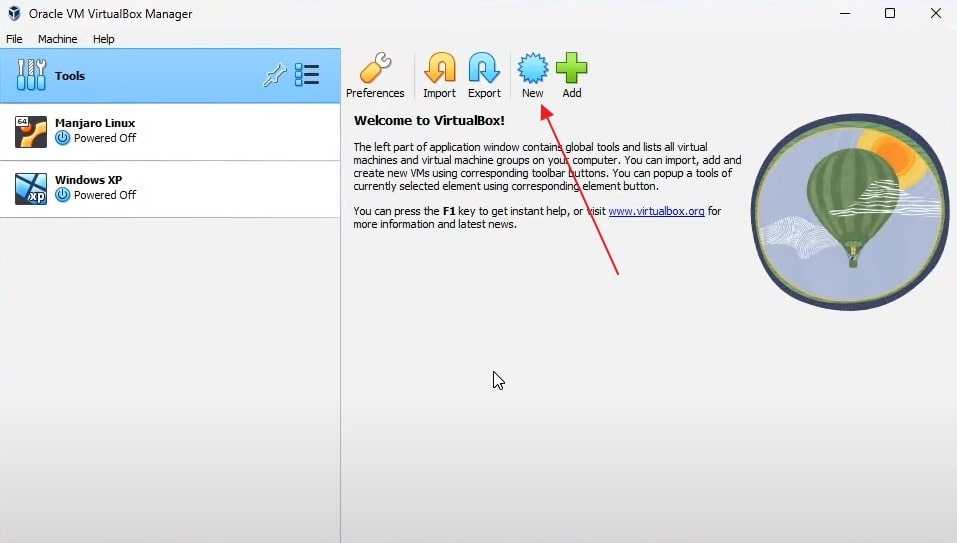
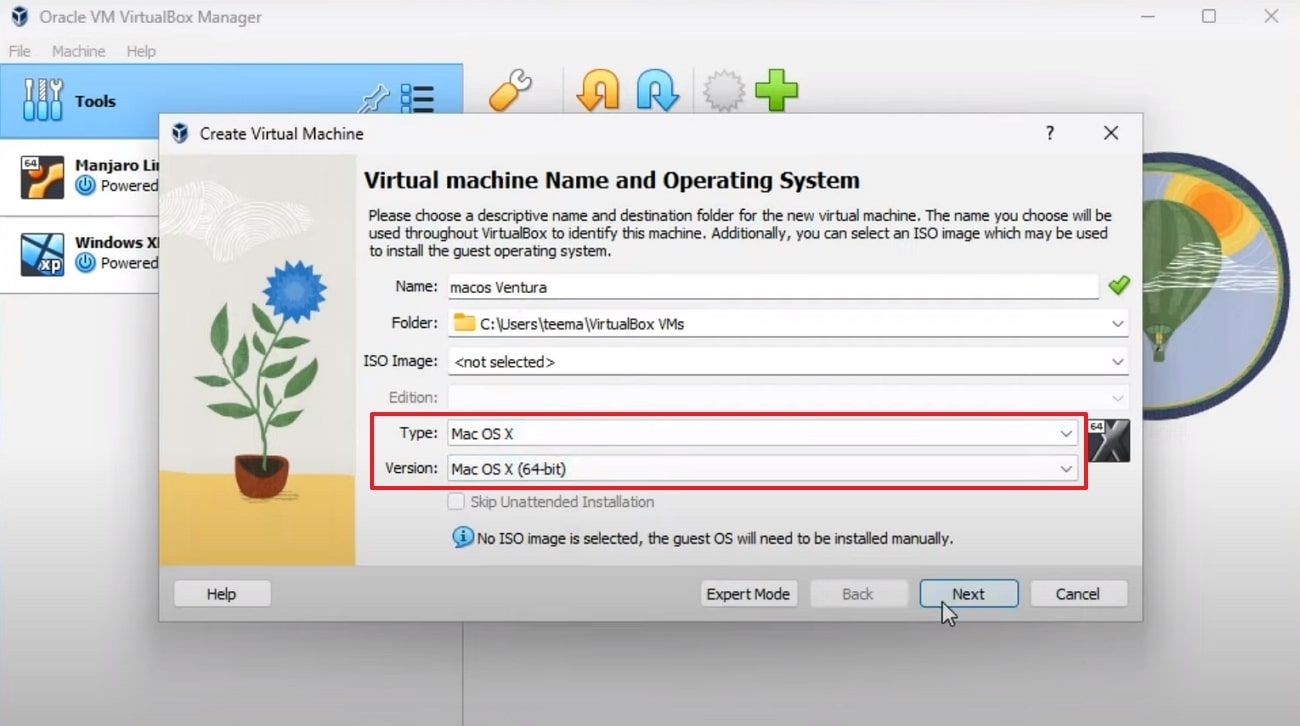
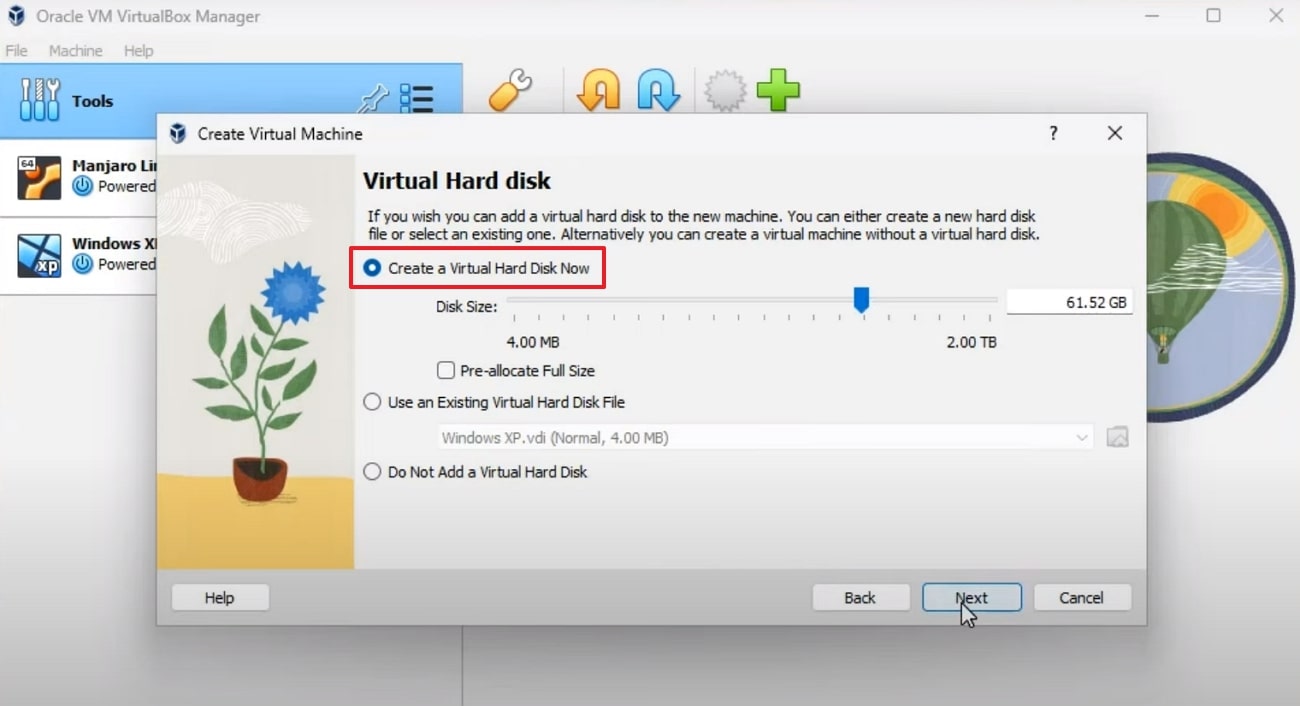
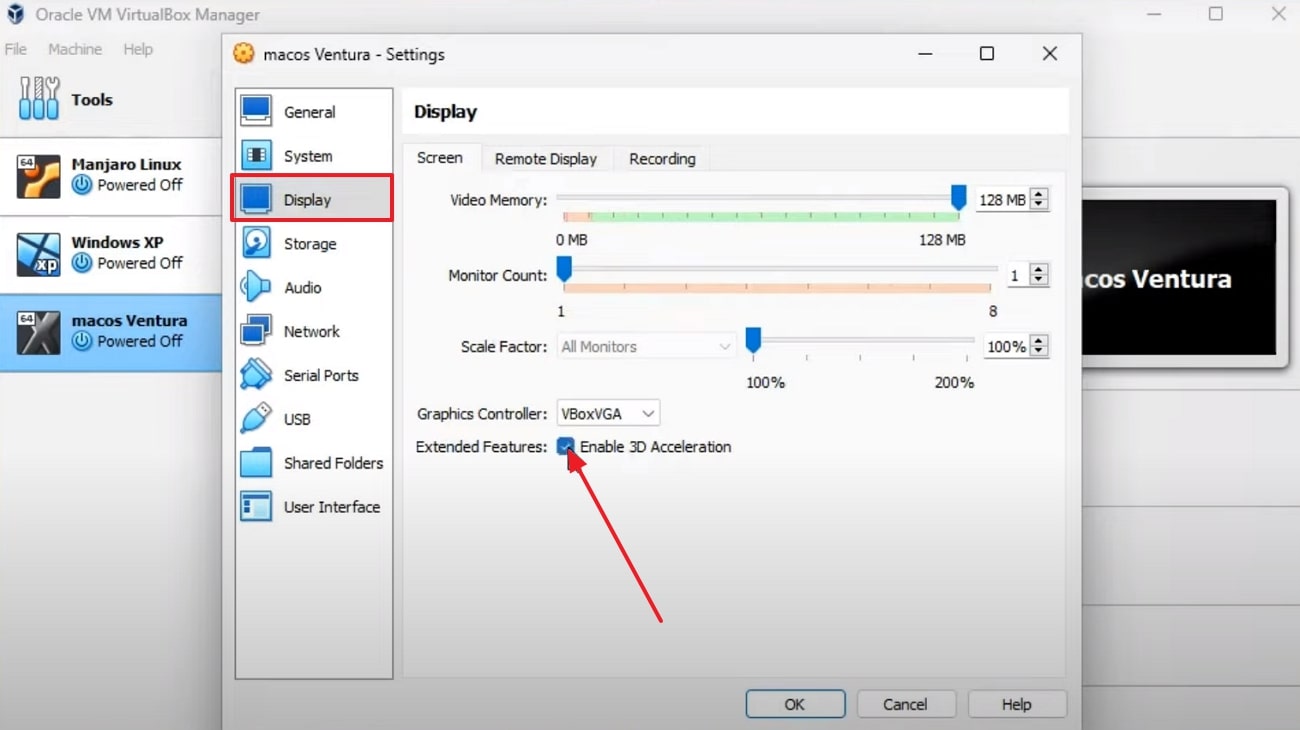
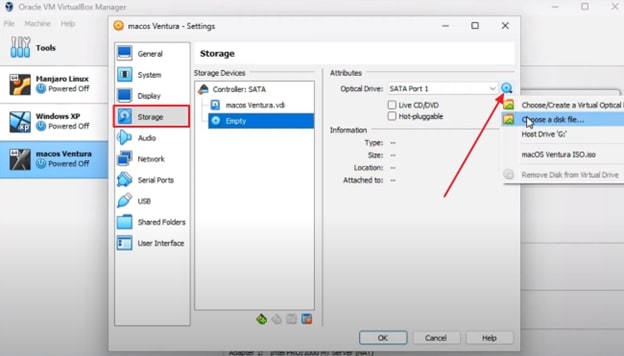
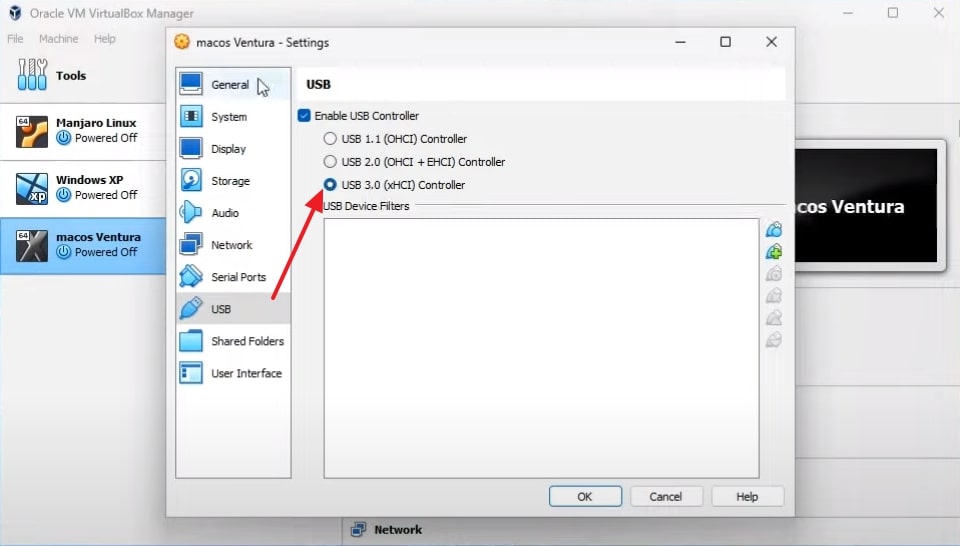
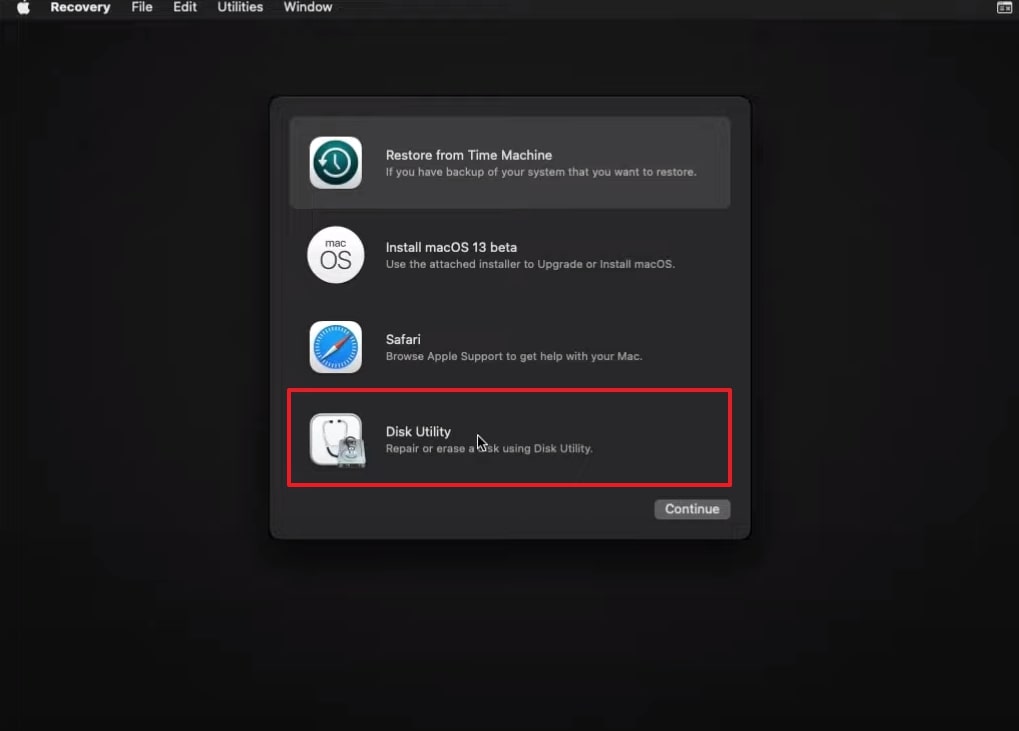
Wait for the process to complete, then choose a language and move to erase disks before installing macOS. To do so, select the "Disk Utility" option and press the "Continue" button to access this utility tool for further processing.
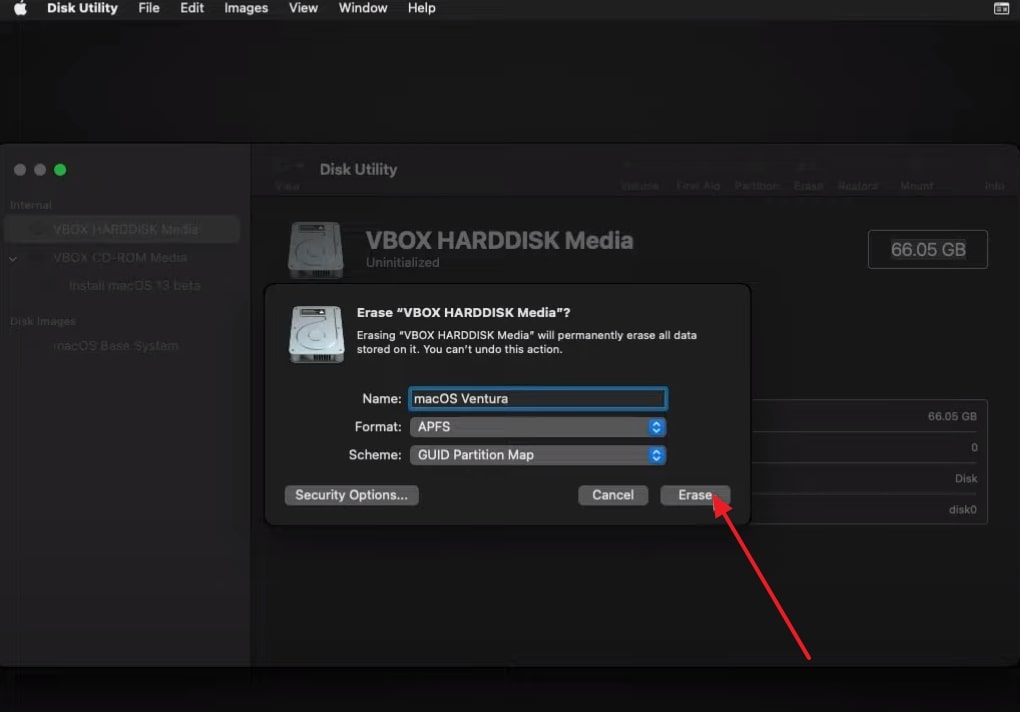
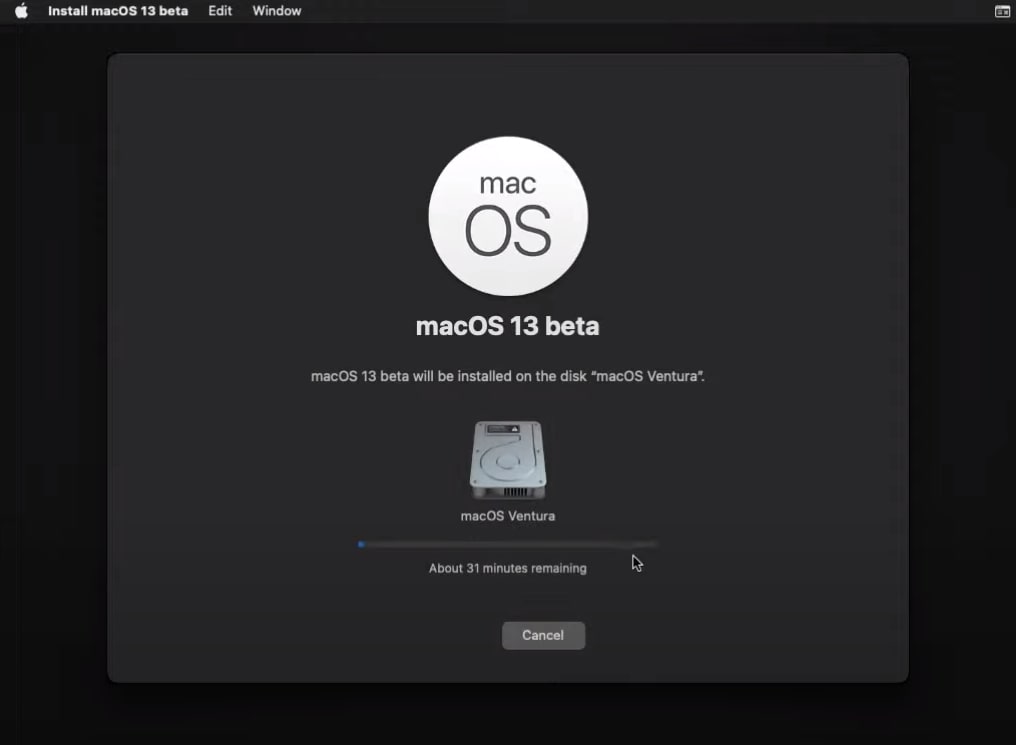
Now, wait patiently as it will take almost an hour or more to process, depending on your hardware. When the processing is finished, you will be able to set up a Mac according to your needs and will be able to operate it.
Pros
- VirtualBox offers free and open-source services, which means you don't need to purchase a separate Mac for fewer macOS-related tasks.
- Developers and students can learn about macOS without needing Apple devices and experiment with macOS features, software, and updates.
Cons
- Not all Windows versions are compatible with virtual environments, and running macOS on non-Apple hardware violates the Apple End User License Agreement (EULA), a legal consideration.
- 100% secure
- 100% secure
- 100% secure
Part 4. Other Methods to Run a Mac App on Windows
Now that we understand that it's not impossible to run Mac software on Windows, let's look at some methods to do so. We have listed the top 3 methods that can help you run Mac apps on Windows without a Virtual Machine.
1. Using Cross-Platform Alternatives
One of the easiest methods to run Mac programs on Windows is using a cross-platform alternative that works both for Mac and Windows. Platforms, such as Afirstsoft PDF, Adobe Acrobat, and more, are designed to work across multiple major platforms. These platforms offer AI-powered editing, annotating, and converting features that give you a seamless working experience.
You can create a collaborative environment with your team or friends by using various cross-platform alternatives. Moreover, this approach decreases compatibility issues and streamlines workflows during collaborative settings. You can also synchronize your work on both platforms and access them whenever you want.
2. Dual Booting macOS and Windows
One popular approach to running Mac apps on Windows is dual booting, where you can install Mac and Windows on the same machine. This process is known as creating a Hackintosh, and it only requires specific hardware to make macOS run on Windows. However, you should not proceed without Apple's agreement to boot Mac into the Windows program.
Moreover, you can install Windows OS on your MacBook and use all its built-in and third-party apps without any disturbances. One downside to this method is that you need an Intel Mac device to boot the two operating systems.
3. Using Remote Access Solutions (Accessing MacOS Apps Remotely)
Although virtual machines have unmatched capability to run Mac apps on the Windows operating system, they are extremely difficult for non-tech-savvy people. That's why remote access solutions come into play to run Mac apps on Windows without virtual machines and complexities. Remote access solutions refer to software and programs that let you access and control macOS using your Windows PC.
In this regard, the location of the MacBook doesn't matter, and you can operate others' Macs remotely just like you operate them physically. Using such software, users can send chats, play virtual games, troubleshoot issues, test software, display presentations, and open PDF files on Mac through Windows. Among some fruitful remote access solutions are Avica remote desktop software, AnyDesk, and TeamViewer.
Part 5. Recommended PDF Tool for Cross-Platform Compatibility - Afirstsoft PDF
We learned about various methods that can help you run Mac software on Windows. One of them includes the cross-platform alternative method and the perfect PDF software for this purpose is the Afirstsoft PDF. This tool can help you manage, edit, and annotate documents with advanced features. Moreover, it is highly compatible with both Mac and Windows and provides almost the same features in both versions.
It also offers over 20GB of cloud storage so that you can store your progress on both devices by enabling you to upload files of maximum 2GB. In addition, Afirstsoft offers excellent features that take your document management to the next level. If you are impressed with the level of AI advancement of this tool, download it today and try out its features for free.
Key Features
Optimize Documents with AI: This tool's most reliable and powerful AI assistant feature can help you optimize content within seconds. You can ask AI questions on various topics, and it will provide you with comprehensive answers. Moreover, it can help you concisely explain complex forms of information.Streamline Navigation: To increase your overall reading experience, the read feature provides you with different reading modes. You can also adjust the scale of the page to zoom in and out of every detail on the document. Furthermore, it lets you preview your whole document by using the full screen mode or for better navigation, set the document in one or double-sided pages.Reliable Conversion Process: If you have a document containing different images and text, then you can showcase them better in different formats. Afirstsoft supports various file format conversions, from PDF to image formats, Word, Excel, HTML, EPUB, and many more.Professional Formatting: Every document needs some type of modification to its contents, and in this case, the edit feature of this innovative PDF toolbox can help you achieve that. This feature offers various colors, styles, sizes, and alignment of options that you can apply.Smart OCR Feature: Users can also edit scanned documents and images using its AI-powered OCR feature. It can recognize the text on any scanned file and convert it into editable text with great accuracy. You can transform scanned or image-based documents of any language because it supports more than 20 languages.
How to Access PDF Files of Mac on Your PC: Using the Afirstsoft PDF
This cross-compatible software aims to boost your productivity by providing batch processing. Besides, users can save their PDF files on the Cloud so their teammates using other devices can also get consistent updates. To access PDF files of Mac on your Windows, the following is a stepwise guide you must consider before beginning your journey with the Afirstsoft PDF.
Step 1: Locate the Cloud Files and Import your PDFs
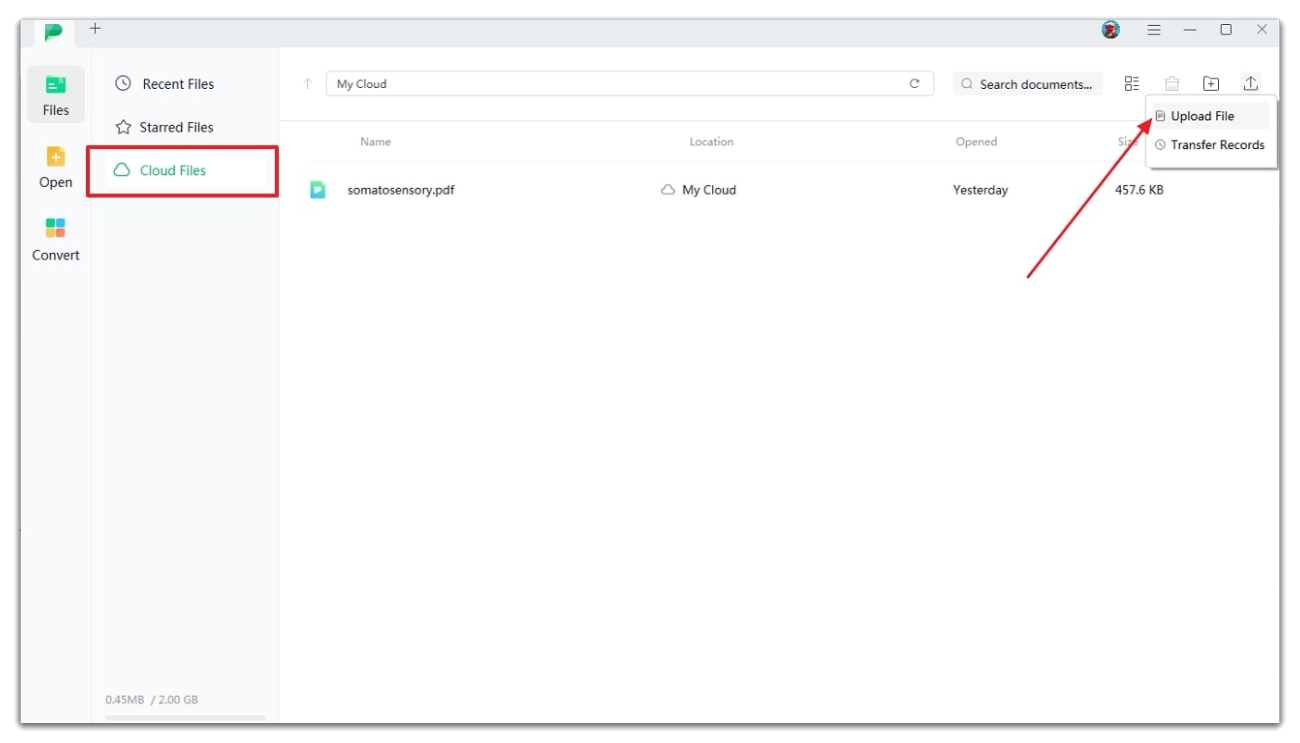
Launch the newest version of the Afirstsoft PDF editor upon installing it from its official site. From its user-friendly interface, choose the "Cloud Files" option on the left side of the panel. Following this, click the "Upload File" button if you are using it for the first time and import your PDF. Conversely, hit the "Upload" icon at the top-right corner and use the "Upload File" option to bring files to the Cloud.
Step 2: Access the Synchronized PDFs on Another Device
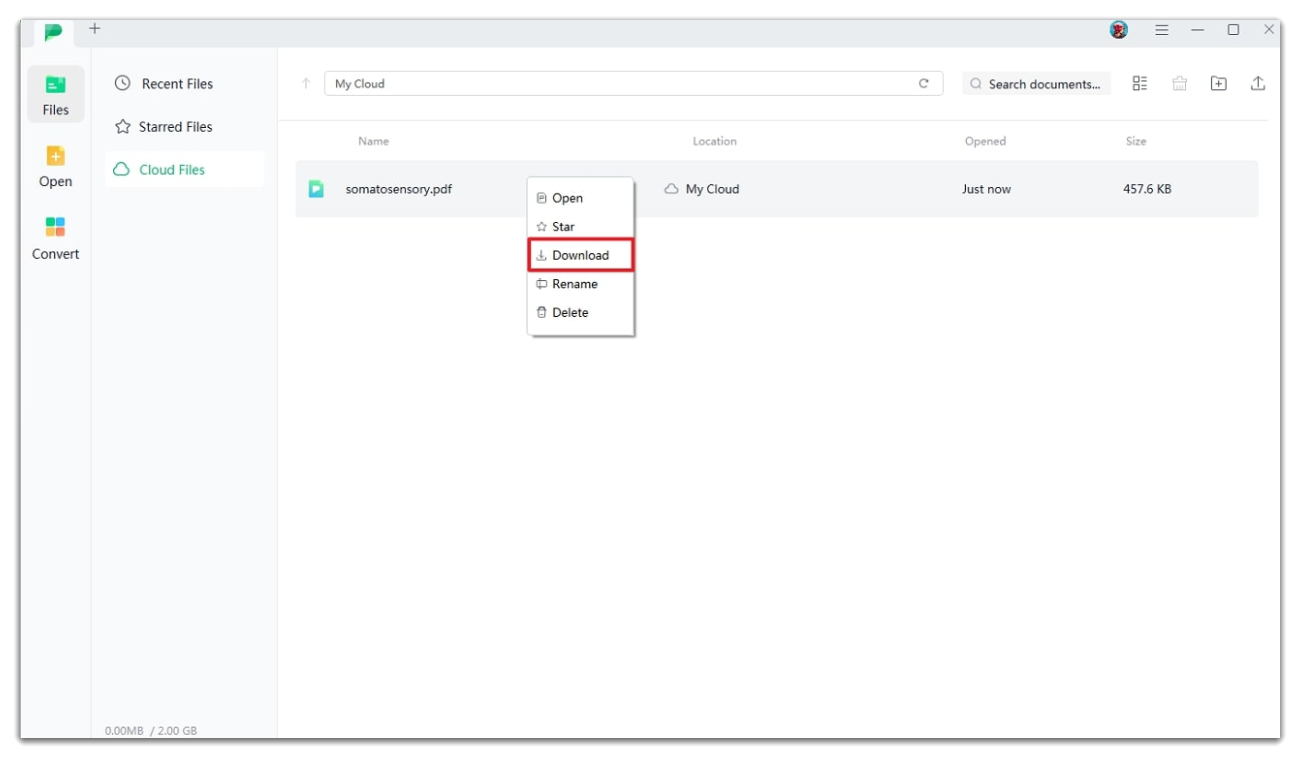
Once you have uploaded the PDF file from your system, it will be automatically synced with other devices to access from there. Thus, go to the other device and launch Afirstsoft, which should be signed in with the same credentials. There, locate the files in the "Cloud File" tab, right-click on the required file, and press the "Download" option.
- 100% secure
- 100% secure
- 100% secure
Part 6. Diagnosing and Fixing Common Issues When Running Mac Programs on Windows
When running Mac applications on a Windows PC, you may encounter a few common issues. Here’s how to address them:
Performance Challenges
Slow Operation:
- Increase Resources:Allocate more CPU and RAM in your virtual machine settings.
- Optimize Settings:Adjust video memory and graphics acceleration in your virtual machine’s configuration.
- Update Software:Ensure both your virtualization software and macOS are up-to-date.
Resource Management:
- Close Unnecessary Programs:Free up system resources by closing non-essential applications.
- Monitor Usage:Use task managers to track CPU, memory, and disk usage and address bottlenecks.
Compatibility Hurdles
Application Crashes:
- Check Compatibility:Confirm that the Mac application is compatible with your macOS version.
- Update:Ensure both the application and macOS are updated to the latest versions.
- Reinstall:If crashes persist, try reinstalling the application.
File Access Problems:
- Verify Paths:Check that file paths are correctly mapped between Windows and macOS.
- Adjust Permissions:Ensure macOS has the required permissions to access the files.
Licensing and Activation Challenges
Software Activation Issues:
- Follow Instructions:Carefully follow activation steps and use the correct license key.
- Check Compatibility:Verify that the activation mechanism works in your virtual environment.
License Compliance:
- Review Agreements:Understand and adhere to licensing terms for both Mac applications and virtualization software.
Graphics and Display Difficulties
Resolution Adjustments:
- Change Display Settings:Adjust resolution and scaling options in your virtual machine to fit your monitor.
- Update Drivers:Ensure that graphics drivers on both Windows and macOS are current.
Graphics Performance:
- Increase Video Memory:Allocate more video memory to improve graphics performance.
- Enable 3D Acceleration:Turn on 3D acceleration if supported by your virtualization software.
Network and Connectivity Issues
Network Setup:
- Configure Adapters:Ensure network adapters in your virtual machine are set up correctly.
- Check Firewalls:Verify that firewalls on both systems aren’t blocking network access.
Internet Access Problems:
- Verify Connection:Check if other devices can connect to the internet to rule out network issues.
- Restart Devices:Restart your router or modem to resolve connectivity issues.
Backup and Recovery Procedures
Data Backup:
- Use Backup Tools:Regularly back up your virtual machine’s data using built-in tools or external services.
- Save Important Files:Store critical files in a regularly backed-up location.
Recovery Methods:
- Create Snapshots:Use virtual machine snapshots to restore previous states if needed.
- Keep Recovery Media:Have recovery media or installation disks ready for reinstallations.
By following these tips, you can troubleshoot and resolve common issues encountered when running Mac applications on a Windows PC.
FAQs about Run Mac Programs on Windows
What common issues may I face when running Mac programs on Windows?
As you know, accessing macOS programs on Windows isn’t a legal, acceptable, or native approach, so you must be aware of its consequences. For example, you may face performance degradation of your system, hardware limitations to support this process, and legality concerns from Apple’s EULA.
Is there any system requirement to run macOS on Windows via Virtual machines?
Running macOS on a virtual machine requires significant CPU, RAM, and storage for a lag-free and good performance. In this regard, a multi-core processor, 8GB RAM, and significant storage are suggested for a Windows PC.
Can I access a Mac device’s PDF File on my PC with consistent updates?
Yes, you can obtain PDF files from a Mac device on your PC through the Afirstsoft PDF, an AI-powered PDF handling tool. Beyond accessing files using its cloud collaboration services, you can utilize its diverse functionality and elevate productivity in remote work.
- 100% secure
- 100% secure
- 100% secure
Conclusion
At the end of this article, we learned in-depth about how to run Mac apps on Windows with various effective methods. We understand why it is necessary to run Mac apps on Windows, as many people prefer to use Windows over Mac. The most advanced and lag-free method for running the Mac apps on Windows OS is through virtual machine.
Moreover, we have discussed the best AI PDF editor that supports both operating systems, which is called Afirstsoft PDF. This AI toolkit can also help you move your PDF documents from one device to another with its Cloud Storage feature.


