With the rising dependence on multiple devices, ensuring that files are consistently up-to-date and accessible has become a challenge. This has directed to syncing folders on Windows, confirming files are backed up to another location, and minimizing the risk of accidental data loss. Besides, it eliminates the need for manual file transfer over devices, saving time to focus on other tasks.
Apart from preventing data loss, it prevents confusion over the latest version so the team members can work efficiently together and maintain their workflow. As it becomes crucial for Windows to sync folders across devices, let’s learn how to make it possible. For this purpose, read this guide, which contains step-by-step guides showing how to sync folders and files in Windows.
- 100% secure
- 100% secure
- 100% secure
Part 1. Why You Need to Sync Folders on Windows?
In this digital era, managing and accessing data is equally integral to students managing academic files and professionals working in the corporate sector. For them, sync folders on Windows 10 have several advantages, a few of which are discussed in this section.
- Data Accessibility: Syncing files allows you to access files from any device and anywhere, which particularly benefits remote workers. If you are going on vacation, you can sync files to your home devices so you can attend urgent meetings away from your office desk.
- Enhanced Collaboration: Teams and organizations can benefit from syncing facilities for real-time collaboration and let multiple users work on the same document simultaneously. It eliminates the hassle of emailing files back and forth, waiting for responses, and confusion over the updated versions.
- Data Security: When your files are continuously saved and updated to cloud services, your data is protected from loss. In addition to automated backup, users can restore previous versions of files, especially when they accidentally change or delete something from files.
- Boost Productivity: Automating the file transfer or backup process will significantly save you time while letting you work on more critical tasks. When one device faces temporary loss or failure, syncing can streamline your workflow over other devices and ensure continuity of work.
Part 2. Learn the Windows Folder Sync via Sync Center
Apart from using a third-party app to sync files, you can try the built-in Sync Center Windows, initially introduced in Windows Vista. To sync files across computers, you need to place them both under the same network, but remember this feature can work even when your devices are offline. Using this approach to sync folders is difficult, so below is a stepwise guide that will simplify the process for you:
Step 1: Access the “Windows” icon from your system's taskbar and launch the Control Center after accessing the Start Menu. From the Control Center, search for the “Sync Center” through the search bar and click on the appeared option. Then, tap the “Manage Offline Files” option from the left side panel and get a pop-up menu. Using it, hit the “Enable Offline Files” button and press the “OK” button to advance.
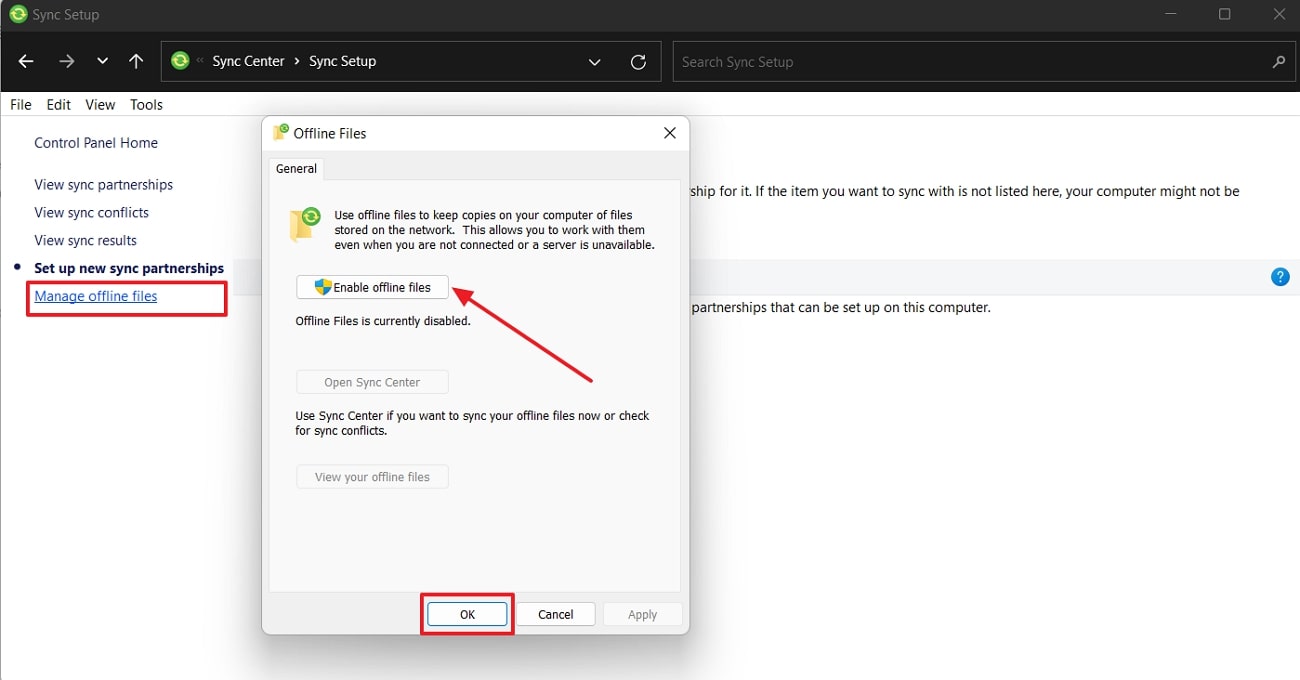
Step 2: Return to the main screen of the “Control Panel” and tap the “Network & Internet” option. Next, click the “Network and Sharing Center” option and select the “Change Advanced Sharing Setting” option from the left side. Now, approve the “Turn on Network Discovery” and “Turn on File and Printer Sharing” before pressing the “Save Changes” button.
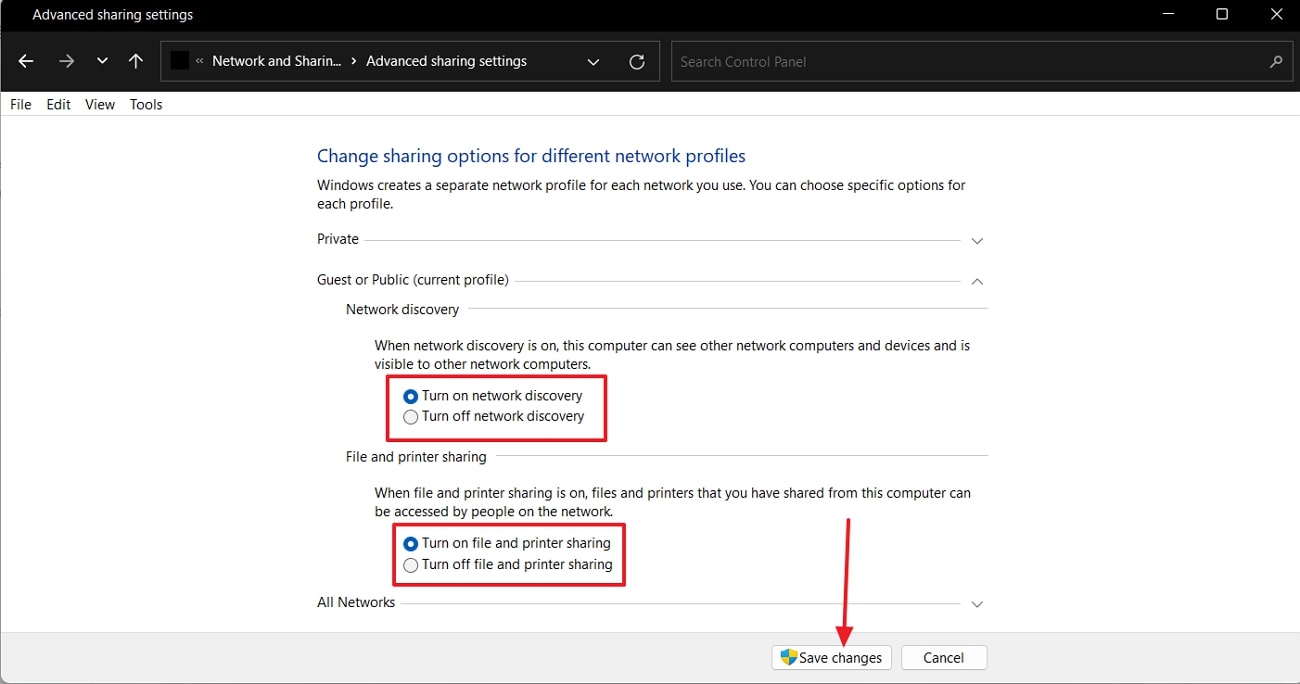
Step 3: Go to the file or folder you wish to share and right-click on it to choose the "Properties" option from the list. This will open the properties settings, where you have to tap the “Sharing” tab from the top and hit the “Share” button. Later, add the desired people by typing their names or using the downward icon to find available people.
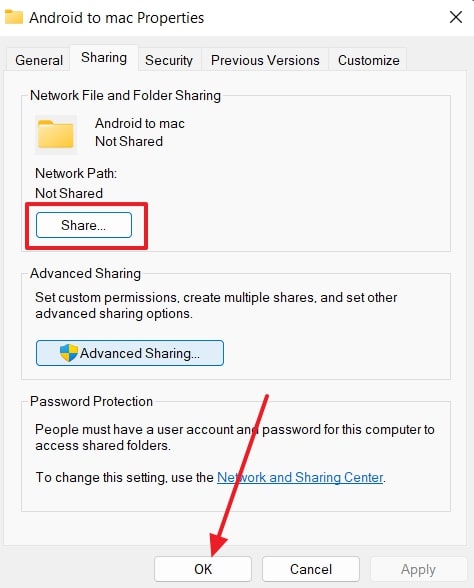
Subsequently, press the "Share" button and go to the "Sharing" tab again. There, use the "Advanced Sharing" button to open a pop-up menu, activate the "Share This Folder," and hit "OK."
Step 4: Press the "Windows" key from your keyboard and open "Command Prompt" by typing "cmd" there. Following that, a new window will open to write the "ipconfig" option and press the enter key to give a command. From the network details, copy the "IPv4 Address" and close the window.
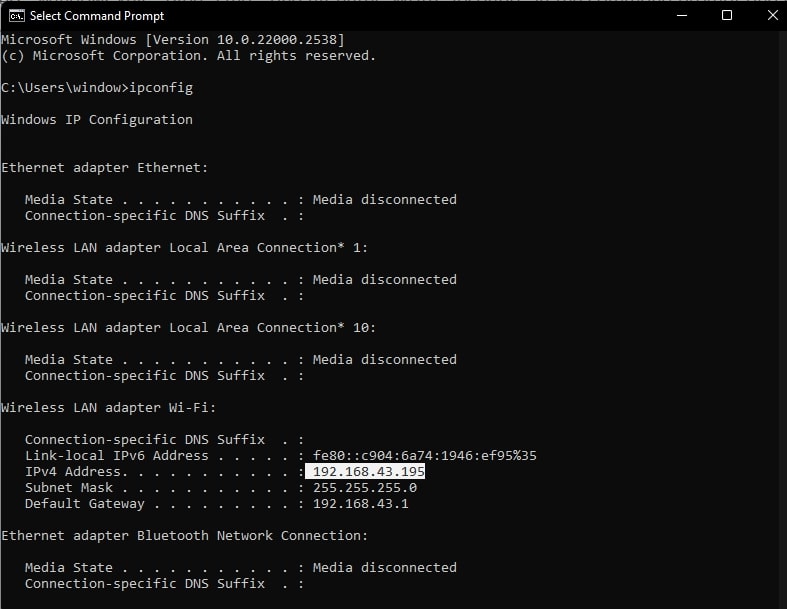
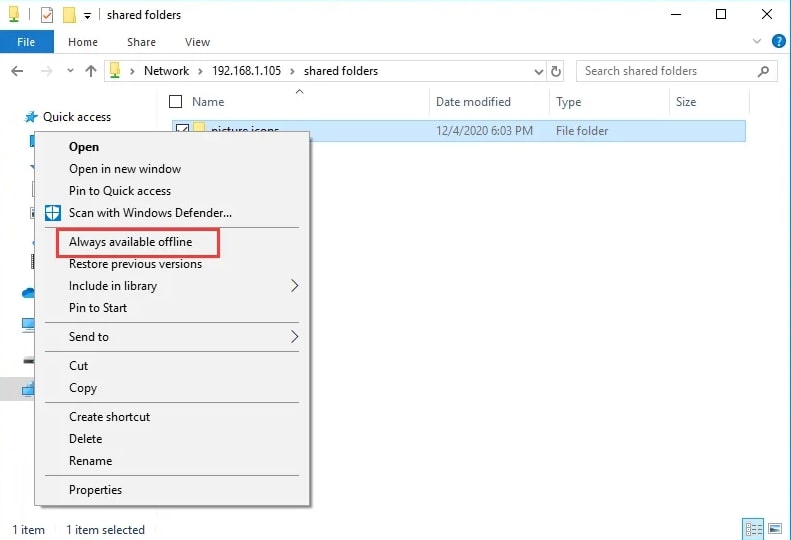
Step 5: Hit the “Windows + R” keys simultaneously to get a small pop-up and insert the” \\network server IP address” command. Then, replace “Network Server IP Address” with the actual one and proceed with the “OK” button. Finally, a folder will appear in front of you to right-click on it and choose the “Always Available Offline Option.”
- 100% secure
- 100% secure
- 100% secure
Part 3. How to Synchronize Folders on Windows 10 Using Google Drive
In providing cloud storage services, Google’s Google Drive is a leading one with the aim of secure data collaboration and storage. It allows users to choose folders on their computer to sync with Google Drive and Google Photos through a simple process. To begin the Windows sync directories through Google Drive, you can go through the steps below:
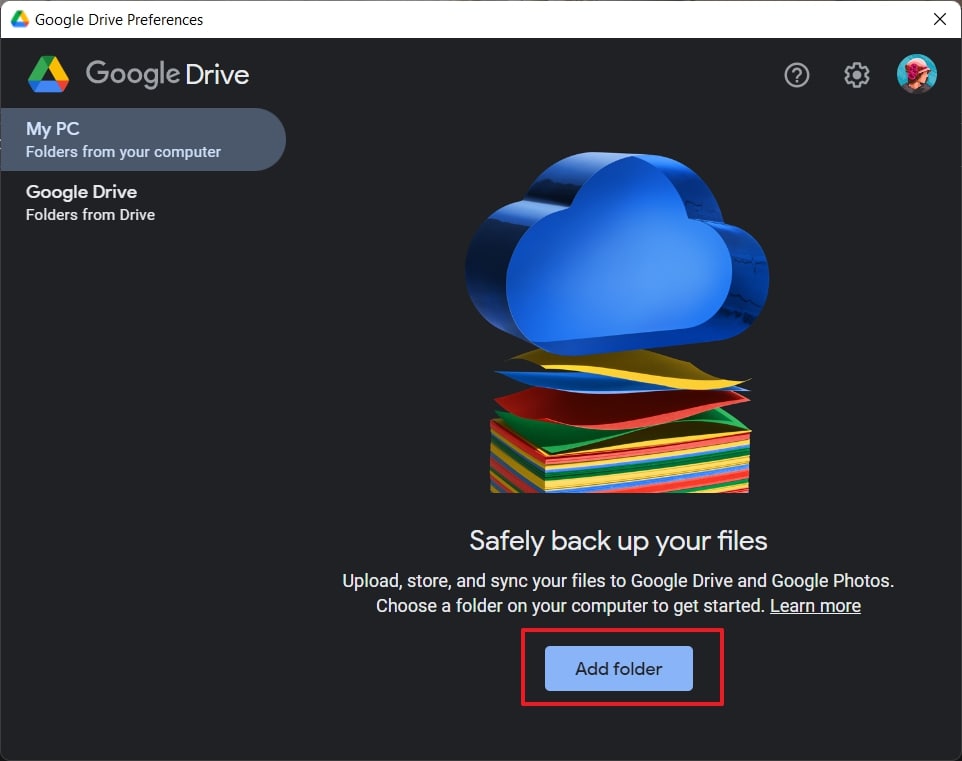
Step 1: Set up Google Drive for Desktop on your Windows PC, and you will find a menu on the right side of the screen. Click the “Settings” icon and choose the “Preferences” option from the expanded list. From the settings screen, hit the “Add Folder” button and select the folder or files you wish to synchronize.
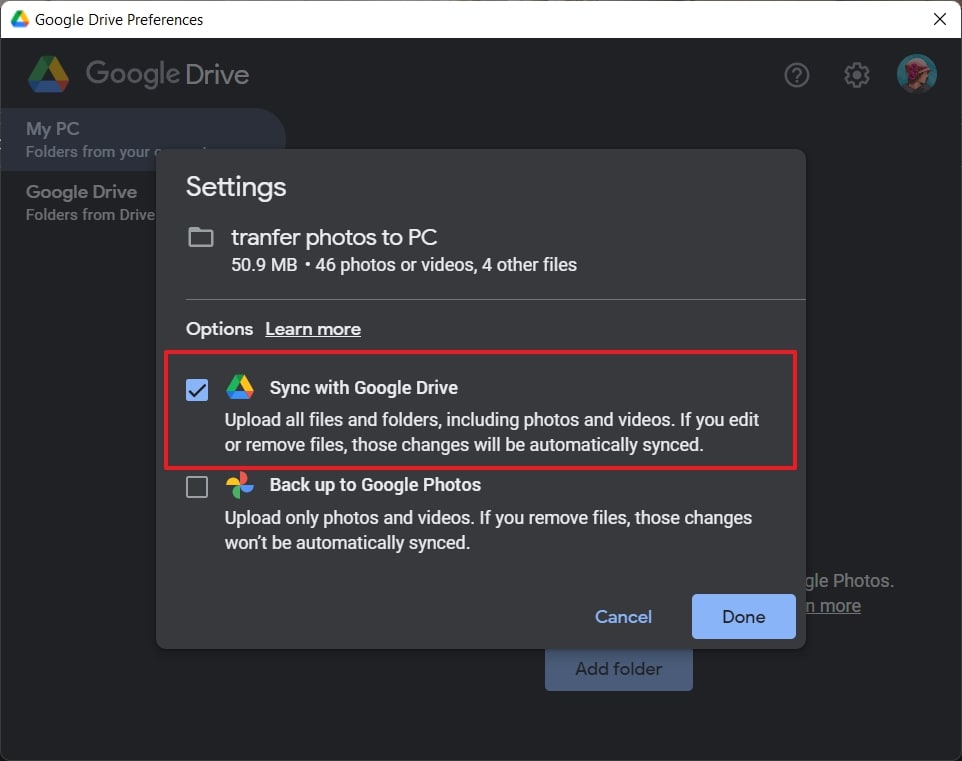
Step 2: Later, activate the “Sync with Google Drive” option and press the “Done” button. Your folder will then be added to a list of synchronizations to Google Drive, so hit the “Save” button and confirm it.
Part 4. How to Synchronize Files on Windows 10 Using OneDrive
OneDrive is another popular cloud storage service that securely saves and shares files across devices. It offers 5GB of free storage for files, but you must subscribe to its plans when your storage needs exceed this. Notably, it can provide you the peace of mind of backing up all the PC folders, where you can access and restore previous versions. Here are the steps to start the sync directories Windows 10 via OneDrive:
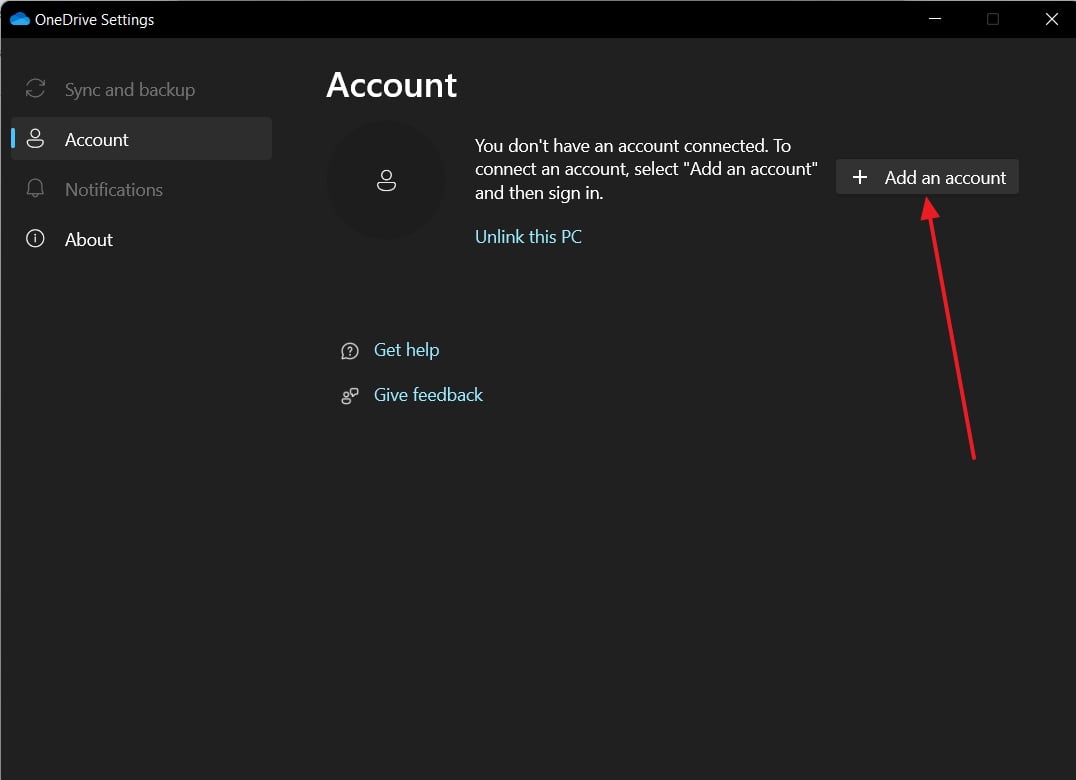
Step 1: If you use Windows older than 10, install OneDrive on your device, as it comes pre-installed in Windows 10/11. Once installed, click the "Gear" icon and choose the "Settings" option from the expanded list. Now, hit the "Add an Account" button from the next window to create an account if you haven't signed up already.
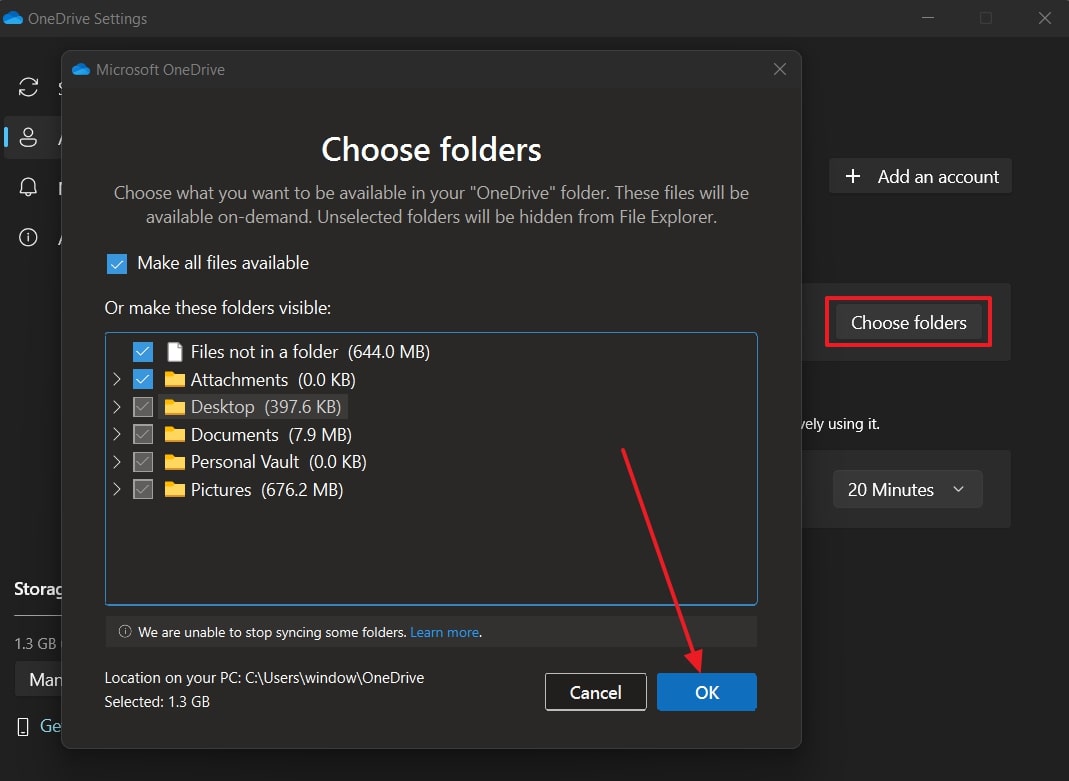
Step 2: Upon creating an account, press the “Choose Folder” button and select folders to sync to your computer. To do so, check the boxes following each folder and tap the “OK” button to initiate the syncing process.
- 100% secure
- 100% secure
- 100% secure
Part 5. How to Sync PDF Documents on Windows? Using Afirstsoft PDF
The first way to sync files on Windows is the Afirstsoft PDF, an all-in-one PDF handling software. It is known for its diverse range of features that streamline workflow and make data accessible to everyone. This software can convert PDF documents into formats like PPT, Word, RTF, HTML, and many more.
Moreover, it provides annotating tools to make digital notes on eBooks and highlight text in various ways to make the documents appealing or easy to read. For ease in reading, it has several reading modes that reduce eye strain and make PDF reading a delight.
A Simplified Guide to Sync PDF Files on the Afirstsoft PDF
The cloud services of Afirstsoft allow you to view and download documents on all devices, such as iOS, Android, Mac, and Windows. If you want to learn how it works, you should delve into the following step-by-step guide on PDF syncing over the Afirstsoft PDF.
Step 1. Access the Cloud Files Feature
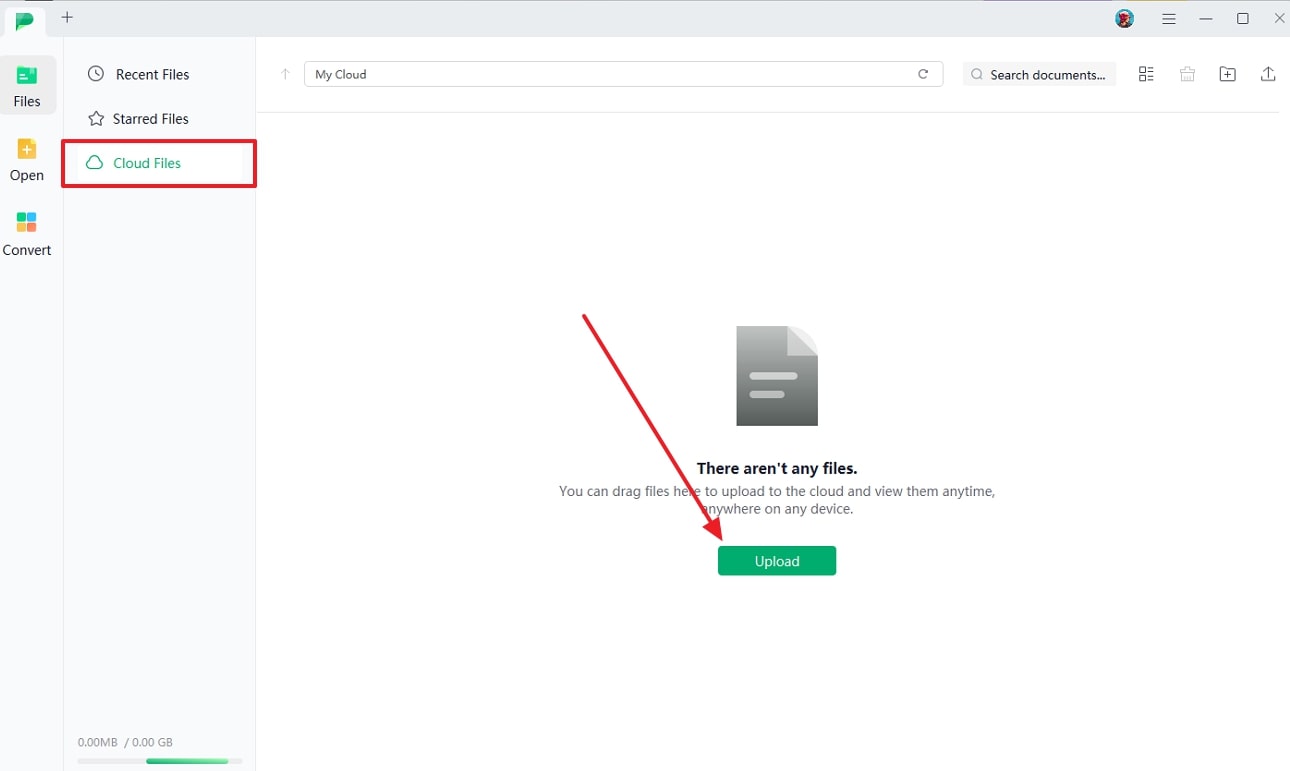
Download the latest version of Afirstsoft PDF to your system and launch its user-friendly interface. Upon reaching the main interface, click the "Cloud Files" option from the left side. Later, hit the "Upload" green button and press the "Open" button after selecting the PDF files you wish to synchronize.
Step 2: Download the Required PDF
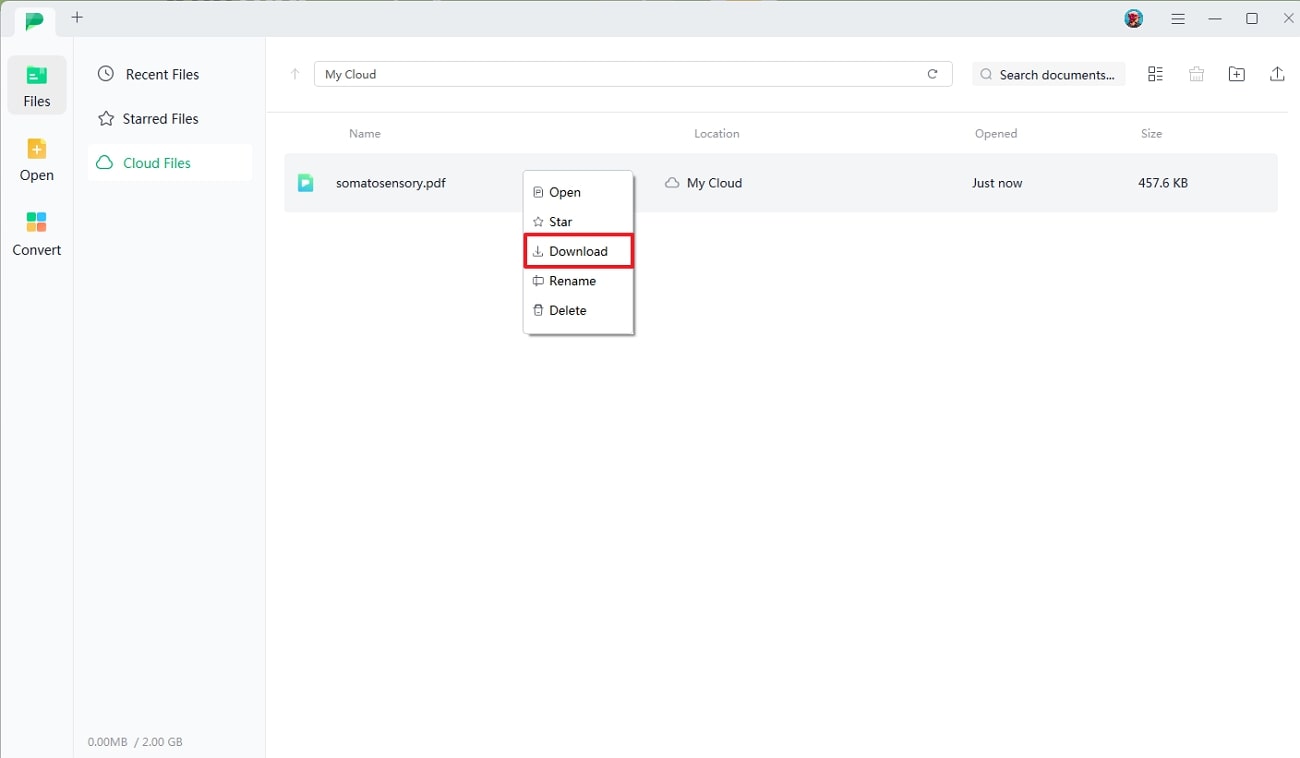
Once the file is uploaded from your computer, anyone with the same Afirstsoft credentials can access it. Upon accessing it from another device, right-click on it and choose the "Download" option to save the PDF document on the device.
Additional Features of the Afirstsoft PDF
Now you know how Windows synchronizes folders through the Afirstsoft PDF, especially PDF files. However, let us remind you that this software isn’t limited to just PDF syncing, and you can also perform all kinds of PDF editing and handling tasks. To witness other exclusive functionalities of this software, you must head to the following points.
1. PDF Summarization
If you wish to increase your productivity and save valuable time, syncing folders isn't the only way. In this regard, Afirstsoft can even help you by offering the AI PDF summarization feature that cuts your need to read the entire document thoroughly. Users can put their lengthy files on this software and access accurate summaries of the texts.
2. OCR PDF
Unlike other software, the Afirstsoft PDF is equipped with cutting-edge OCR technology that can turn your scanned documents into editable and searchable ones. Using this feature, one can transform their physical books into digital libraries with ease and accuracy. OCR in this software is powered with AI, which better understands the language of handwritten documents and helps their digital conversion.
3. Organize PDF
Messy and clattered files lead to misplacements of essential texts and confuse readers. That’s why this software offers an advanced PDF organization section that lets you split PDF pages or delete empty or unnecessary ones. Besides, it allows you to rotate and extract PDF pages from documents to meet specific needs and organize the document.
4. AI Chat
Among some of its AI features, AI chat can increase your productivity because it lets you ask questions related to a PDF or the world. If you find certain concepts troubling, you can ask AI instead of roaming around the internet for the perfect answer and wasting time. It will answer you comprehensively in natural language so you can grasp complex concepts in easy words.
- 100% secure
- 100% secure
- 100% secure
FAQs about Sync Folders on Windows
- What should I do when my folders stop syncing to my other devices?
If the synchronization suddenly stops, the first thing you need to do is check your internet connection and ensure the syncing tool is running. Later, you can check if the accounts on both devices are logged in and if the sync software is updated to facilitate the smooth syncing process.
- Should I choose third-party software or built-in Windows features to sync folders?
The choice of a syncing solution depends on your needs and expertise. If you need a solution without installing anything, you should choose the native ones, which are complex. Meanwhile, if you want an easy solution with various other features, select third-party apps like Afirstsoft PDF. It will help you sync PDF files with simple steps and let you handle PDF documents as desired.
- How to ensure data security in the syncing process of folders?
Many people are concerned about their data security while syncing materials over other trusted devices. The concern is valid as the unsecured networks pose several threats to data security, which can be resolved by using b password protection on folders. Besides, one is suggested to avoid syncing their sensitive data when the connection is unsecured or public.
- 100% secure
- 100% secure
- 100% secure
Wrapping Up
Let’s end the discussion as we have already reflected enough on Windows sync folders abilities through detailed step-by-step guides. Upon reading them all, you must be able to sync folders across devices either through third-party app or via built-in methods. Ultimately, the Afirstsoft PDF seems to be the most practical and easy solution to sync PDF files, enhance PDF management, and streamline workflow.


