As a Mac user, managing MacBook space is necessary as this operating system has minimal storage options to preserve basic to complex files. Thus, instead of deleting files, compressing PDF size is a reliable option to manage space. However, doing so might affect the originality of the file; therefore, choosing reliable tools is the key to maintaining the integrity of PDFs.
For that, knowing how to compress a PDF on a Mac with the right tools is necessary, which will maintain the file quality. Let us walk you through some user-oriented methods that you can consider compressing PDFs to have reduced storage space.
- 100% secure
- 100% secure
- 100% secure
Part 1. How to Compress PDF in Preview on Mac?
If you want a fast way to compress files, using the Preview app’s Quartz Filter will be helpful, as it automatically compresses the file size to offer you enough space. Using the same tool, you can change the tone, lightness, and colors of the PDF to boost the appeal. In terms of reducing the size with Preview, follow the sequential guide on how to compress a PDF file on a Mac in a single click.
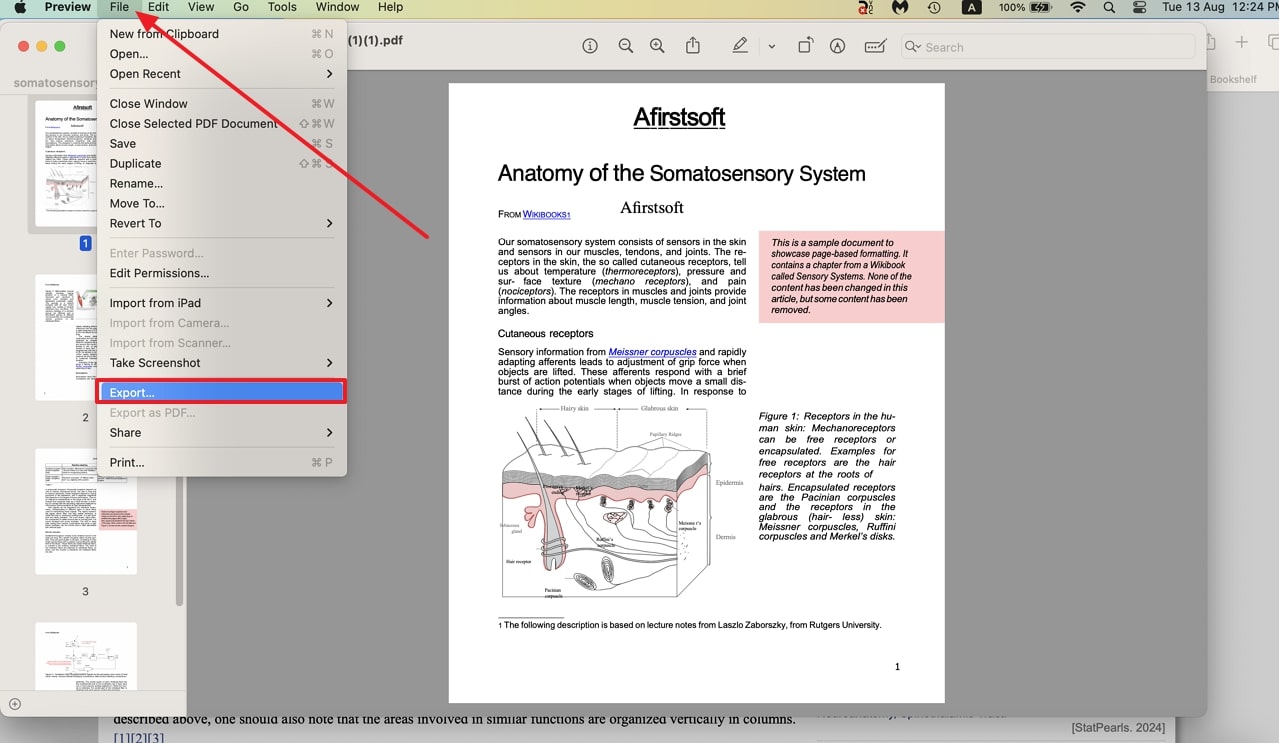
Step 1. For quick compressing, start the process by opening the file on the Preview app and navigating to the “File” option at the top toolbar. There, click on the “Export” option and you will be directed to a pop-up menu to choose the file compression parameter.
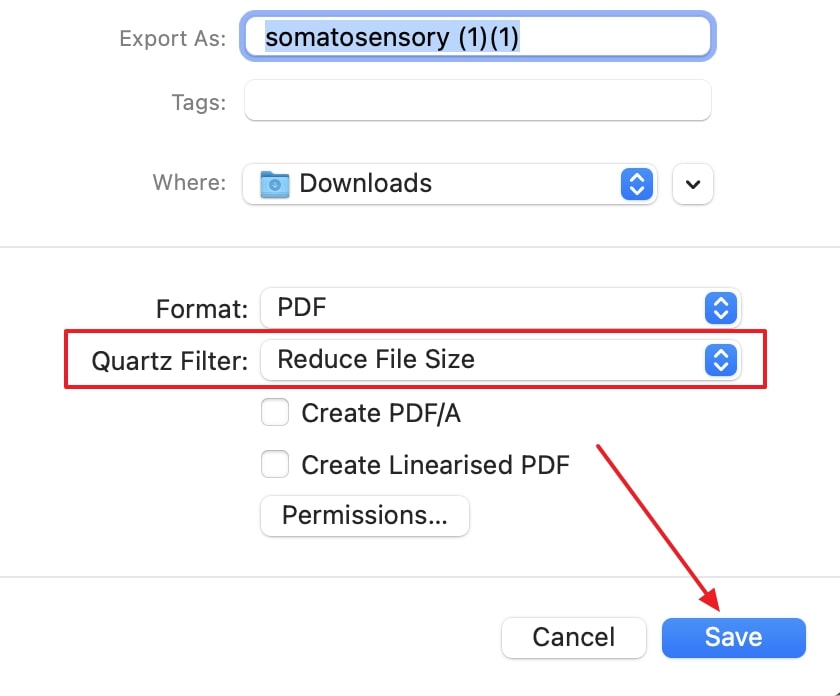
Step 2. On the given pop-up, locate the Quartz Filter and select “Reduced File Size” to automatically compress the file using this tool. To finalize this compression process, click the “Save” button and save the file on your device.
Advantages
- The Preview app is pre-installed on every MacBook, which eliminates the need for additional software downloads.
- As it is pre-installed, it's free of cost making it an ideal and cost-effective solution for those who seek basic compression features at less cost.
Limitation
- Preview app supports basic compressing features and offers less control over the compressing parameters that affect the balance between file size and quality.
Part 2. How to Reduce the Size of PDF File on Mac Using Adobe Acrobat?
To maintain the integrity of files, Adobe Acrobat provides users with multiple quality adjustment options, such as low, medium, or high, for compression. Furthermore, one can decide whether they want to reduce single-file or multiple files, as its batch processing capability will simplify file compression. No matter if you are using simple or scanned files, here is how to compress PDF on Mac in a few taps using Adobe.
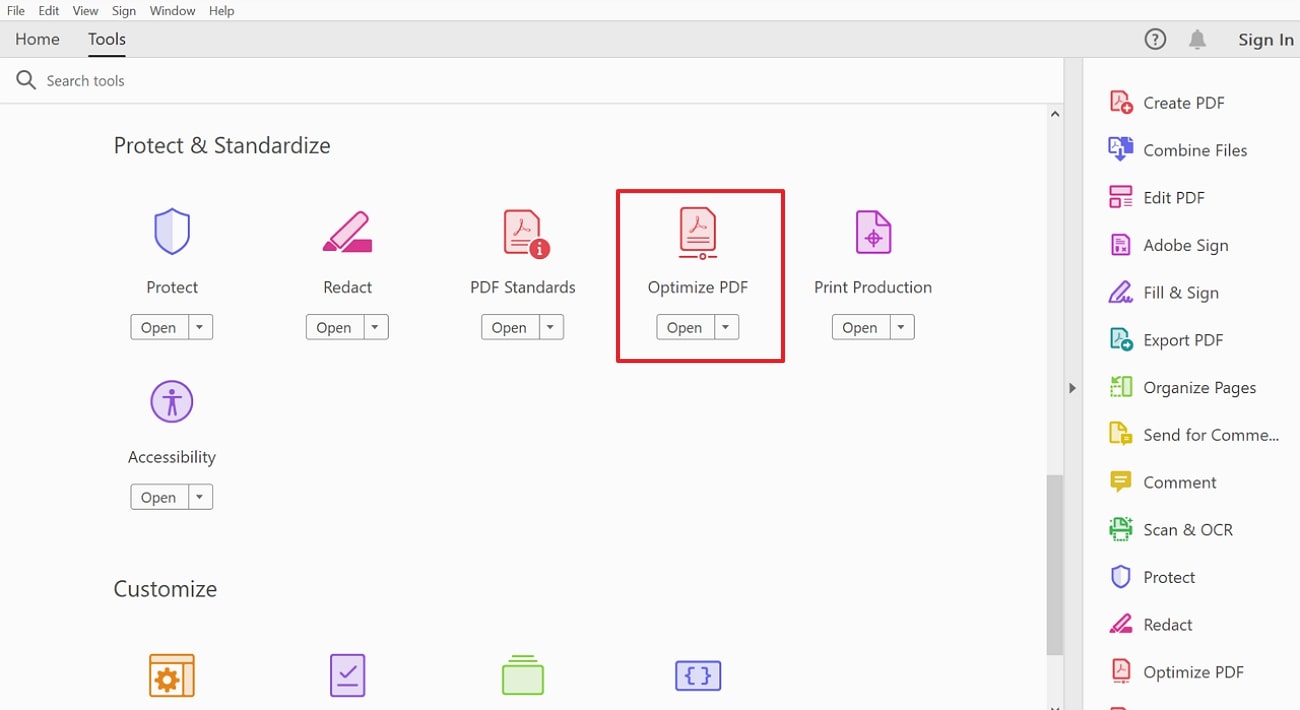
Step 1. Launch Adobe Acrobat on your MacBook and pick “Optimize PDF” from the list of tools available in the “Tools” tab to compress the file to the desired quality.
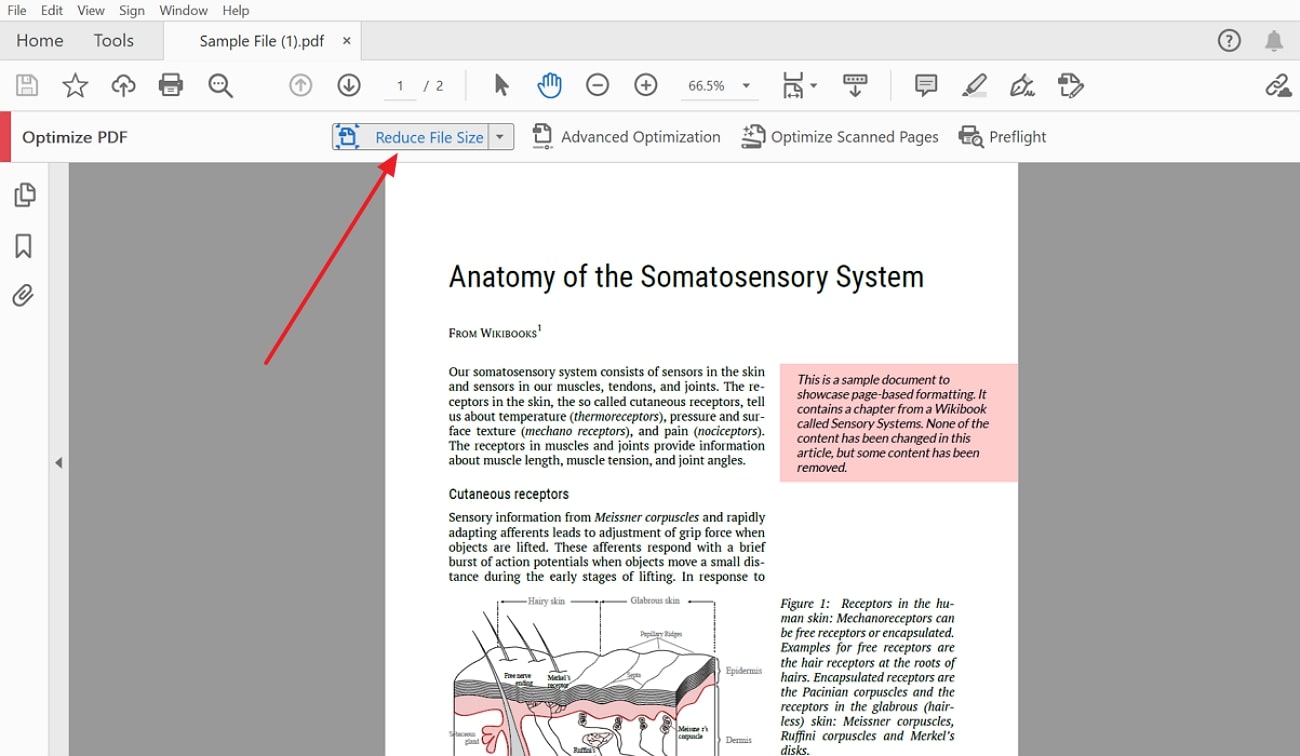
Step 2. Continue on the next page, hit the “Reduced File Size” option, and save the compressed file on your device. If you want to change the file quality or compatibility, hover over to “Advanced Optimization” and personalize the page settings as per your need to save space on your Mac.
Advantages
- This tool supports batch processing that offers the feasibility of compressing multiple files simultaneously so that users can handle large volumes of files easily.
- Adobe Acrobat will ensure the balance between file size and quality so that users can fine-tune the settings as per their requirements.
Limitations
- The compression feature is only available for premium users, so you have to buy its subscription.
Part 3. How to Decrease the Size of PDF on Mac Online?
Despite using desktop software, online tools are there to simplify the compression methods for Mac users. Since there are multiple online tools, considering ones that offer reliable compression without compromising the file resolution is vital. Therefore, here we have researched and picked iLovePDF and PDF2Go as top-notch online tools for you.
iLovePDF comes with three levels of compression to choose from, including extreme, recommended, and high, that tailor the file as per users' preference. On the contrary, PDF2Go offers two compression modes and different presets to reduce the document size. To compress PDF files on Mac online, follow the seamless steps below to compress files with iLovePDF because all the online tools have almost the same procedure:
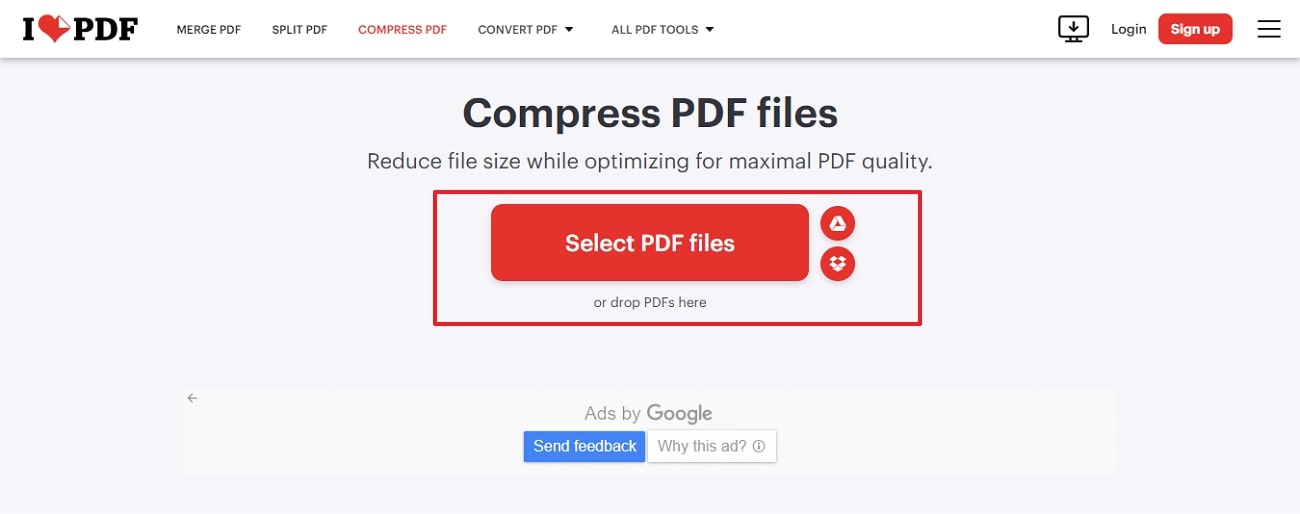
Step 1. Access the iLovePDF web version on your Mac and head to the “Compress PDF” tool from the list of options to start the file-compressing process. On the next window, hit the “Choose File” button and upload the file you want to compress.
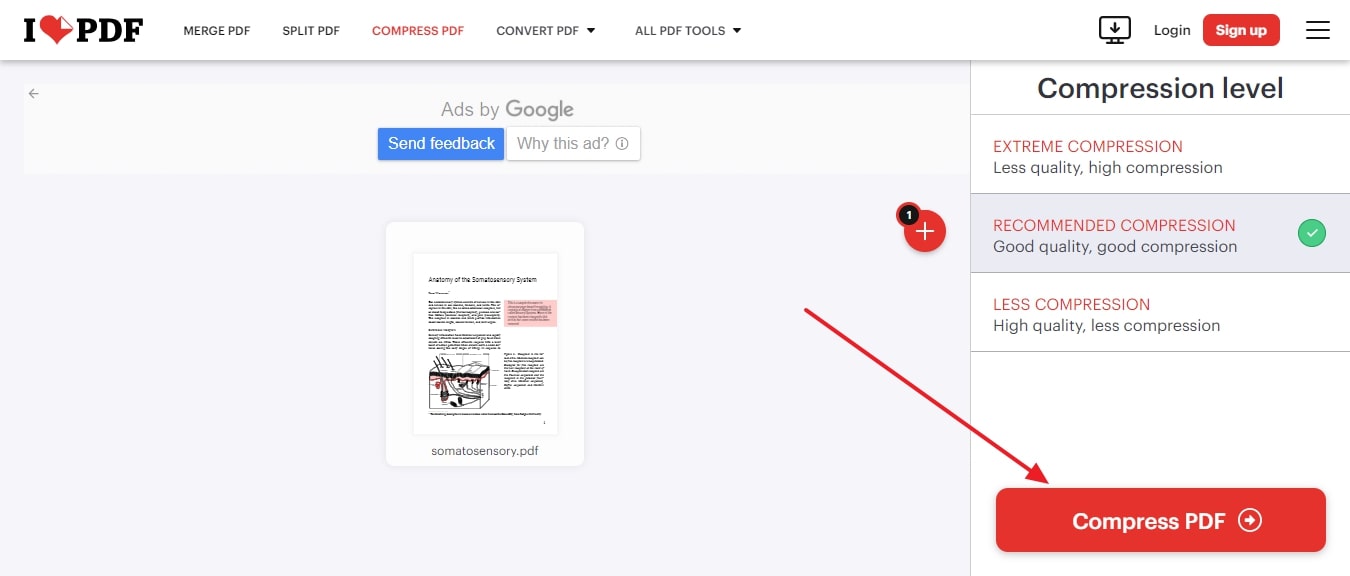
Step 2. Next, choose the compression level from the right side of the screen and initiate the process by clicking on "Compress PDF." Once the file is resized, save the compressed document to optimize space on your MacBook.
Advantages
- The online tools come with an intuitive interface that makes the compression procedure easy.
- As they are available online, they save the hassle of downloading software and save space on your device.
Privacy Considerations
Though online tools are accessible options for compressing files, uploading files on online tools can pose security and ethical threats if they don't have b security features. Hence, consider a tool that comes with file-saving features like password and encryption to save the data from misuse and unauthorized access.
Hence, the customer support and policies of the tool should be reviewed to know how they handle and store data after compressing a PDF on a Mac.
Part 4. Tips for Compressing a PDF on a Mac Effectively
Now that you have learned how to compress PDF file size on Mac, there are numerous considerations you need to remember if you want to get high-quality results. Therefore, for your better understanding, the following details contain a few tips to make the file compression procedure seamless.
- Balance the File Quality and Size: When resizing the PDF file, you need to consider that the quality and size of the file may suffer from over-compression. This can affect the clarity and appeal of the file, so personalize the compression settings as per the document's needs and protect the file quality for later usage.
- Prioritize Confidentiality and Security: Sometimes, PDFs that you compress contain sensitive data and using any online tool can raise data breaching concerns. Thus, either use a reliable file compressor like Preview or Adobe Acrobat. These tools are ideal as they allow you to directly compress the file from the tool instead of uploading it on the internet.
- Consider Image Resolution: Images take a lot of space in PDFs which is why compressing or lowering their resolution is one way to reduce the file size. However, when lowering the resolution, ensure that the clarity of the image is not compromised as it can affect the readability and usability.
- Keep a Backup: Keeping a file backup is a wise decision when compressing a PDF on a Mac, as there are chances that results might meet your preferences. Possibly, tools can lack revert features and you might lose the data. Hence, keeping any backup file will give you peace of mind as your data is secured and you won’t lose it while compression.
Part 5. Powerful AI PDF Editor for Efficient PDF Management in 2025
After learning how to compress PDFs on Mac, you will need an advanced PDF editor through which you can easily manage your PDFs. Afirstsoft PDF is one such tool with multiple editing tools that allow you to tailor the font size and style, underline text, or bold it to pinpoint the key information. With the help of this tool, you can add emphasis to your content by highlighting or adding comments for easy file previewing.
- 100% secure
- 100% secure
- 100% secure
The best part about this tool is that it comes with an AI-powered OCR feature to make the text editable and recognizable after the text recognition. With this, users can easily use the recognized data directly from the tool for further updates. Whether you want to proofread or translate, you can even hand over your complex task to its AI assistant and save your time and effort.
Other Key Features
- Insert New PDF Content:With its innovative editing feature, users can add desired text and images from their system to make their documents more informational. Moreover, it allows you to customize the old and new data properties.
- Summarize PDF File: Its AI assistant is designed with innovative features, and summarizing text is one of them. Using this tool, AI can generate details and precise summaries by processing large files without getting overwhelmed with details.
- Convert PDFs in Batch: Instead of creating or editing a single page at a time, get benefit from its batch processing features. Through this, you can generate and edit multiple files simultaneously to save you significant time.
- Split the PDF: If you want to split the page or files into multiple layers of information, consider its “Page Organize” feature to enhance the readability of the information.
Wrapping Up
To conclude, compressing files can save a lot of space on your MacBook, allowing you to effortlessly handle files. Thus, switching to a reliable tool is significant, but choosing one can be a hectic task. Therefore, in this article, we have listed some comprehensive tools to compress PDFs into desired sizes.
Review the provided details and learn how to compress PDF file size on Mac in a few taps to have extra storage space. Upon compressing the files, you can handle the PDF content using the best document management tool known as Afirstsoft PDF.
- 100% secure
- 100% secure
- 100% secure


