PDF files play an important role in many professions due to their reliability and constant formatting. On the other hand, images, such as PNG, offer better suitability when it comes to sharing memories on social platforms. So, converting your PDF file into PNG on Mac can be beneficial in many ways, including easy viewing and graphic editing. This conversion process improves accessibility and the sharing process with high quality.
In essence, this conversion not only improves your output quality but also simplifies content usage and secures your information. PNG files are supported across all major websites and image viewers, making them an ideal choice for sharing and displaying images. Throughout this article, we'll be going through how to convert PDFs to PNG on Mac and learning about some helpful PDF to PNG converters.
- 100% secure
- 100% secure
- 100% secure
Part 1. Can You Change a PDF to PNG on Mac?
Yes, we can efficiently change a PDF file to PNG on Mac as it already has a built-in application named “Preview.” This tool allows you to convert your existing file to PNG but with some limitations, as it does not provide advanced features, including batch conversion. Besides, it does not allow you to alter advanced image settings, which eventually compels you to download other applications.
Therefore, it is recommended to utilize third-party software like Afirstsoft PDF, offering versatile methods to customize your file. This tool enables you to edit your PDF before conversion to get the desired visual output. Apart from that, it enables users to alter page ranges instead of converting the whole PDF for a more targeted approach during the process.
Part 2. How to Convert PDF to PNG on Mac with Afirstsoft PDF?
With advanced conversion features and fast processing speed, Afirstsoft PDF is an ideal option for converting PDF to PNG. While using this tool, you can In addition, Mac users can use this software to create high-resolution images without losing their content or formatting. This tool also enables users to utilize more PDF transformation options like JPG, JPEG, and BMP.
Furthermore, you can utilize the Afirstsoft PDF online version to ensure consistent conversion functionality from anywhere without the application being installed. During conversion, this application allows you to adjust the page range and the image quality by optimizing the DPI value. Here are some steps you should follow to convert your PDF file to PNG on Mac through Afirstsoft PDF:
Step1: Download Afirstsoft PDF and Import File for Conversion
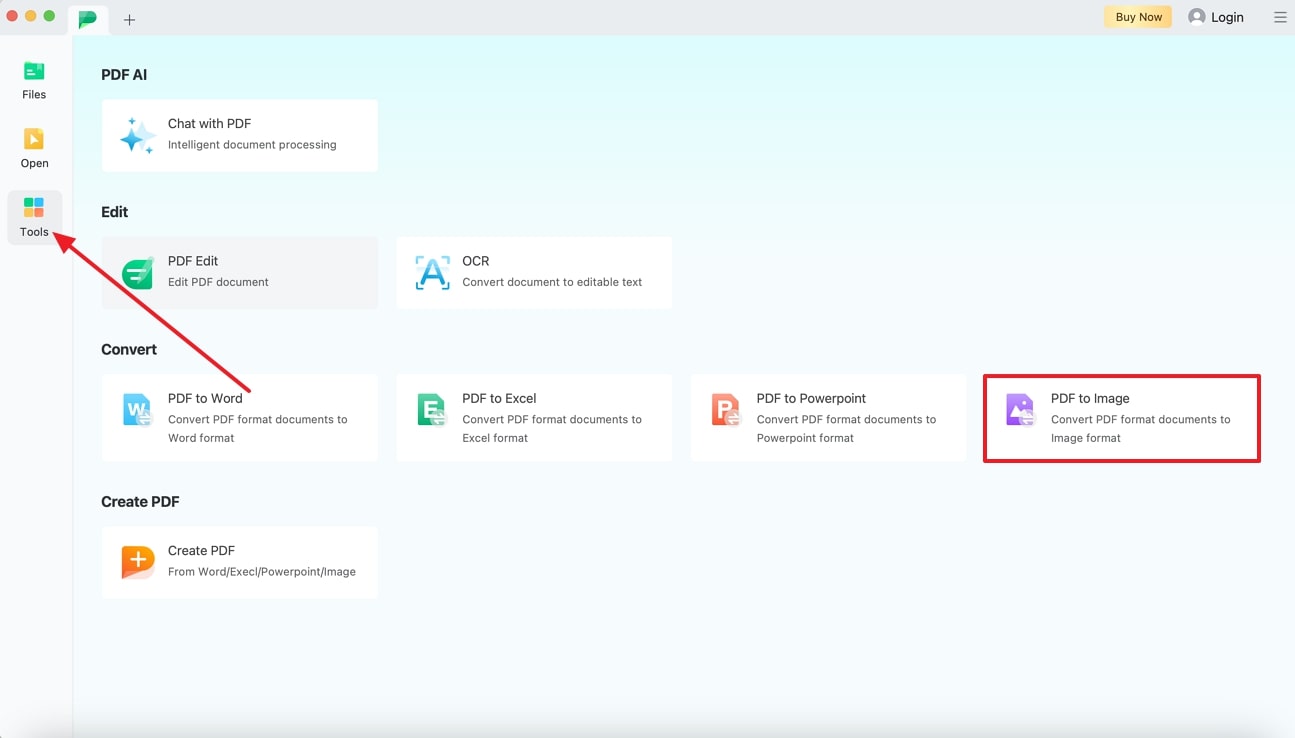
After downloading the Afirstsoft PDF application on your MacBook, launch this tool and expand the "Tool" tab to access a number of features. Now, click on the “PDF to Image” feature to import the file you want to convert using this tool.
Step 2: Adjust Page Range and Output Format
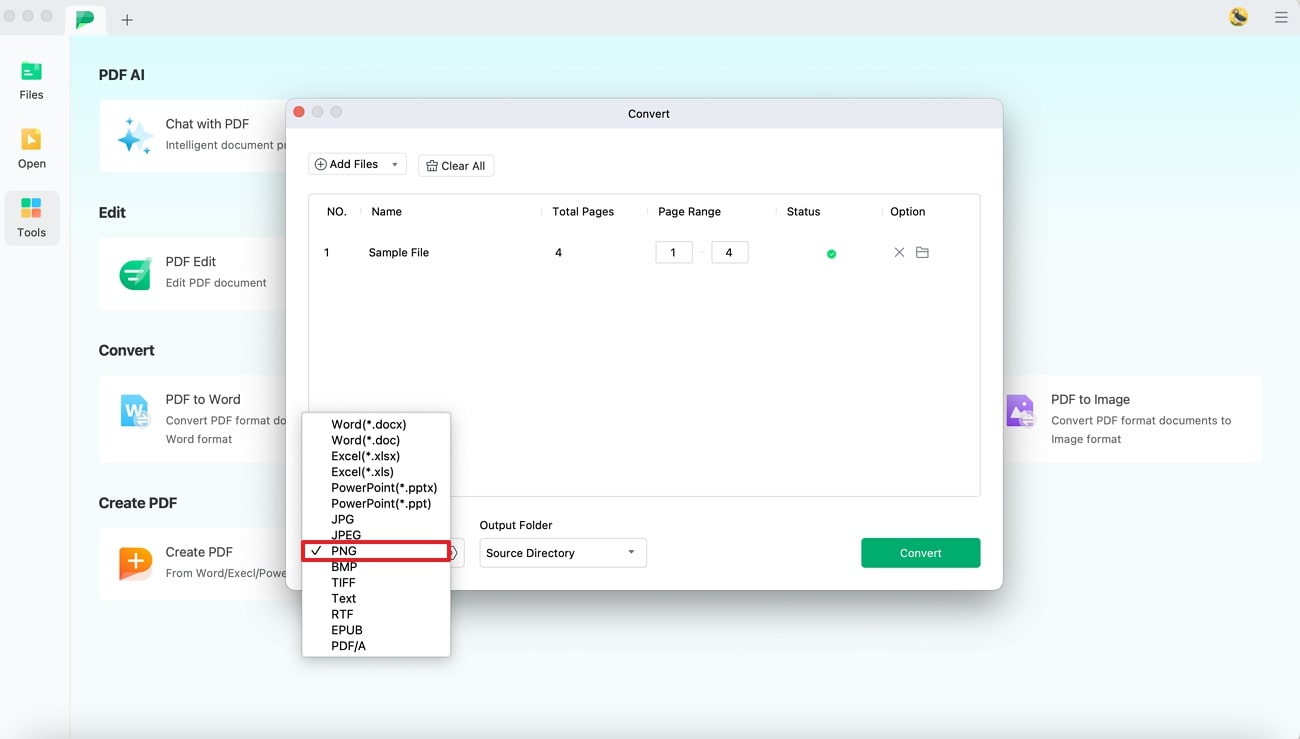
Once your PDF file is imported on Afirstsoft PDF, adjust your page range as per your need and choose “PNG” from the "Output Format" drop-down menu.
Step 3: Set the Image Quality and Convert to PNG
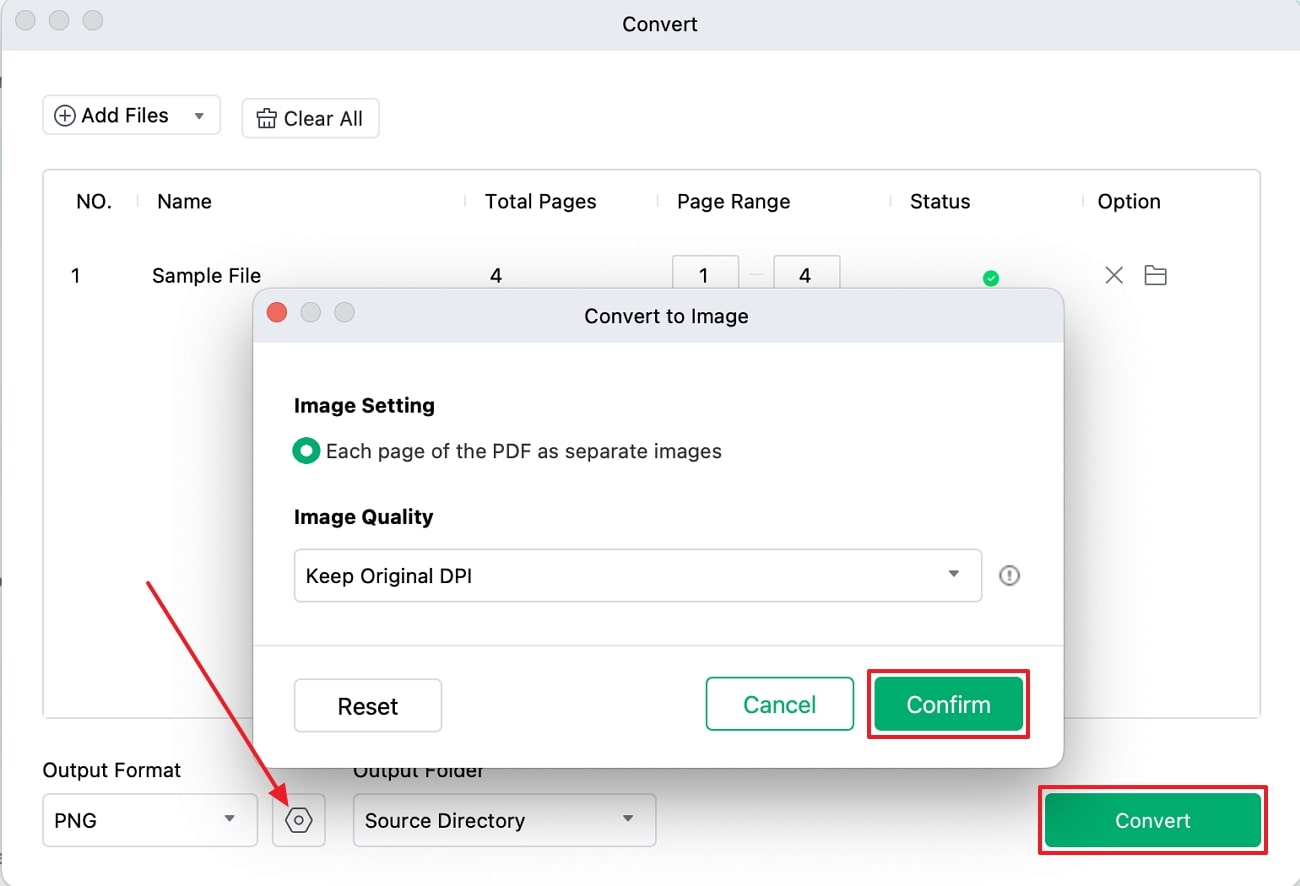
A dialog box named "Convert to Image" will appear after clicking the “Settings” icon. Moving forward, adjust the suitable DPI quality from 72 to 1200 and press "Confirm." Once all changes are made, click the "Convert" button to initiate the conversion process of PDF to PNG on Mac.
Advantages of Using Afirstsoft PDF
- Easy Accessibility:It provides easy access to your documents on various devices, ensuring consistent conversion functionality PDFs from anywhere.
- Smart AI PDF Editor:Before conversion, this tool lets you use AI facility to optimize your workflow and carry out automated proofreading.
- Annotation feature:This feature helps boost readability and improve your image visuality by adding sticky notes, highlighting text, and adding comments.
- Text Editing: Your files can be edited effortlessly by modifying and customizing their appearance with this PDF editor before converting.
- Page Organization: This tool also enables you to organize pages, so you can choose to split a PDF file into multiple parts by page range.
- AI OCR Function: Using the powerful OCR feature, you will be able to convert scanned files into editable and searchable documents.
- 100% secure
- 100% secure
- 100% secure
Part 3. How Do I Turn a PDF into a PNG on a Mac Using Preview?
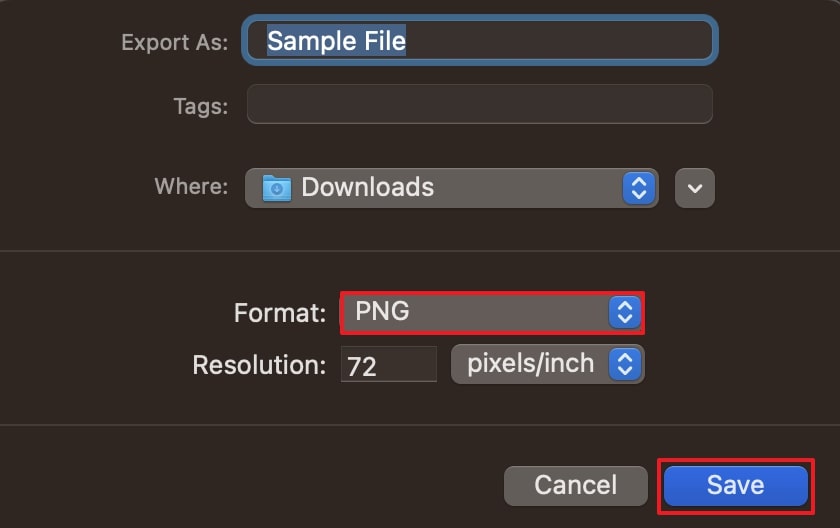
When using a MacBook, users can use built-in tools, such as Preview, to handle PDF conversion tasks. In addition to PNG, this app offers multiple image formats, including TIFF and BMP, for desired conversion. Using its advanced settings, you can even vary the resolution of the image to get the optimal results. To have a better idea of how to convert PDF to PNG on Mac via Preview, follow the steps below:
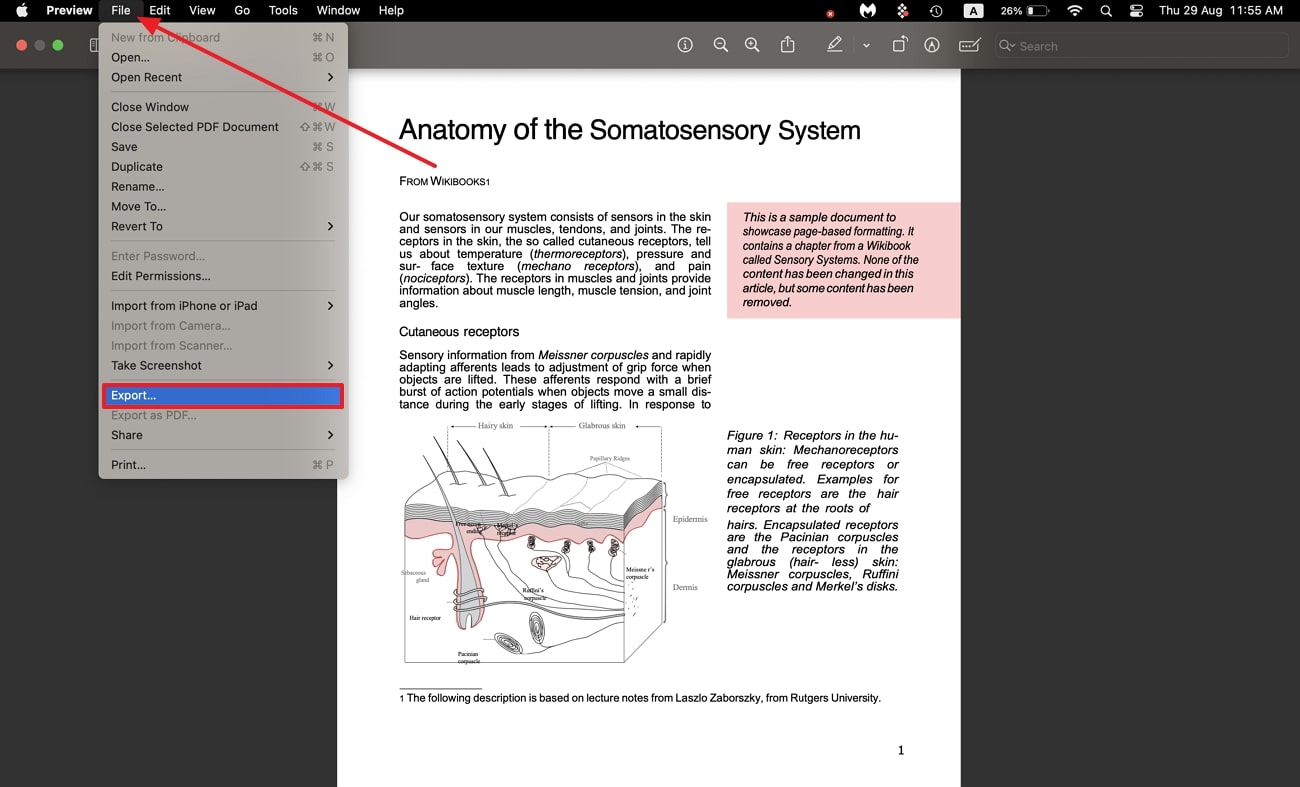
Step 1. Commence this process by opening this built-in application and importing the desired PDF document from the folder. Here, click on the "File" tab, and a drop-down will appear on your screen. Moving forward, press the "Export" option to further access a new dialog box for image conversion.
Step 2. On the pop-up window, select “PNG” as the image format and then set the resolution to achieve your desired image output. Finally, click the "Save" button to convert your file to PNG with saved changes.
Limitations of Preview
- Preview lacks OCR, which means you cannot extract text from scanned documents or images.
- This tool does not allow users to perform batch conversion, so you would need to process each file individually, which can be time-consuming.
- Annotation and editing facilities are available, but they are very limited, which can affect your workflow.
Part 4. Tips for Optimal PDF to PNG Conversion
When converting your file from PDF to PNG, you need to consider some tips for an efficient and effective conversion process. Here are some points that users should analyze while transforming the PDF in order to obtain the best quality outcome.
- Resolution Settings: Changing the image resolution as per your requirement is necessary for a professional outlook. If your PDF contains detailed images, you should set your resolution high to 300 DPI or more while exporting to PNG.
- Text-Clarity: When converting your PDF with text to PNG, make sure that anti-aliasing is enabled. By doing so, you can ensure that your text is more readable and clearer, especially in low resolutions.
- Color Management: If the conversion files contain crucial colors, ensure that color documents are correctly managed. Therefore, we recommend you use the software that supports such profiles to avoid color shifts that occur during PDF to PNG Mac
- Preserve Metadata: In the process of conversion, name your files that clearly reflect your content or the purpose of PNG. Therefore, this process it easier to manage and organize your files later.
- Adjusting File Size: This feature is essential if you are sharing your PNG file via email or optimizing files for web use. However, users need to make sure that they strike the right balance between size and quality while compressing images.
- 100% secure
- 100% secure
- 100% secure
Conclusion
All in all, this article has discussed how to convert PDFs to PNG on Mac, as it allows better accessibility while improving your workflow. Moreover, we have explained how the Mac’s built-in app works for such conversions.
As discussed, Preview is a versatile tool, but it does have some limitations, which can be avoided by simply utilizing Afirstsoft PDF. To use this PDF editor’s advanced features, install it by pressing the “Free Download” button to access more features.


