Converting PDFs to images is a common task that can be done effortlessly on a Mac as it offers numerous advantages to enhance your workflow. Whether you need to convert PDF to JPG for easier sharing or use visuals in presentations, knowing how to convert PDF to JPG on Mac simplifies managing digital content.
This way, you can modify stable PDFs into dynamic JPG images that are versatile and user-friendly for different reasons. Hence, to assist you in converting PDF to JPG on Mac with minimal effort, this article contains a step-by-step guide to ensure you can accomplish this task smoothly. So, go through the details to learn how to maximize the benefits of converting PDFs to JPGs on your Mac.
- 100% secure
- 100% secure
- 100% secure
Part 1. How to Convert a PDF to JPG on Mac with Afirstsoft PDF?
When it comes to the query of how to convert a PDF to a JPG, Afirstsoft PDF stands out with its impressive range of conversion features. This versatile tool can convert files not just into JPGs but also into formats like PPT, Word, Excel, Image, RTF, and EPUB.
Another plus point is that no matter if you're managing a single file or multiple documents, Afirstsoft PDF supports batch processing, reducing all your manual effort of file managing. With numerous image quality options like 120, 150, or original DPI, Afirstsoft PDF allows you to customize the resolution of converted images.
Whether you are handling documents for high-quality print or web use, tailor the image quality to fit your specific needs to ensure optimal clarity and performance.
Simplified Guide to Convert Your PDFs into JPGs using Afirstsoft PDF
Now that you know how efficiently this AI-powered tool handles PDF-to-JPG conversions, follow the guide to convert your PDFs into high-quality JPGs with ease and precision using Afirstsoft PDF.
Step 1. Install Afirstsoft and Import the PDF File
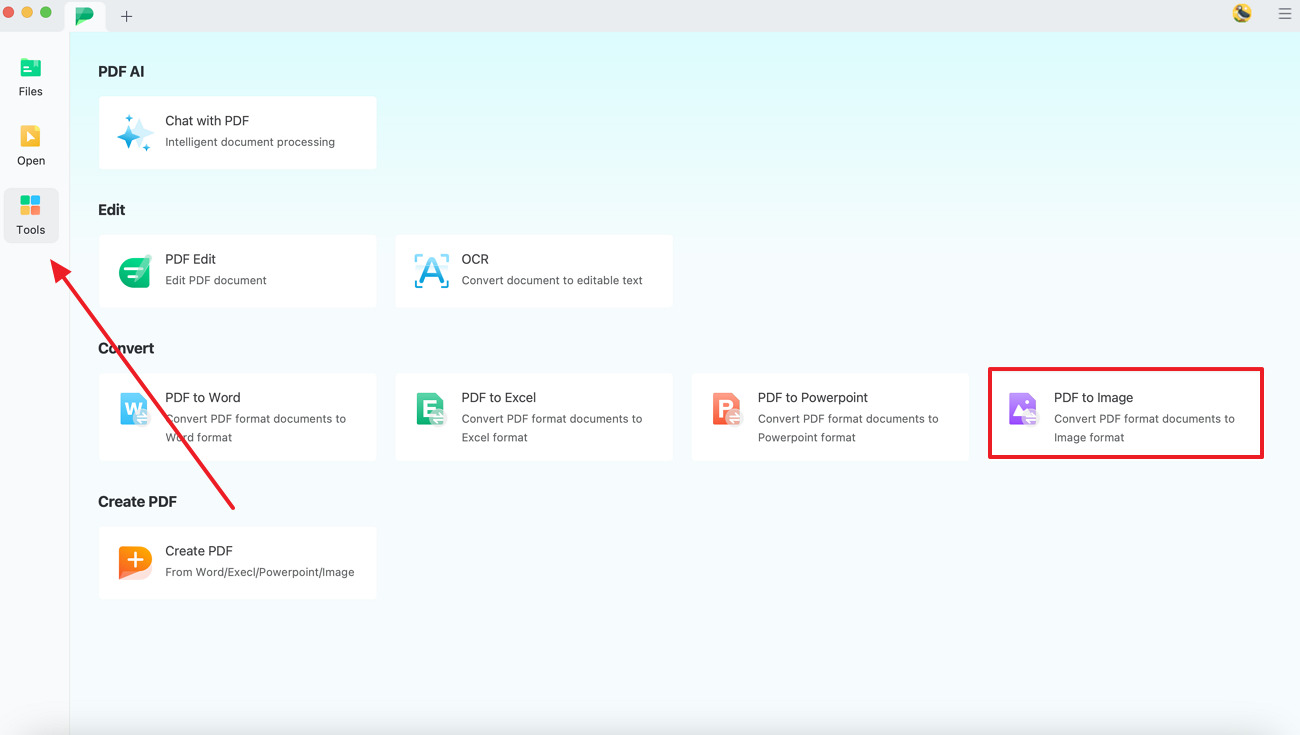
Start by downloading and installing Afirstsoft PDF on your MacBook and tap the “Tools” tab from the left side of the screen. As you access different features, hit the “To Image” button to import file for PDF to JPG conversion.
Step 2. Navigate to Convert Tool and Continue the Conversion
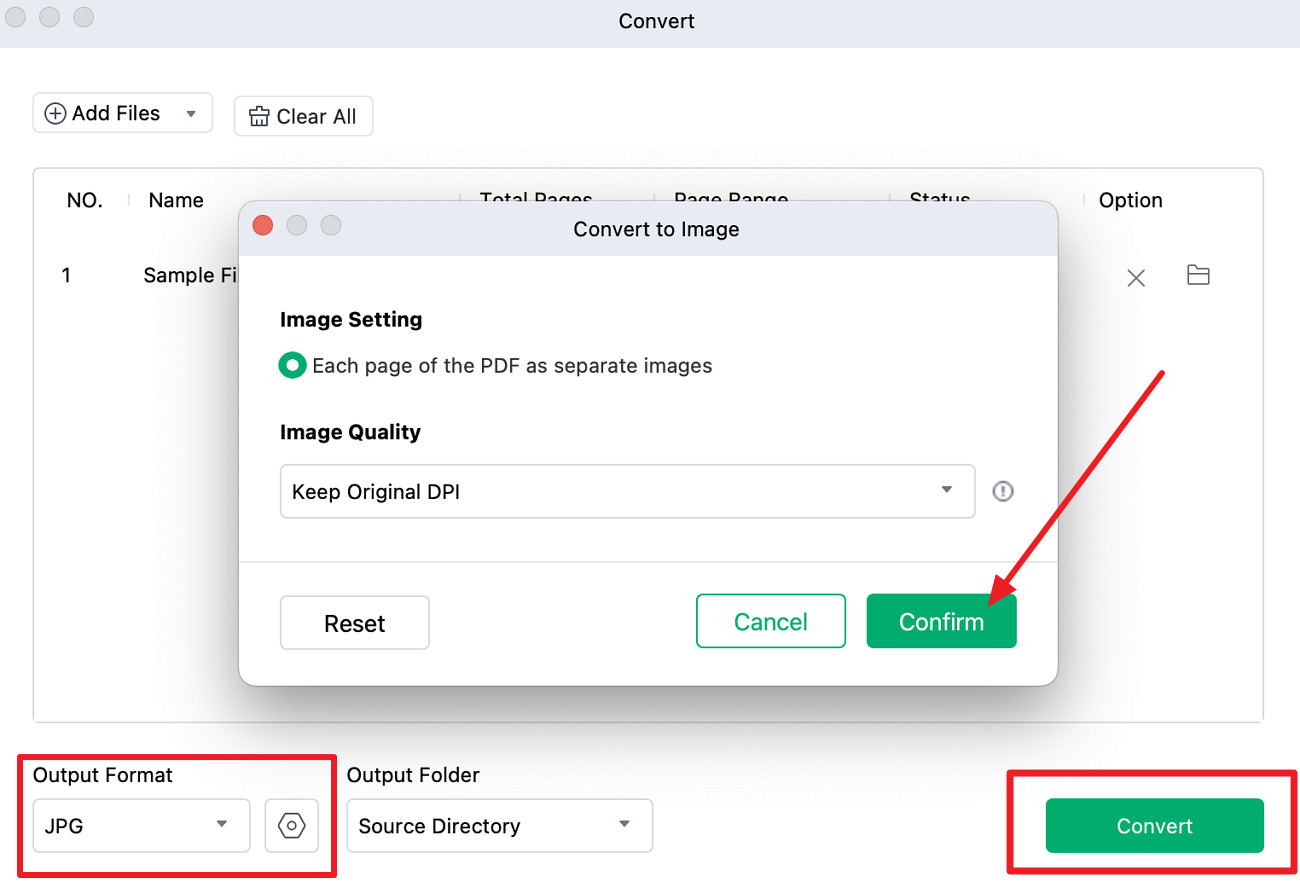
Next, you will reach a pop-up window where you have to pick the page range and output format, such as JPG. For further tailoring, click the “Settings” icon beside the format box and set the image quality before clicking on the “Confirm” option. Head back to the previous window and press the "Convert” button, after which your PDF file will be transformed into JPG.
Other Key Features
- Annotate PDF: For effective collaboration and note-taking, users can effortlessly annotate their PDFs by highlighting or adding comments, directly from the files. Doing so allows them to review and add reference points in the file to enhance the emphasis of the document.
- Edit Files: Afirstsoft PDF enables you to easily edit your files by providing tools to modify text and layout to ensure that all your documents are perfectly tailored. Alongside that, you can also insert and edit images in the content to enhance the user's engagement.
- Batch Processing:With its batch processing feature, one can convert or edit multiple files simultaneously to save time and enhance productivity for large-scale projects. With this, you can save the manual effort of converting and editing one file at a time, improving productivity and workflow.
- AI Features: Leveraging AI features, Afirstsoft PDF empowers users to automate repetitive tasks like proofreading and summarization to make file management smarter. Its AI assistant is assured of correcting grammatical errors while converting baffling details into bite-size details for improved comprehension.
- Create PDF: You can also create PDFs from various file formats with just a few clicks, ensuring that all your documents are easily shareable and professionally formatted. One can also try to insert files and images in their document to generate new files in real-time.
Part 2. How to Turn PDF into JPG on Mac Using Preview?
To learn how to turn PDF into JPG on Mac, explore Preview as another convenient method that is available. As a built-in macOS app, Preview offers a user-friendly interface that allows you to transform your PDFs into JPGs, taking the hassle of installing additional software. Additionally, Preview's straightforward conversion supports an array of formats like TIFF, HEIC, and EXR, making it a versatile tool for handling various image types beyond just JPGs.
Furthermore, users can set the resolution and pixels as per their needs to improve the image quality for professional presentations, high-quality prints, or web content. So, while ensuring that anyone can manage their document conversions with ease, here is the step-by-step guide to convert files effortlessly:
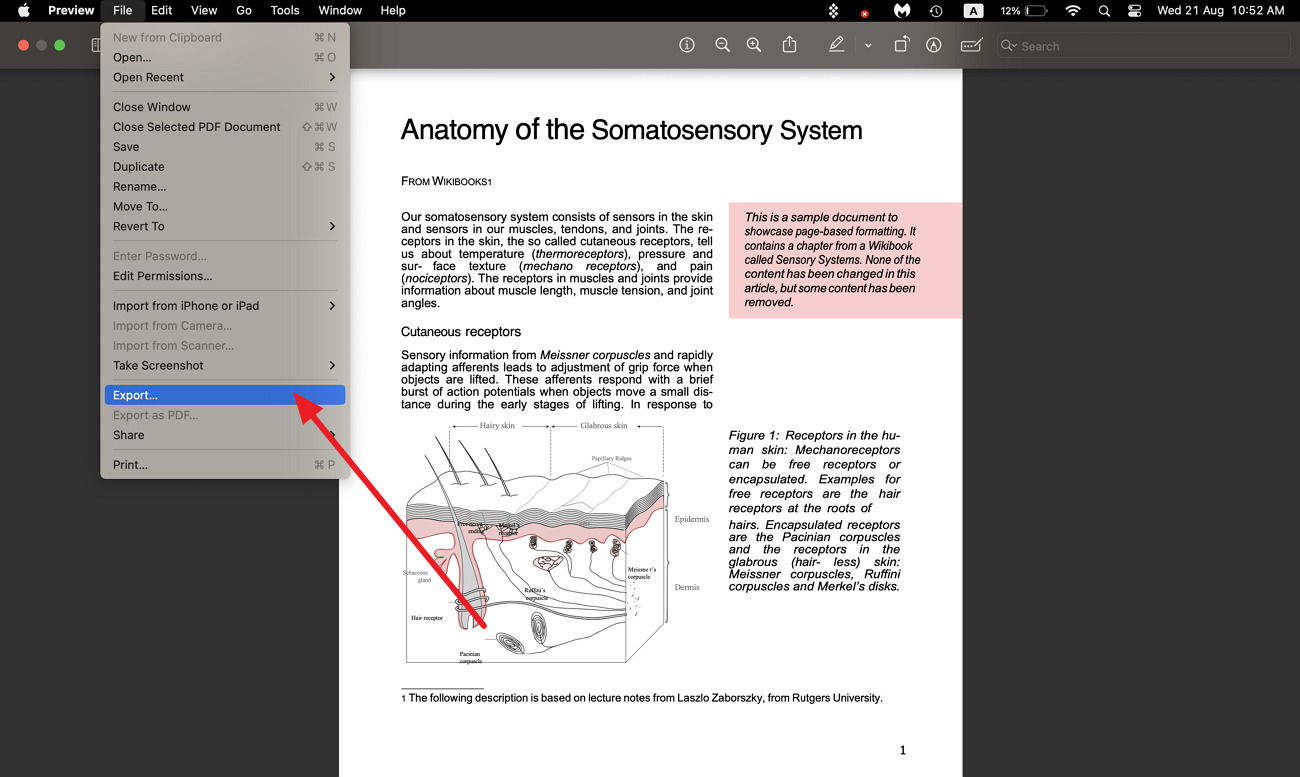
Step 1. Initiate PDF to JPG conversion by importing the file in Preview app to generate appealing and accessible visuals. After your file is opened, click on the “File” tab from top of the window and hit the “Export” option for further modification.
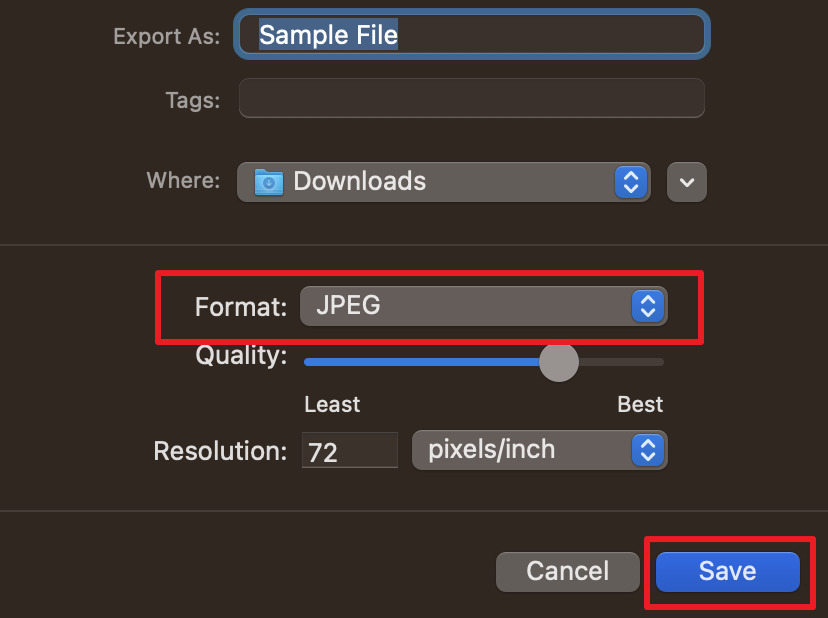
Step 2. Moving on to the settings pop-up, choose “JPEG” as the intended format and tailor the quality as per your preferences. Set the resolution and pixels of the portraits and click on the “Save” button to share your images effortlessly.
Part 3. How to Change PDF to JPG on Mac with Online Tools?
Online tools have revolutionized the way we handle document conversions, offering quick and accessible solutions from any device with an internet connection. Among these, Smallpdf stands out as a reliable option to know how to convert PDF to JPG on Mac while providing fast conversion speeds. With no need for software installation, this tool allows users to easily transform PDFs into JPGs, making it a go-to tool.
Though online tools are accessible, they often have limitations in file size, quality, and privacy, so Afirstsoft PDF offers a secure solution without these concerns. So, whether you're converting a single file or multiple documents, Smallpdf handles the task while bearing these concerns. Now that you're familiar with this powerful online tool, go through the stepwise guide below to convert your PDFs to JPGs:
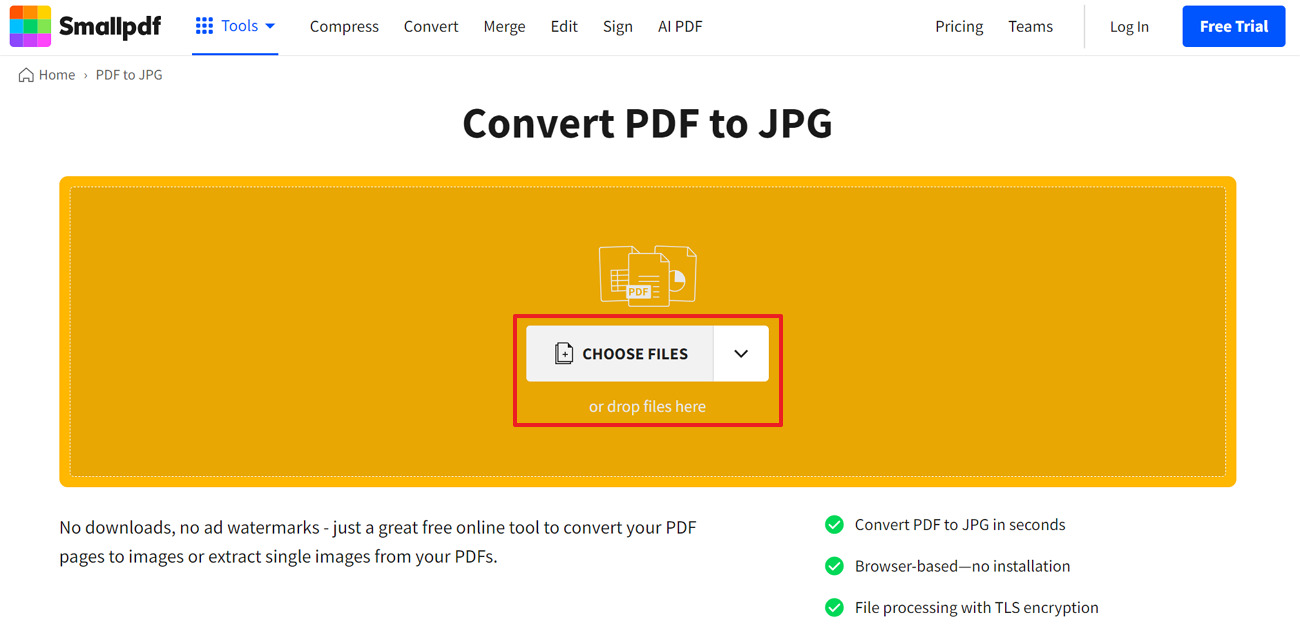
Step 1. Access the PDF to JPG page on Smallpdf and click the “Select Files” option e to start the process. From the dropdown options, you can select if you want to fetch the PDF from Drive, Dropbox or from your device for imported accessibility.
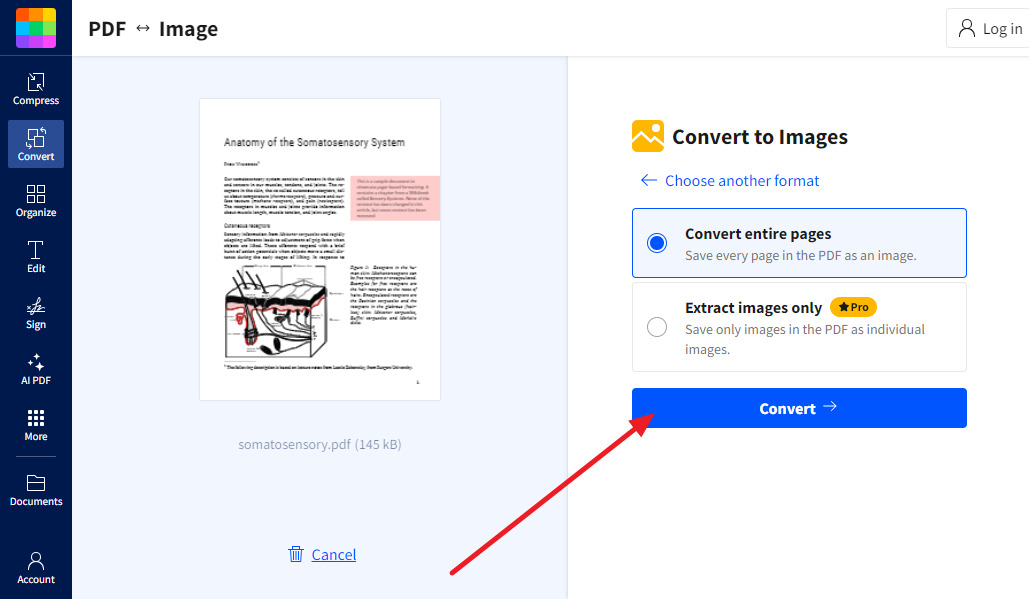
Step 2. Once the file is there, you will get two options on the right side of the screen: “Convert Entire Page” or “Extract Image Only.” As per your needs, select the entire page option or choose extract image if you are premium users. No matter the choice you made, finally, hit the “Convert” button to transform your file from PDF to JPG.
Part 4. How to Batch Convert PDF to JPG on Mac with Adobe?
Now that you know how to change PDF to JPG on Mac with various approaches, you can take your conversion process to the next level with Adobe Acrobat. This revolutionary tool supports batch conversion capabilities that allow you to convert multiple PDFs into JPGs with ease and precision.
Furthermore, Adobe ensures high-quality results with advanced image quality options, including resolution, to ensure that the final product aligns with your requirements. Plus, its adjustment tools include crop, resizing, and optimizing to perfect your JPGs after conversion. Below, you'll find a step-by-step guide to batch converting PDFs to JPGs on your Mac using Adobe so you can streamline your workflow effortlessly.
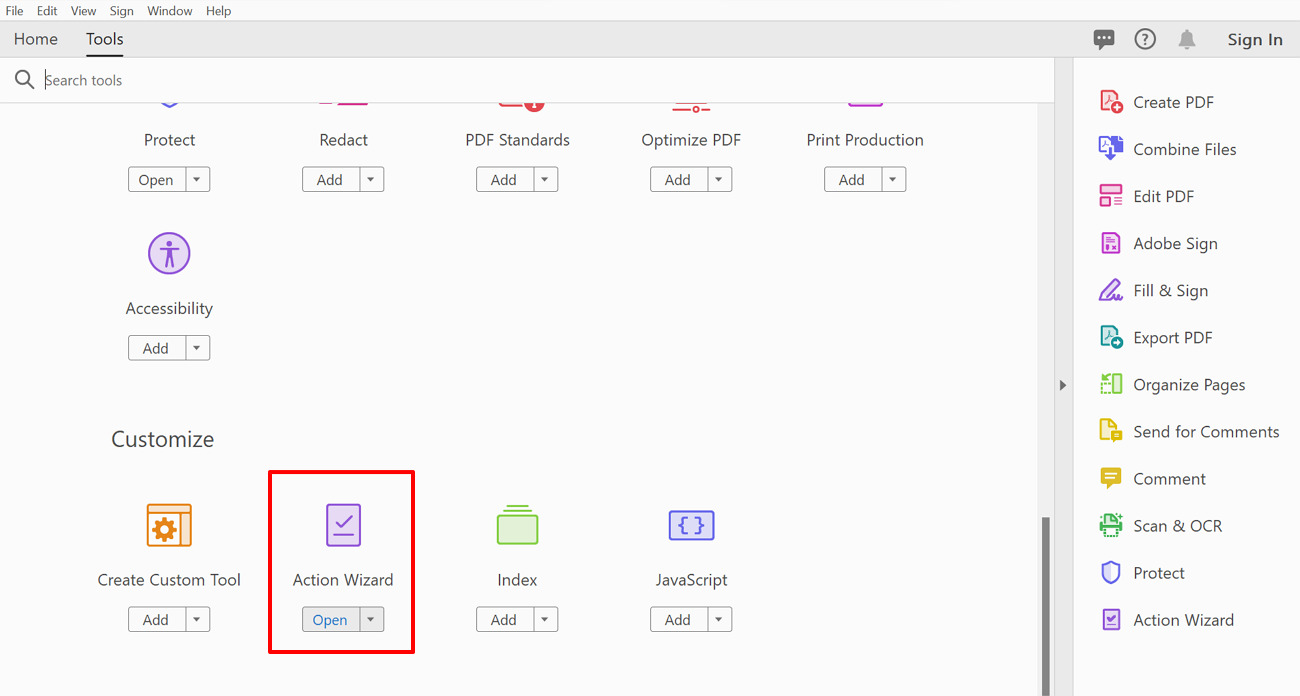
Step 1. To begin with, launch Adobe Acrobat on your Mac and locate the “Action Wizard” feature by accessing the “Tools” tab. As you click the “Open” button beneath the feature, open the files you want to convert into JPEG.
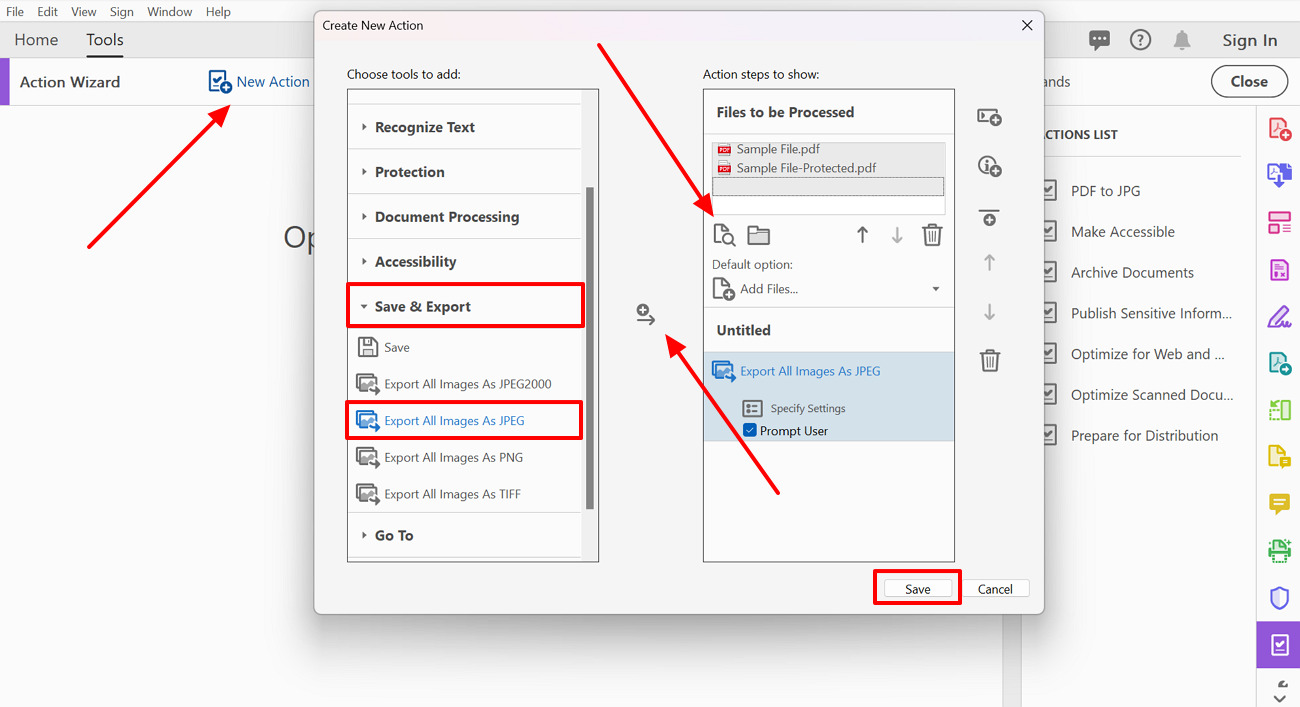
Step 2. Continue on the new window where you have to click the “New Action” option to open a new dialog box. There, tap the “Save and Export” tab and then “Export All Images as JPEG” to process the conversion procedure.
Within the "Files to be Processed" box, hit the "Add Files" icon and import all the files you want to convert. Moving on, hit the "Add to Right-Hand Pane" icon and press the "Save" button to add this batch conversion action within this converter.
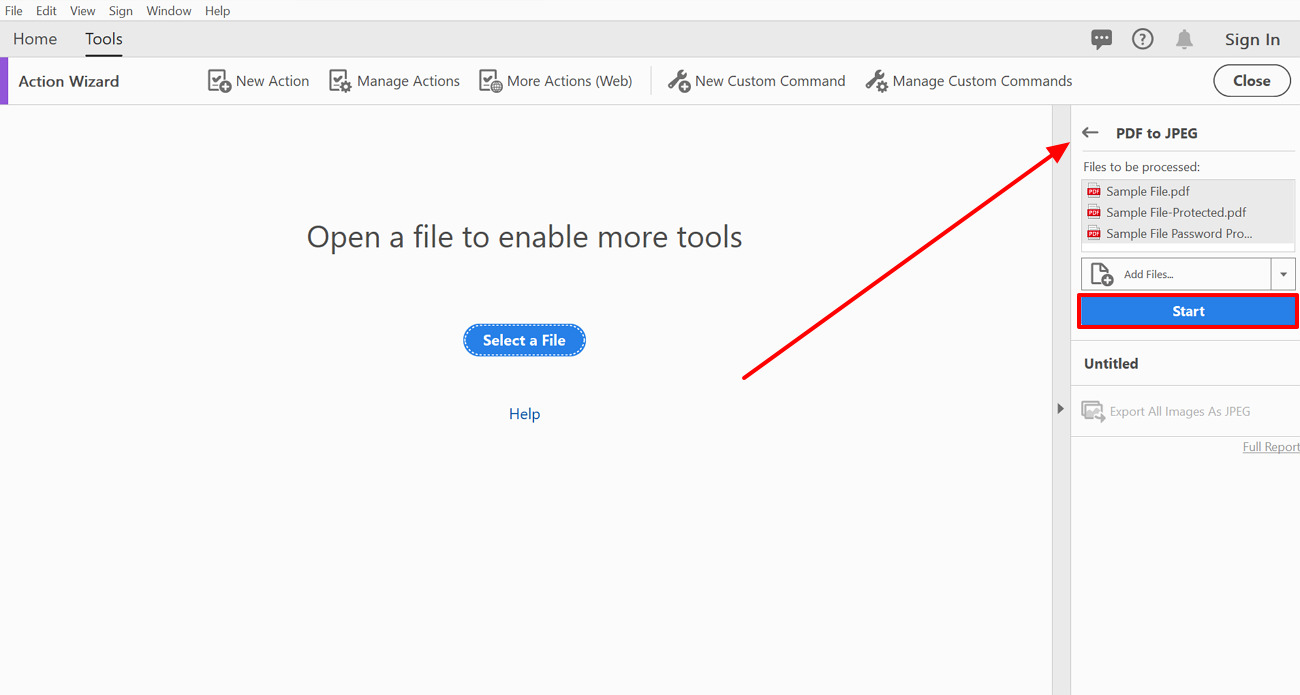
Step 3. Then, access the PDF to JPG batch conversion action from the right-side panel and click on the “Start” button to start converting each added file into JPEG.
Conclusion
In conclusion, mastering how to convert a PDF to a JPG on a Mac opens up new possibilities for managing and sharing your documents effectively. Among the various options available, Afirstsoft PDF stands out as the best tool to handle this task with exceptional ease and versatility. Whether you need to convert files individually or in batches, Afirstsoft PDF ensures high-quality results and a seamless experience for all your conversion needs.
- 100% secure
- 100% secure
- 100% secure


