There could be many times when you stumble upon a PDF that you want to download on your iPad and view it whenever you get free time afterward.
If you don't know the process, we'll walk you through the simple steps on how to save PDF documents on your iPad from different sources.
- 100% secure
- 100% secure
- 100% secure
Part 1. How To Save PDF Documents on iPad Online
Your iPad is your digital backpack. Whenever you are browsing and find a valuable PDF file, here is how you can save it on your device:
- Open Safari on your iPad (from the Home Screen or App Library) and go to the web page from where you want to save the PDF.
- Tap to open the PDF in the browser.
- Tap Share (a square with an upward arrow) in the top toolbar.
- Scroll down the Share menu and choose Save to Files.
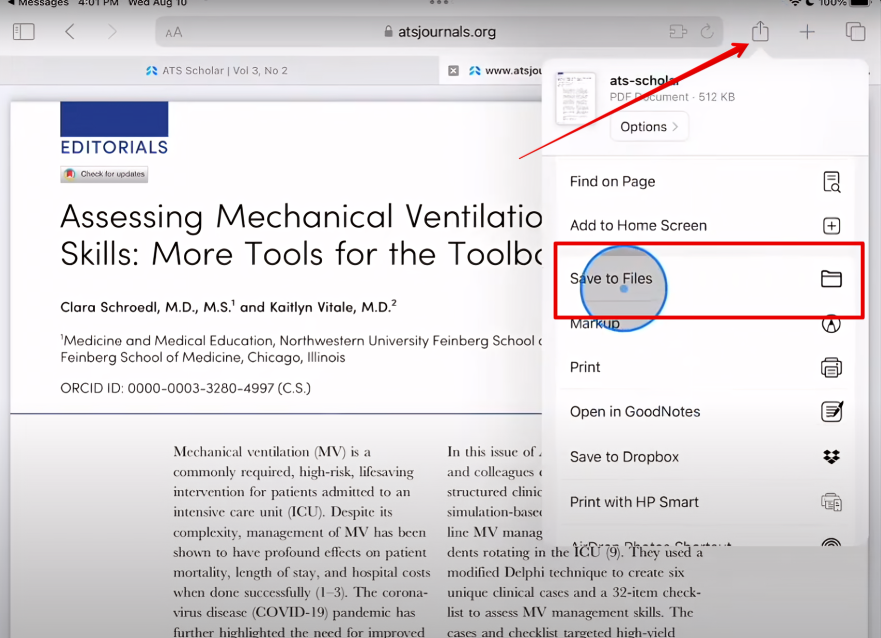
- Select the folder where you want to save the PDF and tap Save.
Now, you can access it anytime through the Files app on your iPad.
Part 2. How To Save PDF Files on iPad Using Email Attachments
Have you received a PDF via email on your iPad but don’t know how to save it? Here are the easy steps for this process:
- Open the Mail app from the Home screen or App Library on your iPad.
- Find and open the email with the PDF attachment in the inbox.
- Tap & hold the PDF in the email and select Share. Alternatively, tap on the attachment to see it preview and tap Share.
- Choose Save to Files from the Share menu and choose where you want to store the PDF - either on your iPad or in iCloud Drive.
- Select Save.
- Otherwise, select Notes or Books and tap Save to confirm and save the PDF file.
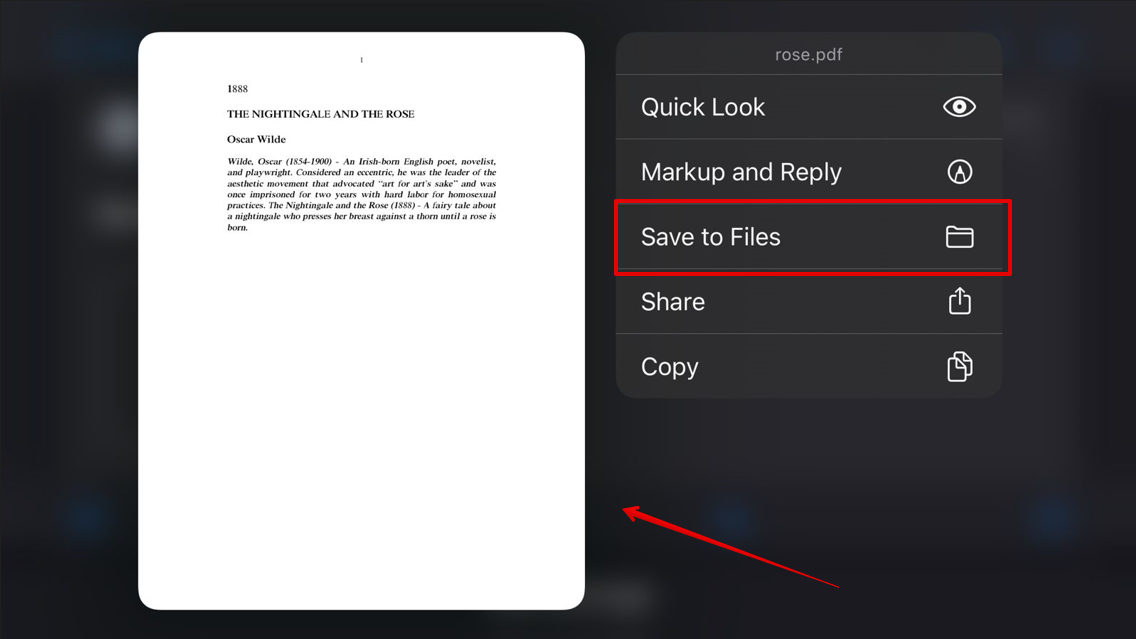
You can access the file later through the Files, Books, or Notes app on your iPad.
Part 3. How To Save PDF Files on iPad with Third-Party Apps
If you frequently manage PDF documents on your iPad, you may want to save them to Cloud services (Google Drive, Dropbox, or OneDrive) to easily share them across different devices.
Here’s how to save PDF documents on iPad using these apps:
- Open the App Store.
- Download & open Google Drive, Dropbox, or your preferred Cloud app.
- Sign in with your account.
- Next, open the PDF from your email in the Mail app or web browser.
- Tap the Share icon.
- Choose the downloaded cloud service, i.e., Copy to Drive, from the share menu.
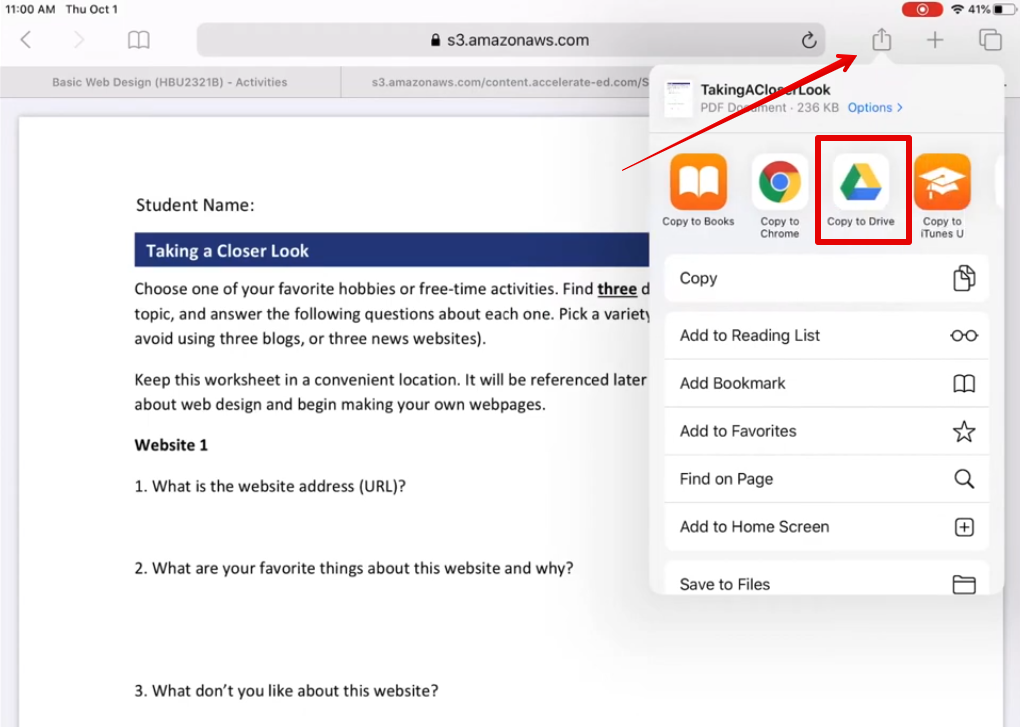
- Tap Save or Upload to confirm and save the PDF.
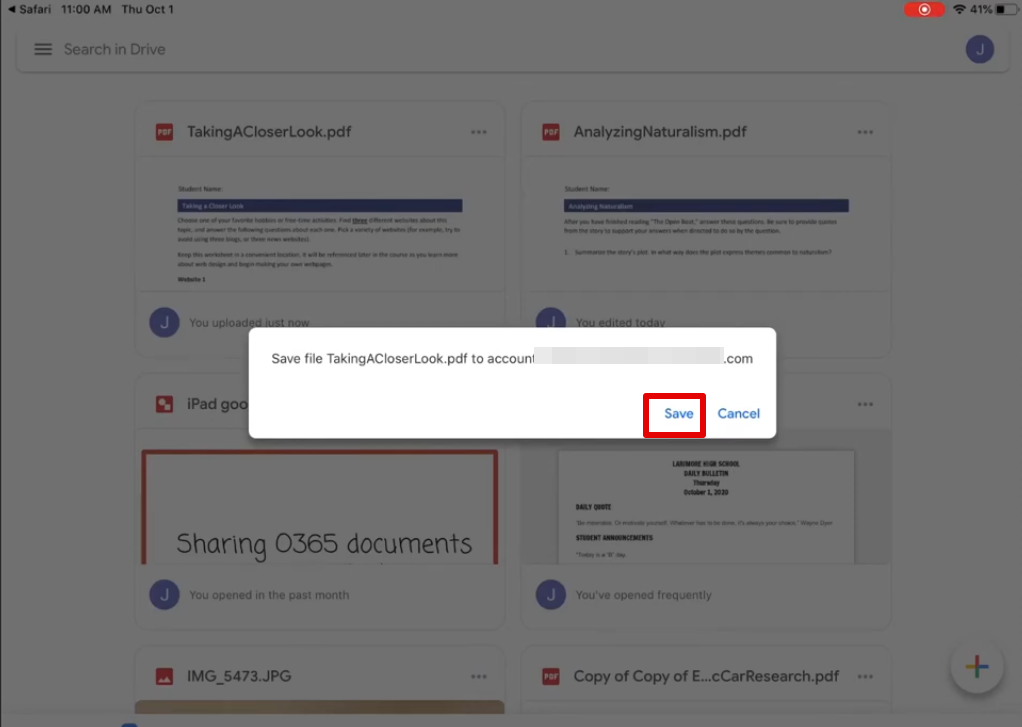
In case you want to save a PDF from the Drive to your iPad, open the app, locate the PDF, tap the three dots next to it and choose Download to export the PDF to your iPad.
You can also tap Make Available Offline to access the file in the Drive when your iPad is not connected to the internet.
Part 4. How To Save a Pages Document to PDF File on iPad
Pages is a word processor app by Apple that helps you create any kind of document on your Mac, iPad, or iPhone. But sometimes, you may need to save the file from the app to your iPad in PDF format and wonder how to do this.
So, here are the steps:
- Open the Pages app on your iPad (from App Library or Home screen).
- Locate and open the document you want to save to your iPad.
- Tap ••• (top right corner of the screen).
- Choose Export.
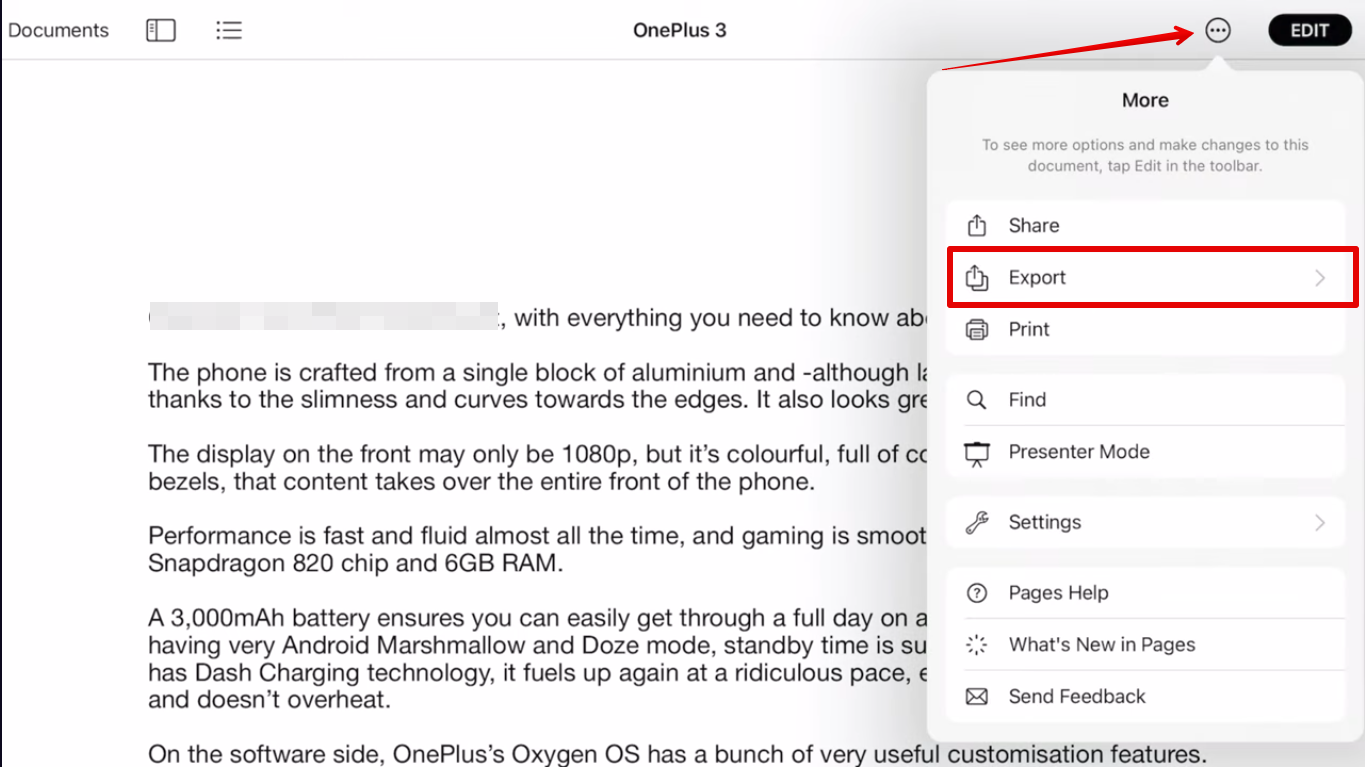
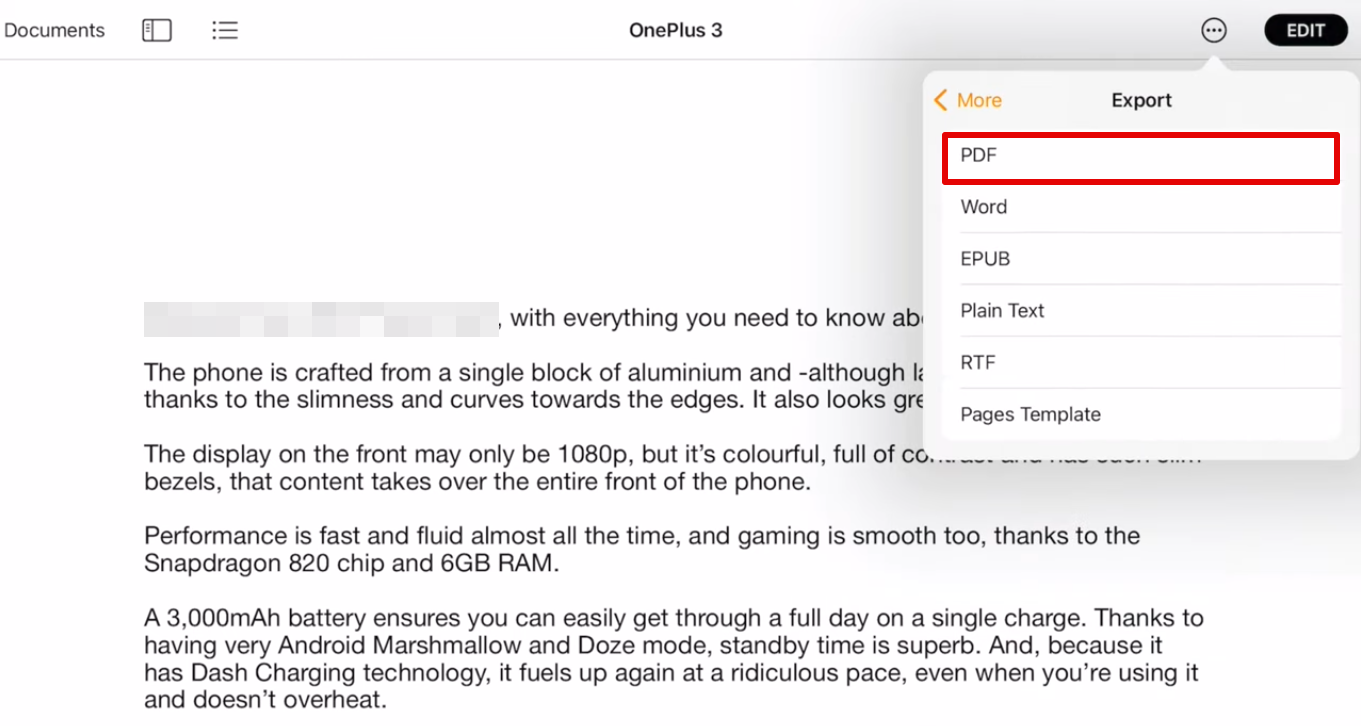
- Select PDF from the export options.
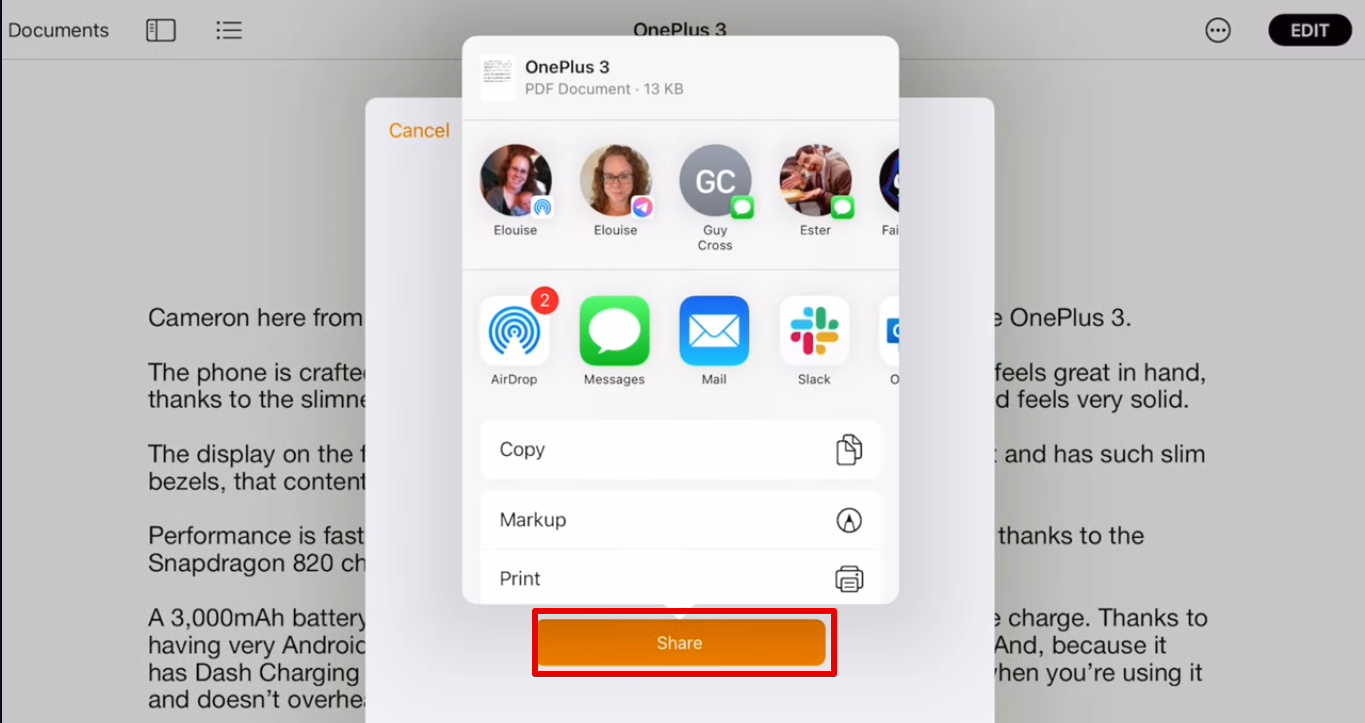
- Tap Share, select the Save to Files, Notes, or Book app to save the PDF on your iPad, and that’s all about it.
Part 5. How To Save Word Document as PDF on iPad
Afirstsoft PDF is a simple-to-use iOS app to quickly convert your Word documents into PDF, format & annotate them, and save them to your iPad.
Let’s explore the steps on how to save Word document as PDF on iPad using Afirstsoft PDF:
Step 1. Install Afirstsoft PDF on iPad
Open the App Store on your iPad, go to the Search tab, and find the Afirstsoft PDF. Then, tap Get and provide your fingerprint or Apple ID passcode to authorize the app installation.
Step 2: Create a Blank PDF
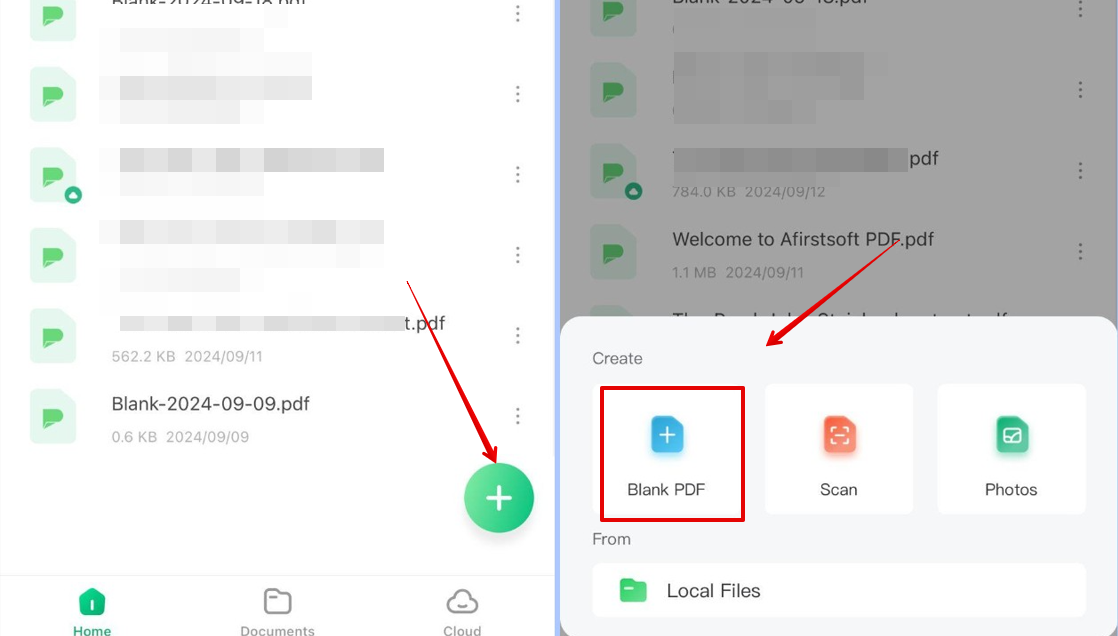
Next, open Afirstsoft PDF on your iPad and sign in to your account. Tap + in the bottom right corner of the screen and choose Blank PDF from the menu to create a PDF file.
Tap Edit from the bottom navigation menu, select Add Text, and tap anywhere on the blank PDF page to add a text box.
Step 3: Copy/Paste Word Document
Open the Word document on your iPad, touch and hold the page, drag the cursor to select the content of the first page, and tap Copy (pop-up menu).
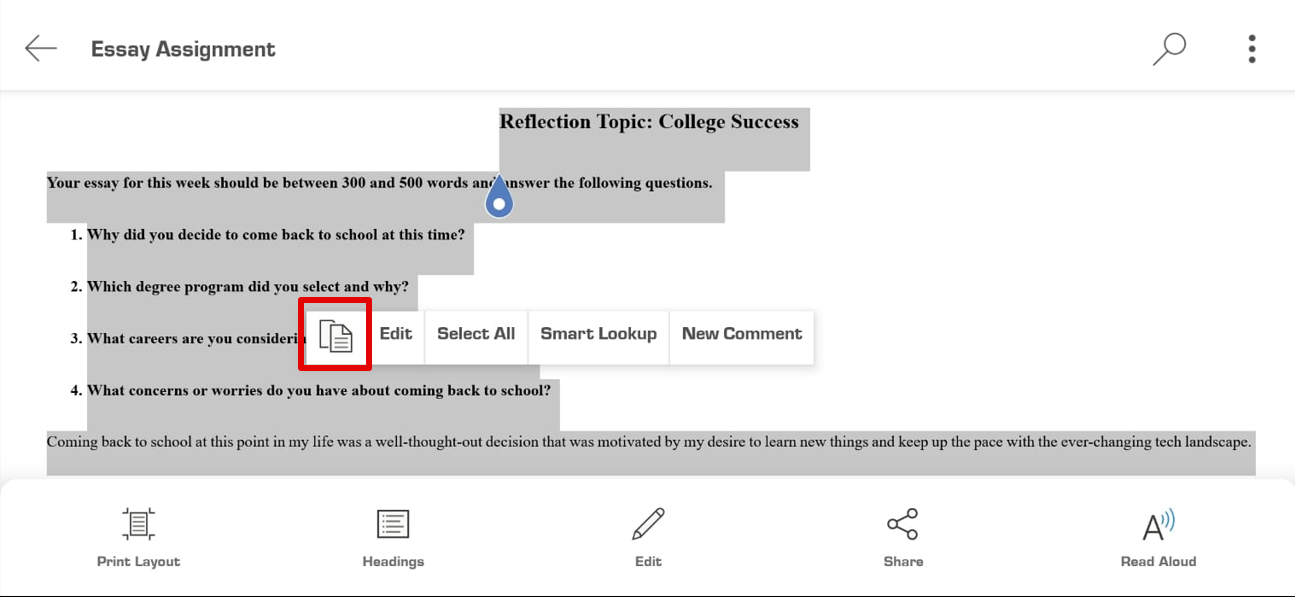
Now, go back to Afirstsoft PDF and paste the copied Word document content in the text box. Repeat the steps until you copy and paste all the content to the PDF.
Step 4: Format the PDF
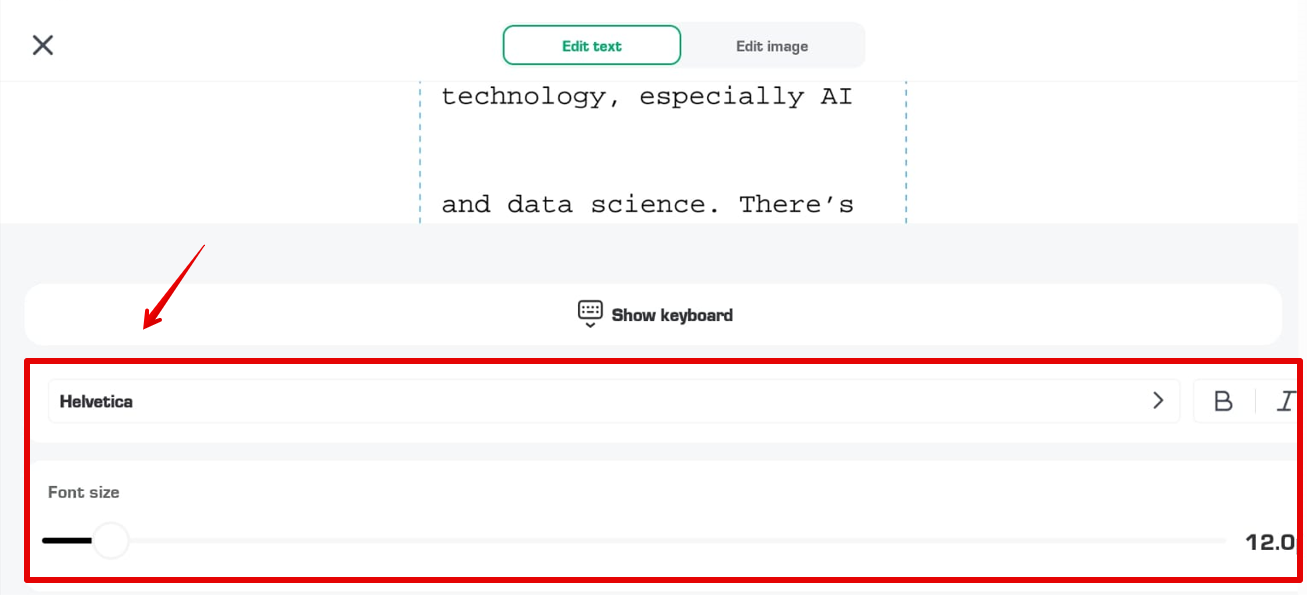
Select the text boxes one by one, and drag them to position correctly on the page. Then, select text boxes again, tap Select All from the pop-up menu, and choose the Font Style/Size option above the keyboard.
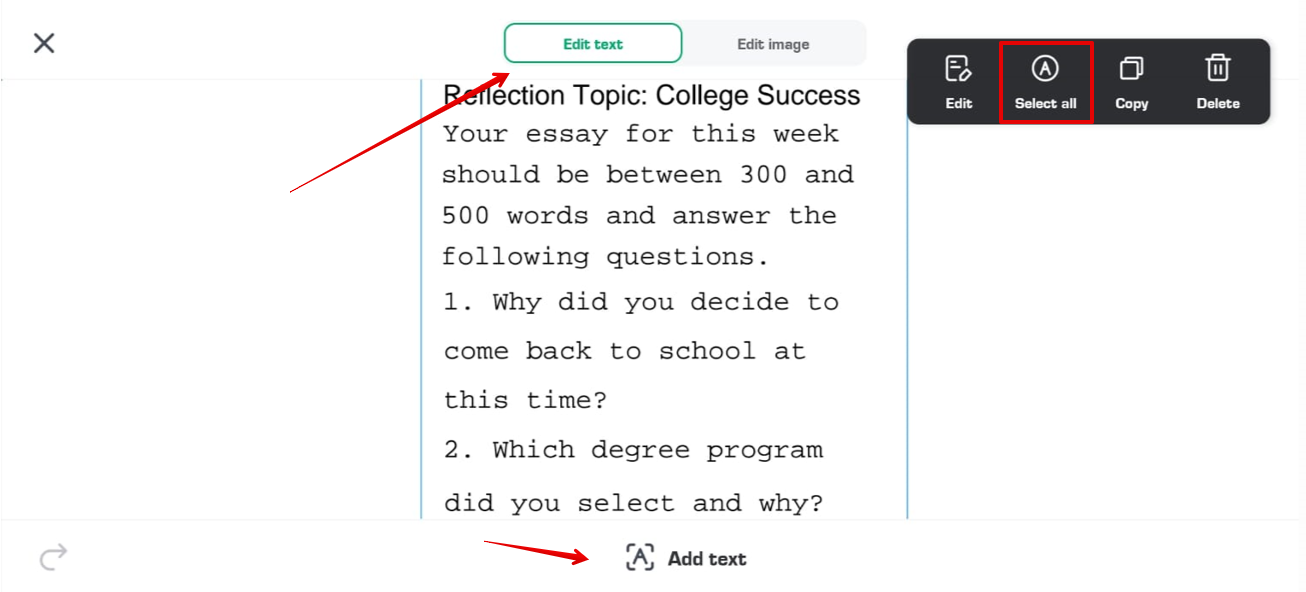
Tap the Font Style option, select the style that was applied in the Word Document, and drag the slider to set the text size.
After that, choose the color you prefer from the presets to apply to the text, or tap the Custom Color menu and select a custom shade.
You can also bold or italicize any text from this menu and tap Done to save your changes.
Step 5: Add Images
If your Word document has any images, take screenshots of them using the Home/Power+Volume Up buttons on your iPad.
Then, go to the Edit Image tab under the Edit menu in Afirstsoft, drag your cursor to the location where you want to add the pictures and tap Add Image (at the bottom of the screen). Tap Select From Photos and choose the image to upload to the PDF.
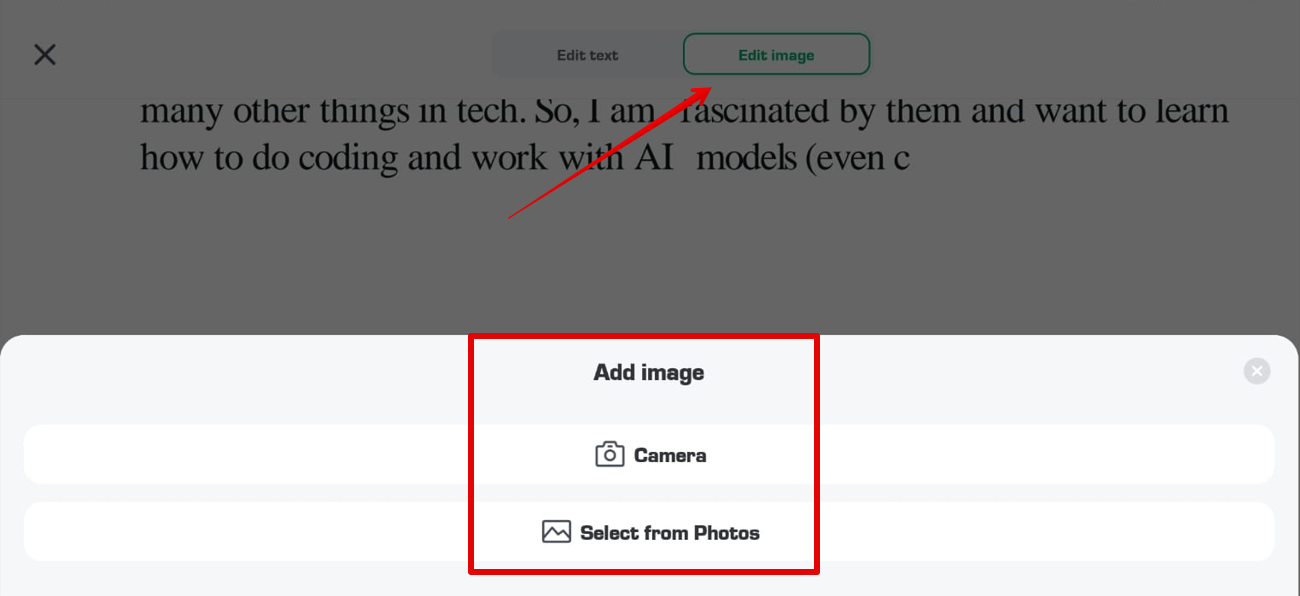
Next, tap the image and choose Crop to remove unnecessary parts, or tap Rotate to set the orientation.
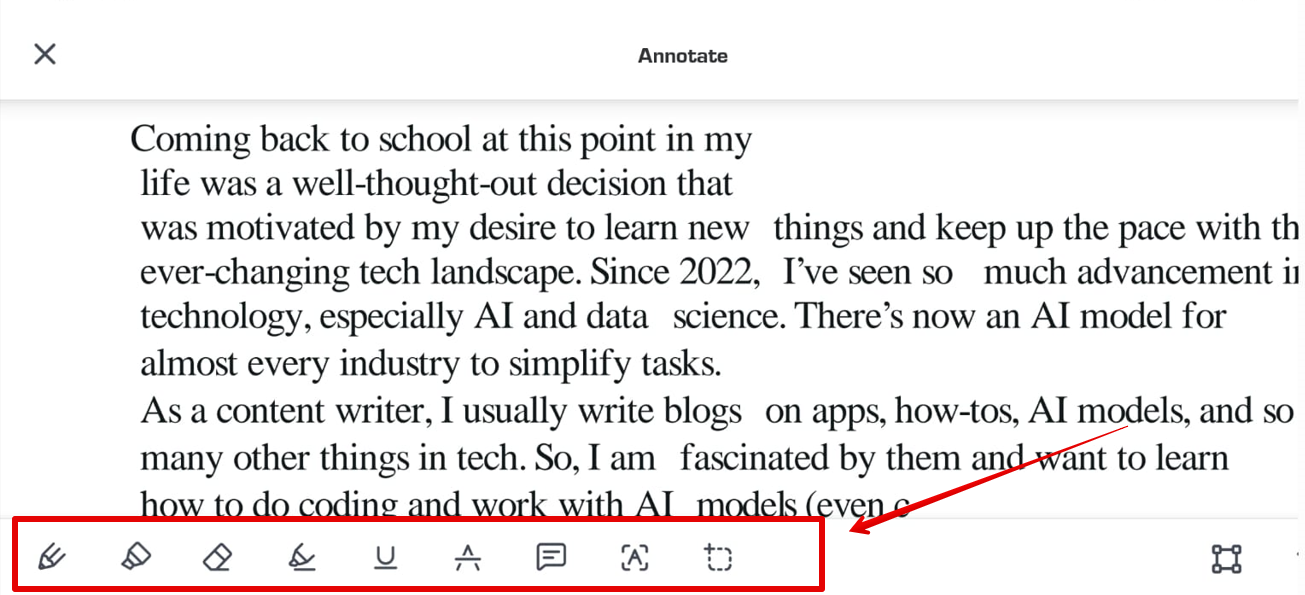
Step 6: Annotate the PDF
If you want to highlight content or add your suggestions, tap Annotate. Now, select the text on the file and choose Highlight, Underline, or Strikethrough. You can also select Area Highlighting and select a passage to highlight it.
To change the color, simply select the drop-down arrow next to each markup and choose the shade you like.
If you want to add something more to the PDF, tap Text or Notes, type in your suggestions, and tap Done to attach them.
Step 7: Save the PDF to iPad
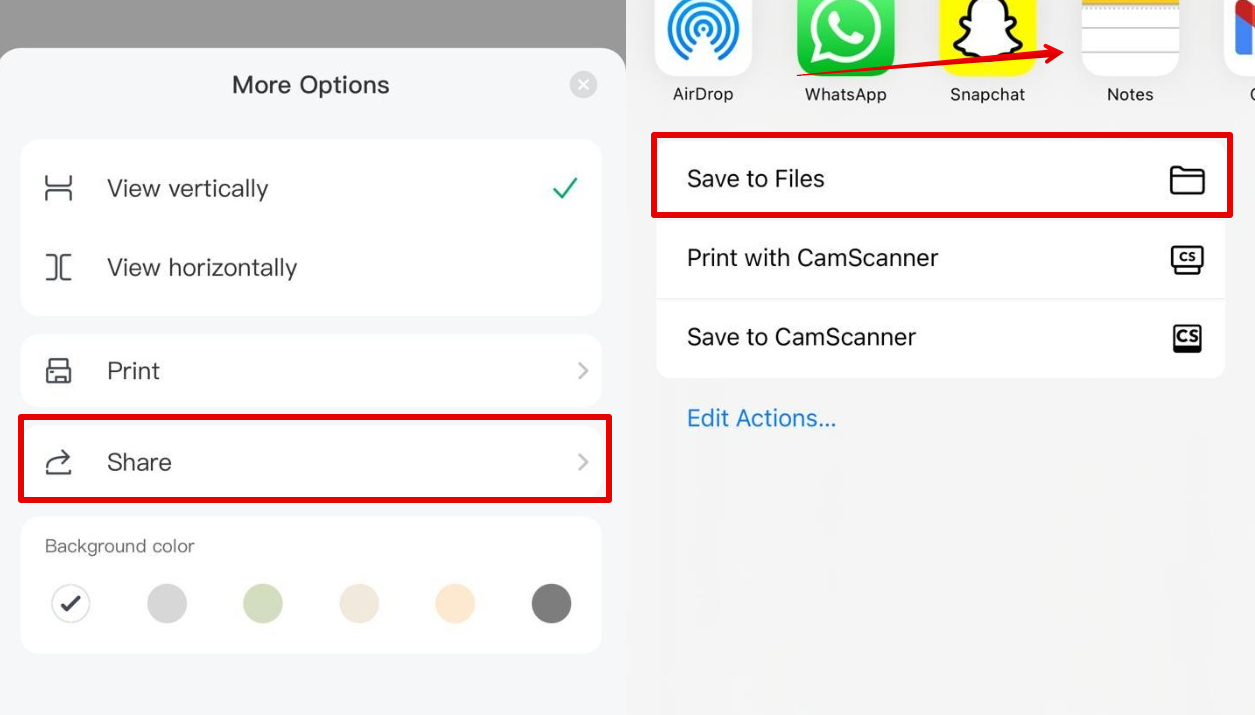
Finally, tap the three dots, choose Share, and select Save to Files. Pick a folder and tap Save to save the PDF to your iPad. You can also export the PDF to the Notes or Books app on your iPad from the share menu.
Part 6. FAQs Related to Saving PDF Documents on iPad
Where do PDF downloads go on an iPad?
Unlike Chrome, Safari does not directly download the PDF files on your iPad when you click their links. Instead, the browser allows you to share and save the file in your desired folder in the Files app on your iPad. You can also download the PDF to the built-in Notes or Pages app on your device.
How to save doc as PDF on iPad?
Install and open Afirstsoft PDF on your iPad, tap +, and choose Blank PDF. Select Edit, choose Add Text under the Edit Text tab, and tap on the blank page to add a text box. Copy the content of the doc and paste it in the text box. Set the font style & color, and add images to the file through the Edit Image menu. Then, tap Annotate, select the text, and choose Highlight, Underline, or Strikethrough to markup the content. Finally, tap the three dots, select Share, and choose Save to Files to save the PDF on your iPad.
Part 7. Conclusion
To sum things up, you’ve explored how to save PDF documents on iPad with step-by-step instructions.If you want ease of use and convenience in formatting, annotating, and saving PDFs on your iPad, Afirstsoft PDF for iOS is by far the best choice.So, install Afirstsoft PDF now, and manage your files without much hassle!
- 100% secure
- 100% secure
- 100% secure


