PDFs play an important role in professional life as we utilize them for documentation preservation, managing data, and many more. However, if you convert PDF to image on Mac, it displays a whole array of benefits in various fields, including media and businesses. The conversion process of PDF to the image makes it easier to embed the document content in videos, presentations, and other files.
Additionally, image formats can be shared on various platforms that don’t support PDF viewing, thus ensuring easy usage. Whether it’s for improving one’s workflow efficiency, visual presentations, or ensuring compatibility, converting PDF to image Mac is used by many professionals in different contexts. In this article, we’ll go through various effective methods on how to convert PDFs to images on Mac and why it’s worth converting them.
- 100% secure
- 100% secure
- 100% secure
Part 1. Why Do You Need to Convert PDF to Image on Mac?
In business settings, images are widely used in documentation, presentations, and websites to represent their brand and presence information. There are multiple reasons why you should convert Mac PDF to image, as they can assist you in various other fields. Therefore, we’ll look at some of the reasons below to understand why there is a need to turn PDFs into images.
- Preserving Content: When you turn a PDF into an image, you can set a high-resolution level to specific pages of the PDF document. This permanently preserves the contents of the PDF file as an image, and you can view them exactly the same way on different platforms.
- Online Shareability: There are many websites and platforms that only support images, so transforming PDF to image can help you embed and share content on them. Moreover, images are universally accessible on social apps, making it easy to share them online with others.
- Platform Flexibility: Converting the PDF to an image on Maccan ensure flexible platform accessibility to Mac users. You can open, edit, and personalize them using multiple Mac built-in tools and make your work more professional.
- Multimedia Usage: Images can be a great source of entertainment as you can integrate them into presentations, websites, and other digital media. Furthermore, users can create visually stunning visuals by adding graphics, elements, and more to these images.
- Editing Possibilities: Mac has different built-in tools like Preview, which offers a range of annotating features. You can utilize these markup features to personalize and stylize images, thus making your website’s branding stand out from the rest.
Part 2. How to Convert PDF to Image on Mac with Afirstsoft PDF
With advanced conversion features and fast processing speed, Afirstsoft PDF is the ideal PDF-to-image conversion software. Mac users can utilize its advanced technology to create high-resolution images without losing any formatting or content. Moreover, this AI tool supports image formats such as PNG, BMP, GIF, and many more that you can embed on your branding website.
- 100% secure
- 100% secure
- 100% secure
Furthermore, Afirstsoft PDF reassures users of its high-resolution results and image quality that make advertisements, blogs, and posters. Before converting, this software allows you to choose to separate each PDF page as a separate image, alongside adjusting image quality from 72 to 1200 DPI.
Step-to-Step Guide to Turn PDF to Images with Afirstsoft PDF
Now that we have established the endless conversion possibilities of Afirstsoft PDF, let’s look at the steps on how to convert PDF files to images on Mac. The following are the easy steps that you can follow to turn a PDF into an image within seconds:
Step 1. Install and Open PDF on Afirstsoft PDF
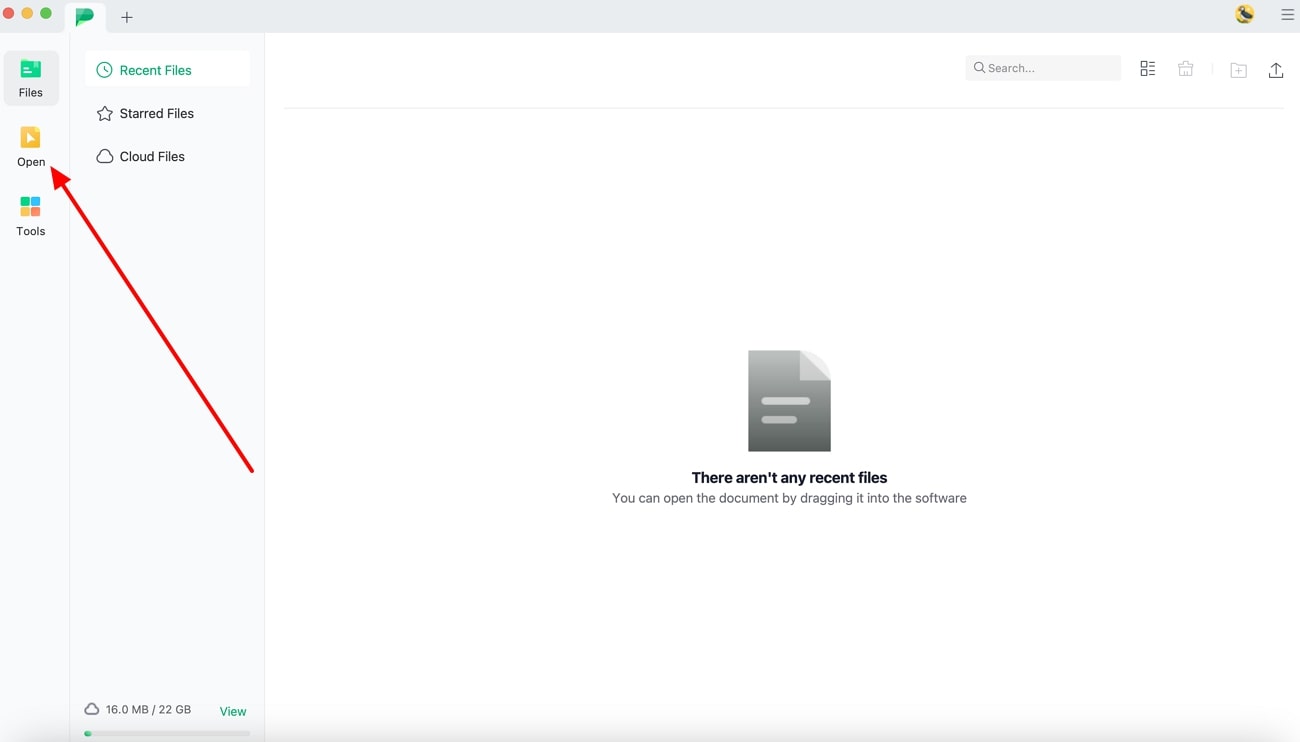
Begin the download and installation process of this AI-powered converter on your MacBook by pressing the “Free Download” button. Once installed, open its main interface and choose the “Open” file icon to access all the documents present on your device. Here, select the desired PDF file from a folder you want to convert into the image.
Step 2. Access the Image Conversion Settings
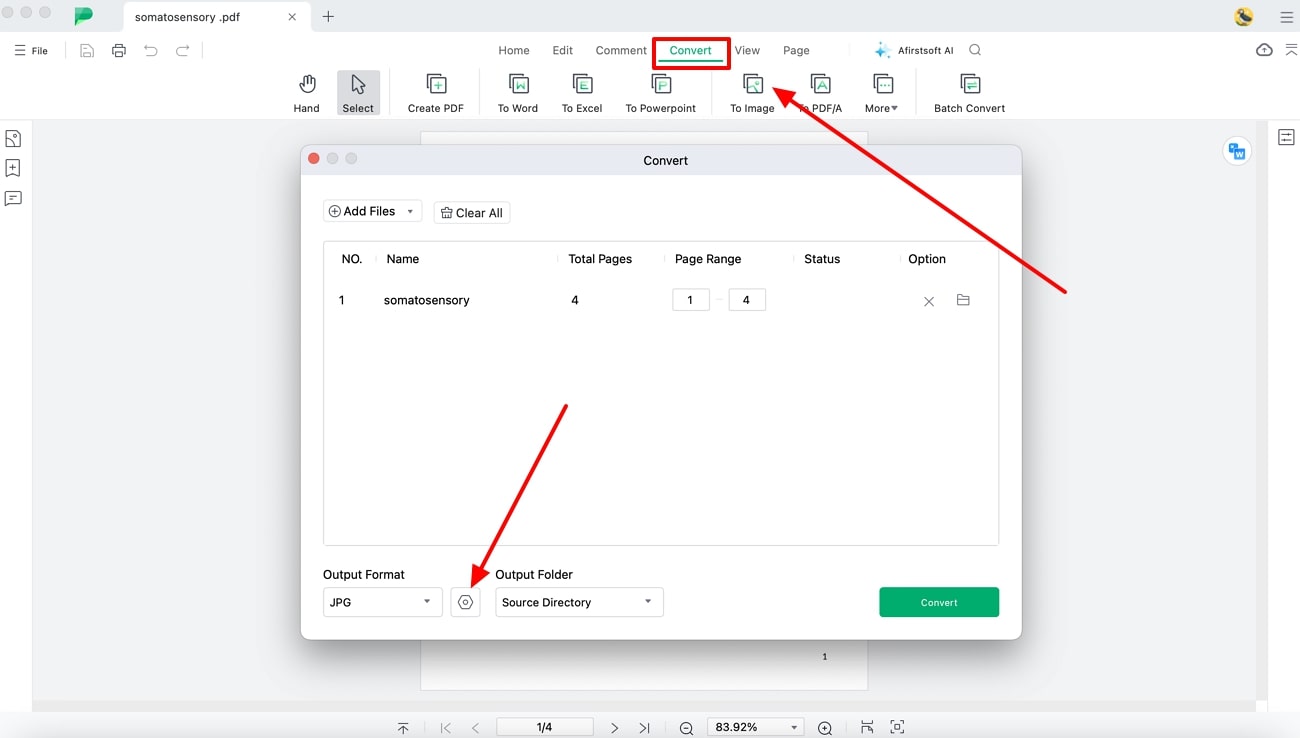
Upon importing, the PDF will appear on the editing interface, where you can access the top toolbar. From the toolbar, click the “Convert” tab and press the “To Image” format to open a small settings screen. You can adjust the PDF pages, the output folder, and more before clicking the “Settings” icon next to the “Output Format” box.
Step 3. Initiate Convert after Adjusting Advanced Image Settings
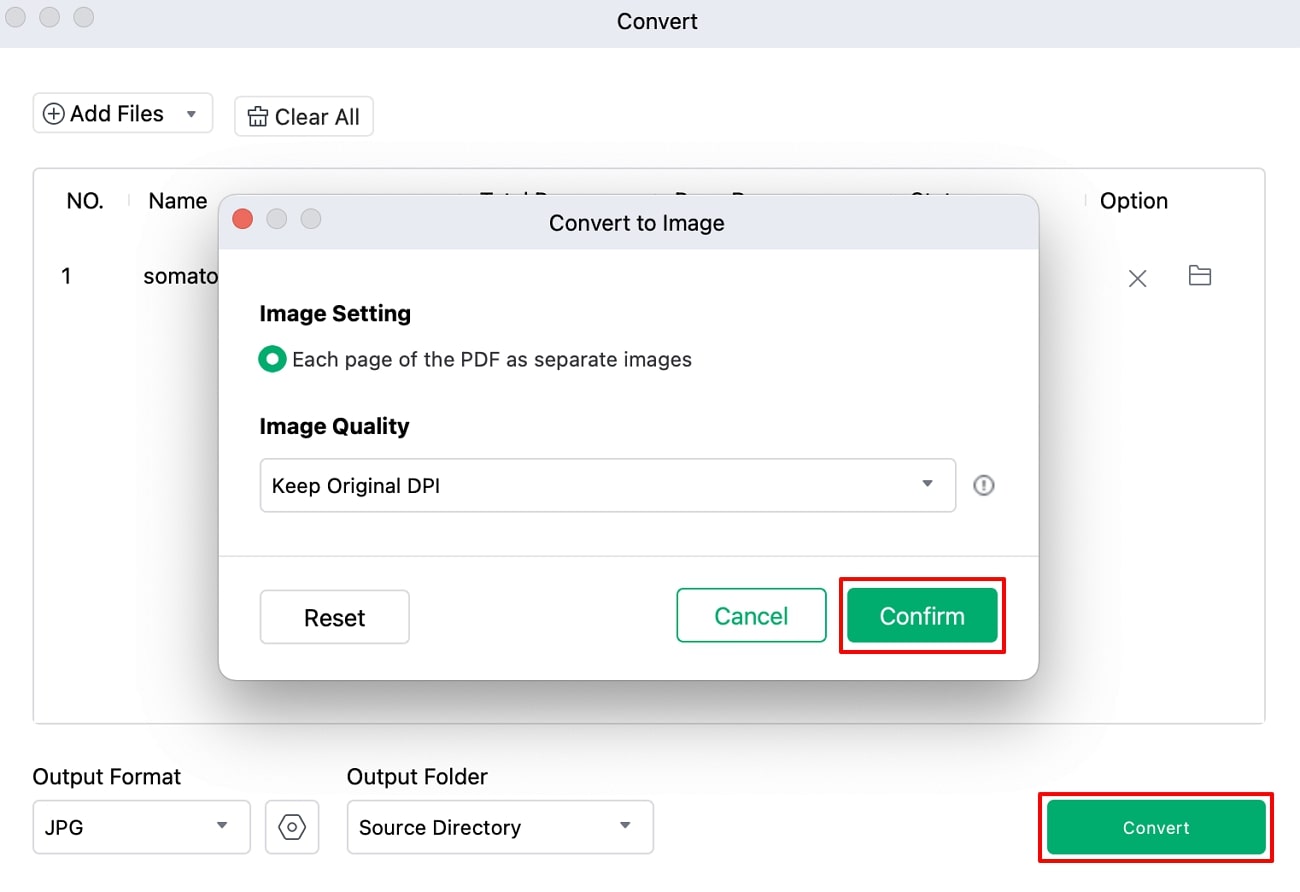
When the “Convert to Image” dialogue box appears, you can select the “Image Setting” option to separate each PDF page into an image. Besides, pick the suitable DPI image quality according to your needs from 72 to 1200 and press the “Confirm” button. Once satisfied with all the changes, click the “Convert” button to initiate the conversion process of Mac PDF to image.
Benefits of Using Afirstsoft PDF
- Mac users can effortlessly manage their PDF files with this tool’s revolutionized features to edit, organize, and many more.
- With its unmatched security protocols, it protects your sensitive information and data from unauthorized personnel.
- Afirstsoft PDF offers various other conversion formats, such as Word, Excel, RTF, EPUB, and more, for a diverse workflow.
- You can blindly rely on this software and its consistent accessibility on various platforms, such as Windows, Android, iOS, and the Web.
What Else Can Afirstsoft PDF Do?
Work efficiently on your Mac with Afirstsoft PDF software, as it also delivers editing, annotating, and other advanced features. Learn more about this tool’s different features than converting PDF to image Mac to have a fully immersive and engaging experience.
- Advanced AI Features:You can gain a deeper insight into your PDF by engaging with the AI assistant and asking relevant questions. Moreover, to minimize content error, let AI proofread the PDF content and suggest suitable changes for better readability.
- AI-Powered OCR: Using AI-powered OCR technology of Afirstsoft PDF, scanned images and documents can be effortlessly converted into editable text-based PDF files. Using this powerful feature, you will also be able to correct the mistakes in the document or interact with AI.
- Edit Document: Before converting your PDF document into an image,you can add text boxes that come with rich formatting and styling adjustments. This tool empowers you to modify, resize, and crop images to make your PDFs look more professional.
- Annotate Files: Swiftly read your PDF documents by adding various annotation options of Afirstsoft PDF to have the same reading experience as a book. It also lets you add stickers from its diverse library of 10+ categories and leave suggestions for your team members to understand the PDF better.
- Cloud Integration: When you convert PDFs to images on Mac, storing them in the cloud lets you access them anywhere and on any platform. This keeps documents secure, efficient, and convenient for sharing with others online.
Part 3. How to Batch Convert PDF to Image on Mac
Afirstsoft PDF is an all-in-one PDF solution for you, as it simplifies every task and offers fast-processing AI technology, producing excellent results. As discussed, its conversion feature can easily convert any PDF into an image with high-quality resolution.
- 100% secure
- 100% secure
- 100% secure
Additionally, if you want to work efficiently, use the batch conversion option to turn all documents into images simultaneously. Now, let’s follow the given steps and learn how to convert PDF files to images on a Mac to get excellent results:
Step 1. Access Conversion Feature on Afirstsoft
Launch Afirstsoft PDF software on your MacBook and access its left side panel on the main interface. From the panel, click the “Tools” icon, and it will display various features for you to choose from. Moving forward, under the “Convert” section, choose the “PDF to Image” option, and from the dialog box, add multiple PDF files.
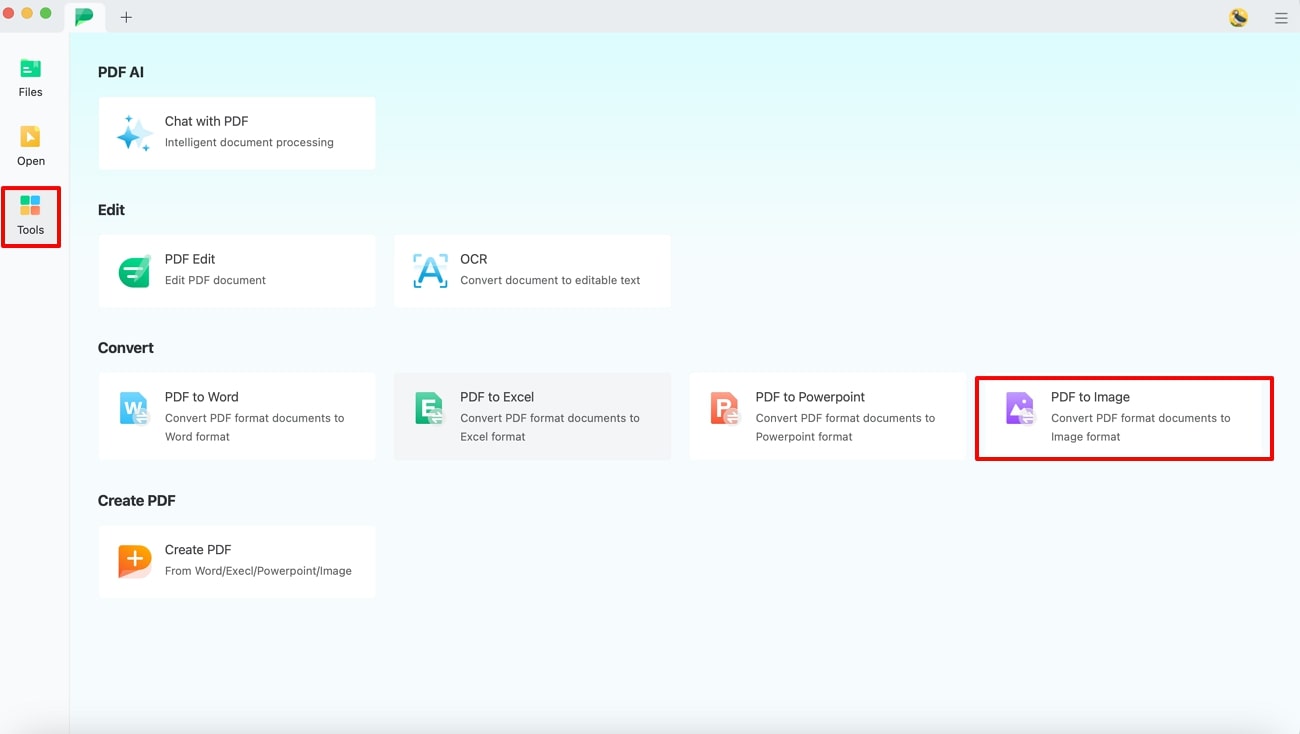
Step 2. Make the Required Conversion Settings
If you forget to add any PDF file, press the "+ Add Files" option at the top left corner of the Convert window and add more files. Now, you can make appropriate changes, such as output format, folder, and pages of the different PDF files. After that, hit the “Settings” gear at the bottom of the screen to explore other conversion options.
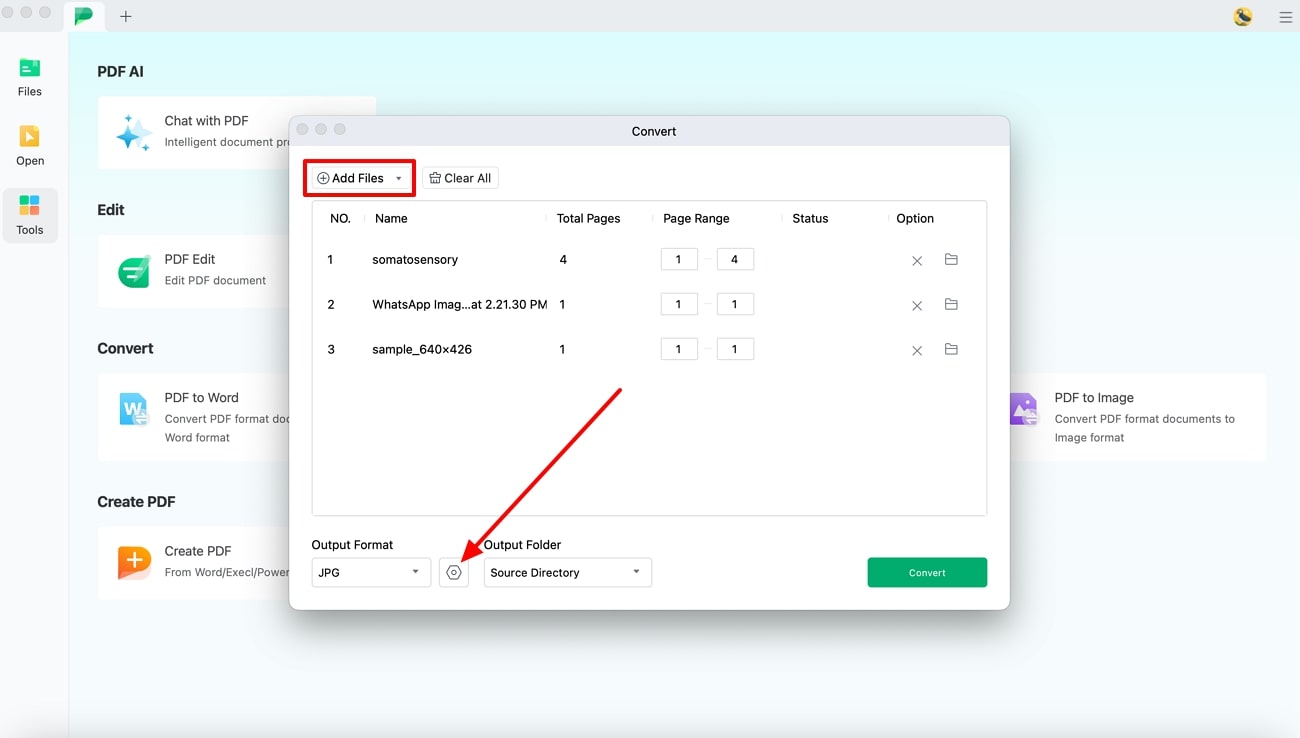
Step 3. Initiate Batch PDF to Image Conversion
Once the Settings open, select the required “Image Settings” option and expand the drop-down menu of “Image Quality.” It provides several DPI options from 72 to 1200 to help you choose the quality according to your requirements. Afterward, confirm your choices by clicking “Confirm” and then start the batch conversion process by pressing “Convert.”
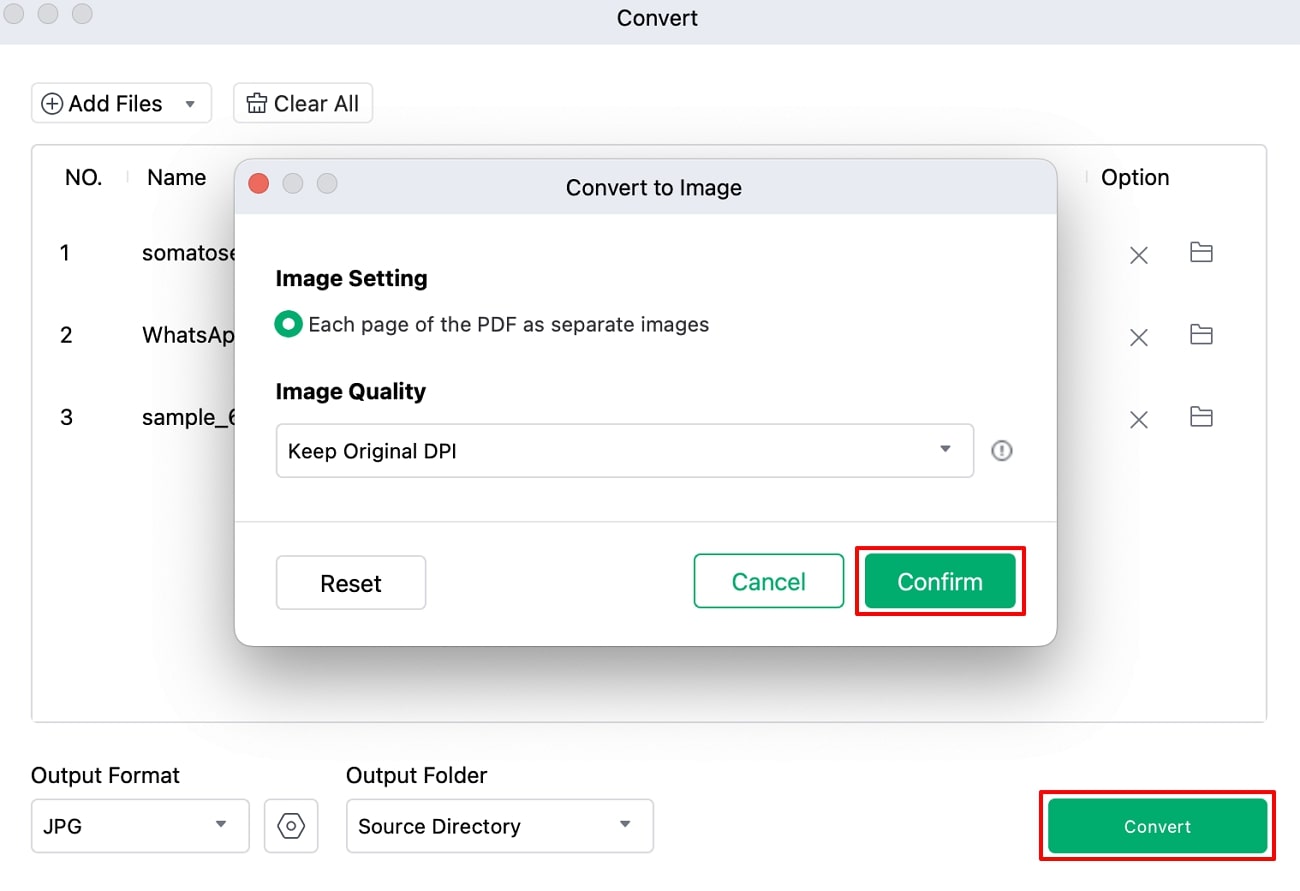
Part 4. How to Transfer PDF Document to Image on Mac Using Preview
When working on a Mac, its built-in tools come in handy more than other basic software as it easily offers options to convert PDF to image on Mac. Moreover, Preview offers multiple image formats with advanced output parameters from which you can choose. To grasp a better idea of how to convert PDF files to images on Mac with Preview, look at the following steps:
Step 1. Launch the Preview tool, and from the desired folder on your macOS device, select a PDF document. Now, press the “File” tab from the top toolbar to access its drop-down menu. From the menu, pick the “Export” option, and this will open a small dialog box with different image settings.
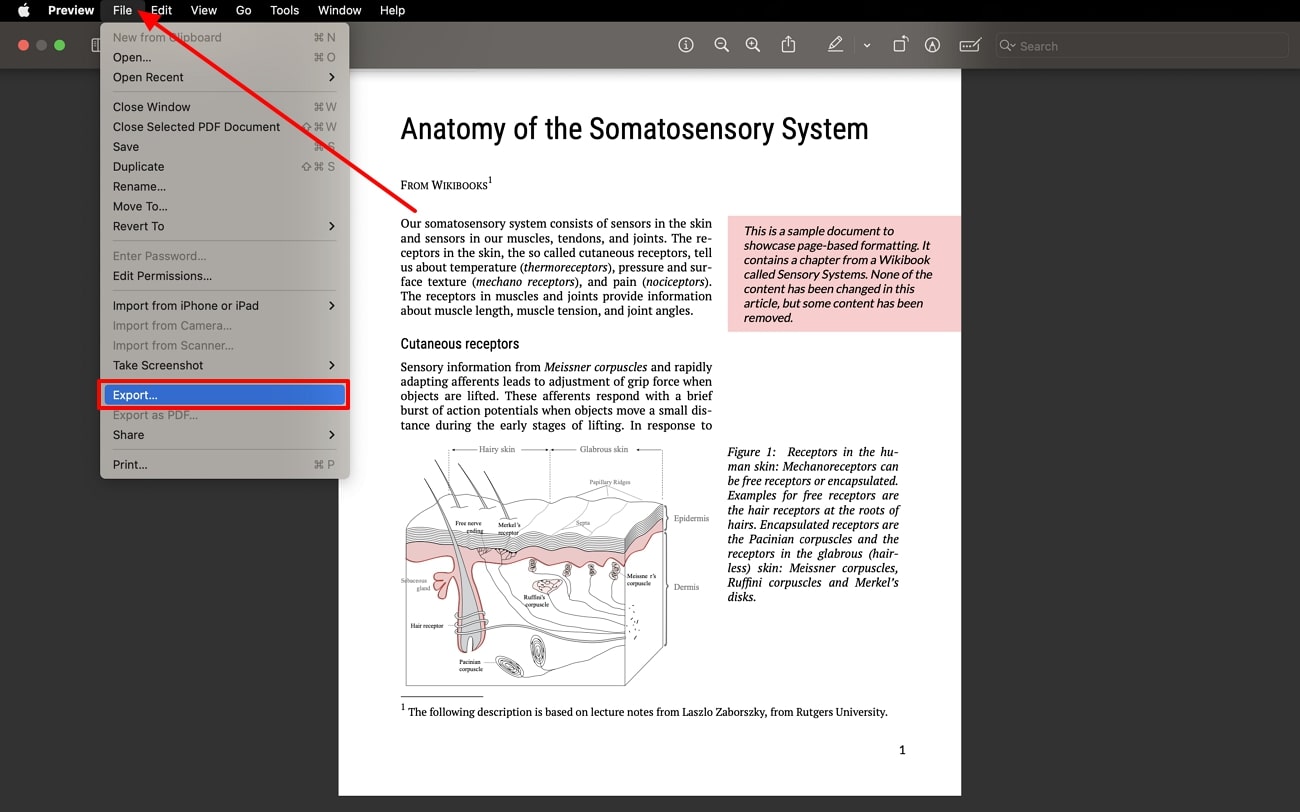
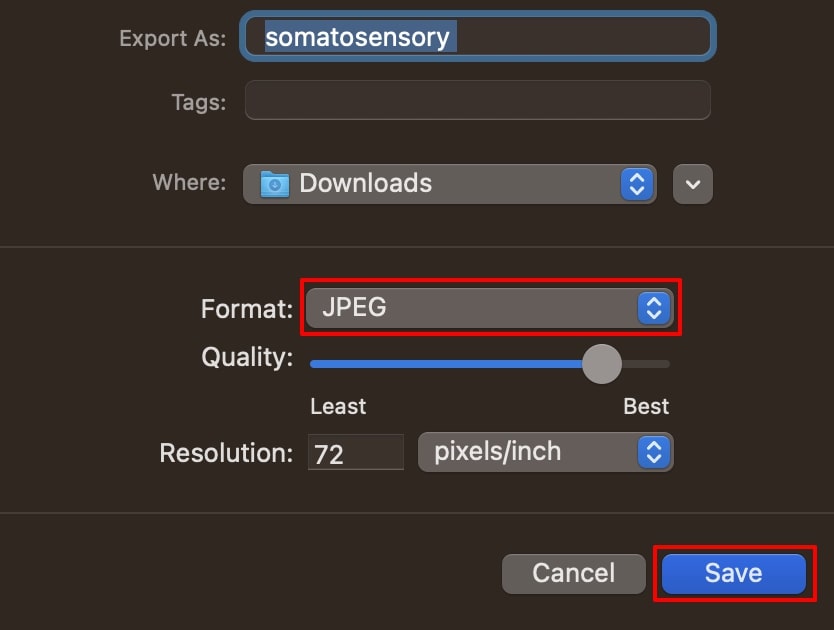
Step 2. On the dialog box, choose any image format, like JPG, PNG, or TIFF, from the drop-down menu of “Format.” Now, set other parameters, such as quality, resolution, and pixels, to receive the desired outcome and click the “Save” button.
Pros
- Preview allows you to convert the image in full resolution with variable pixels for maximum clarity and details.
- Users get to choose the desired quality of the output image file to maintain a professional outlook.
Cons
- There is no batch conversion feature available on this Mac conversion tool.
Part 5. How to Convert PDF Files to Images on Mac with Automator?
Automator is an excellent and valuable built-in tool for Mac users that basically simplifies and automates your tasks. With its vast collection of repetitive tasks and actions, you can effortlessly convert PDF to image on Mac. In this section, we’ll go through a series of steps to understand how to convert PDF to image on Mac using Automator.
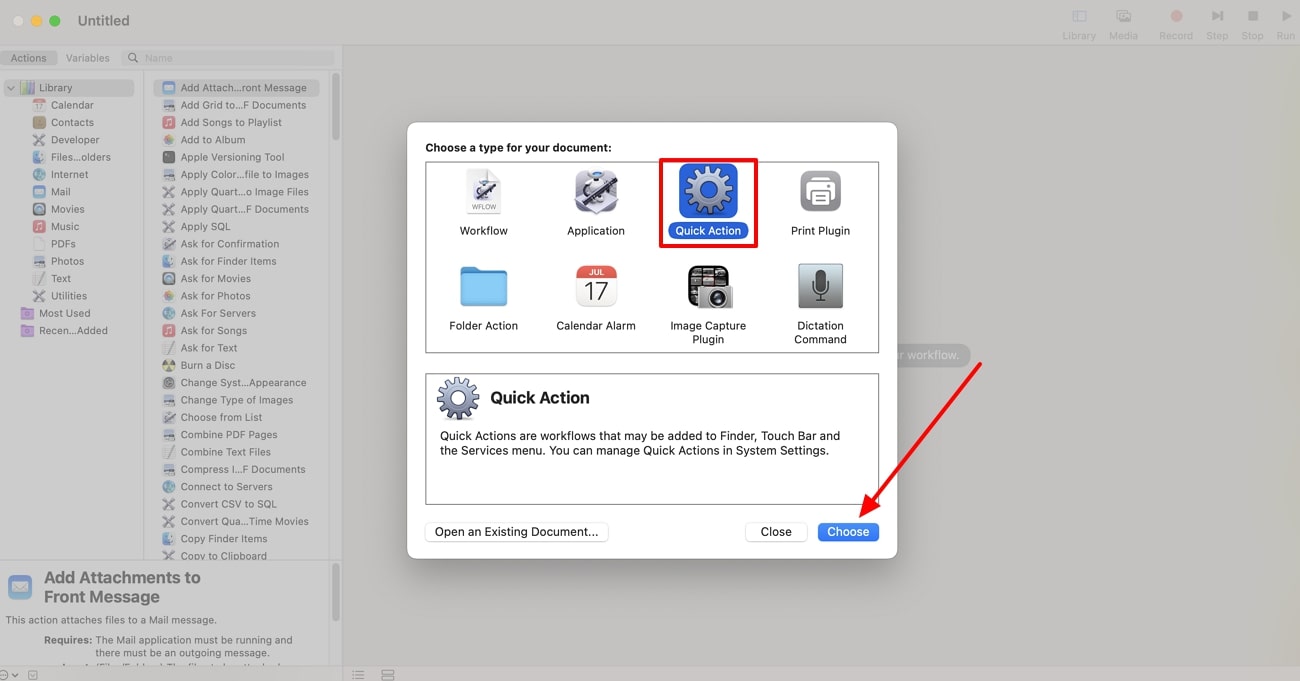
Step 1. Locate the Automator tool on your Mac and launch it to access its various tools and features. Upon opening, an “Application” screen will appear, where you need to choose the “Quick Action” feature.
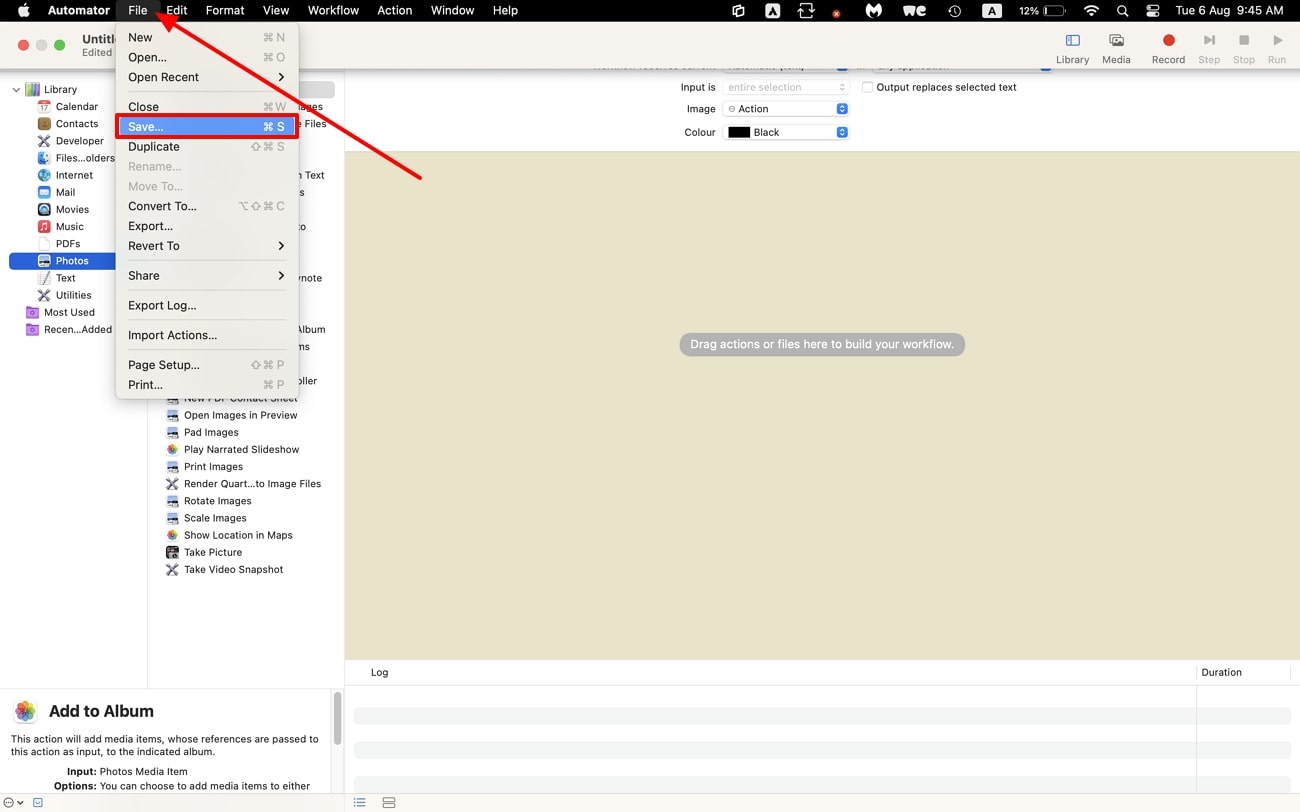
Step 2. The action will appear on the main workflow section of the Automator tool at the top. After this, go to the top toolbar and press the “File” tab to open its drop-down menu. Now, hit “Save,” and on the next dialog box, write “PDF to Image” in the “Save quick action as” and click the “Save” button.
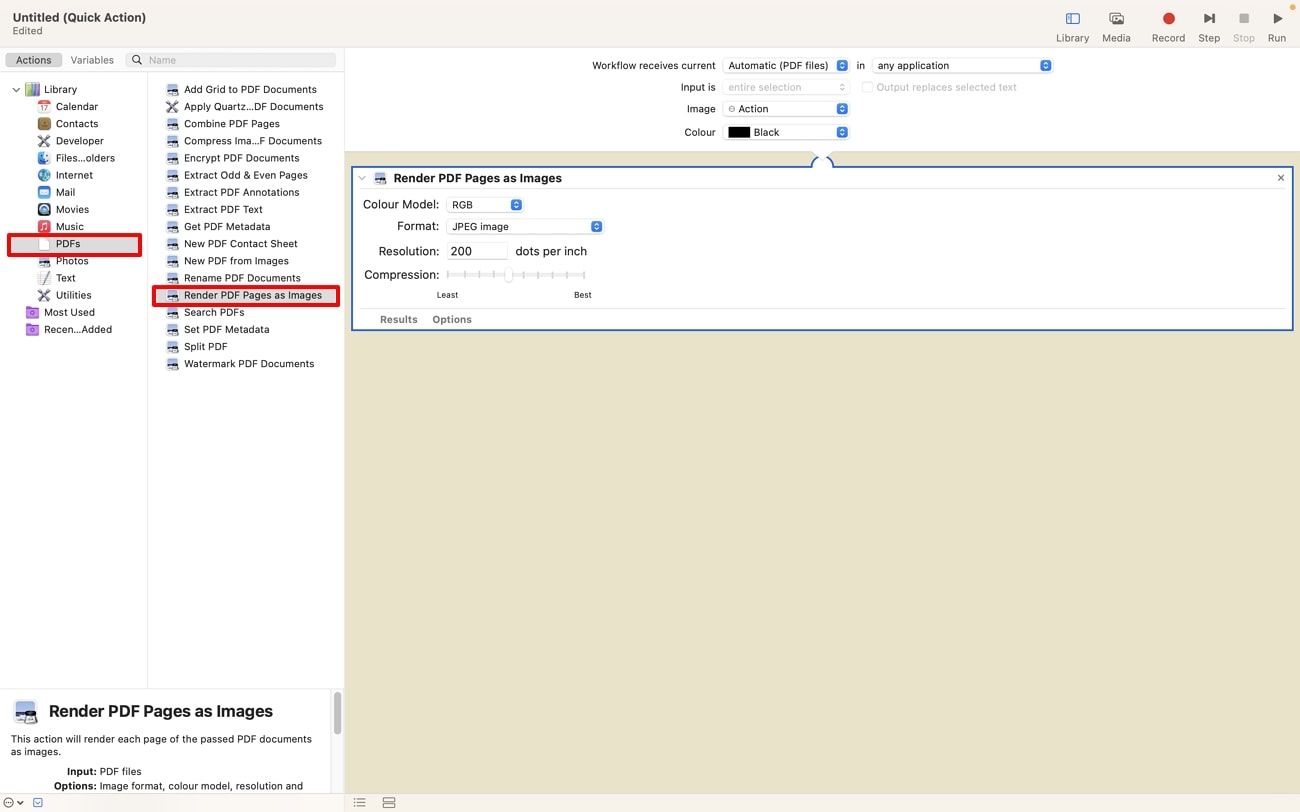
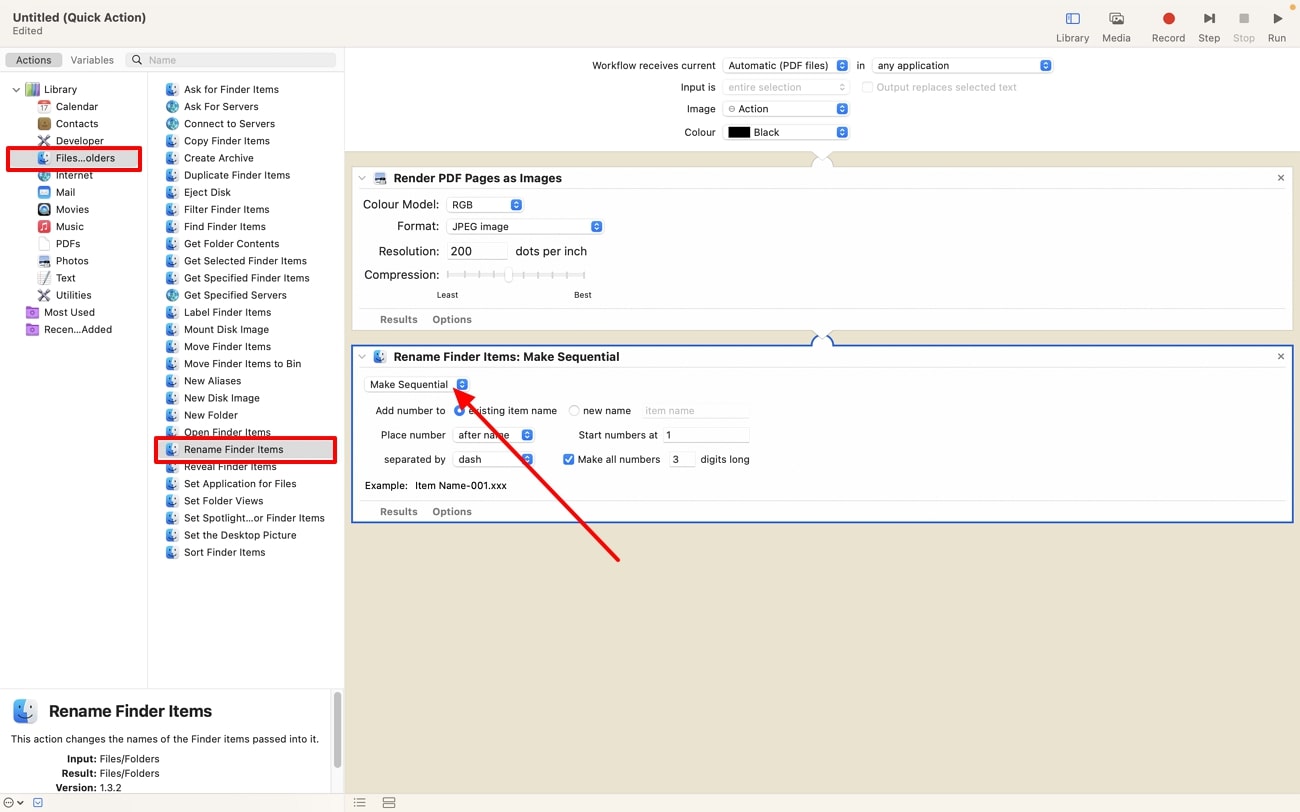
Step 3. Now, go ahead to the first left side panel, and under the “Library” section, click “PDFs” to extend its options. From the various options, choose to drag the “Render PDF Pages as Images” on the main workflow panel. In the “Format” box, pick any image format, like JPEG, HEIF, GIF, PNG, and more. Besides that, adjust the color model, resolution, and compression for a flawless outcome.
Step 4. Once that’s added, click the “Files and Folders” option from the left side panel and access its options. Now, drag the “Rename Finder Items” into the workflow under “Render PDF Pages as Image.” Afterward, change to “Make Sequential” in the first box and tick the “Mark all numbers” to value 3.
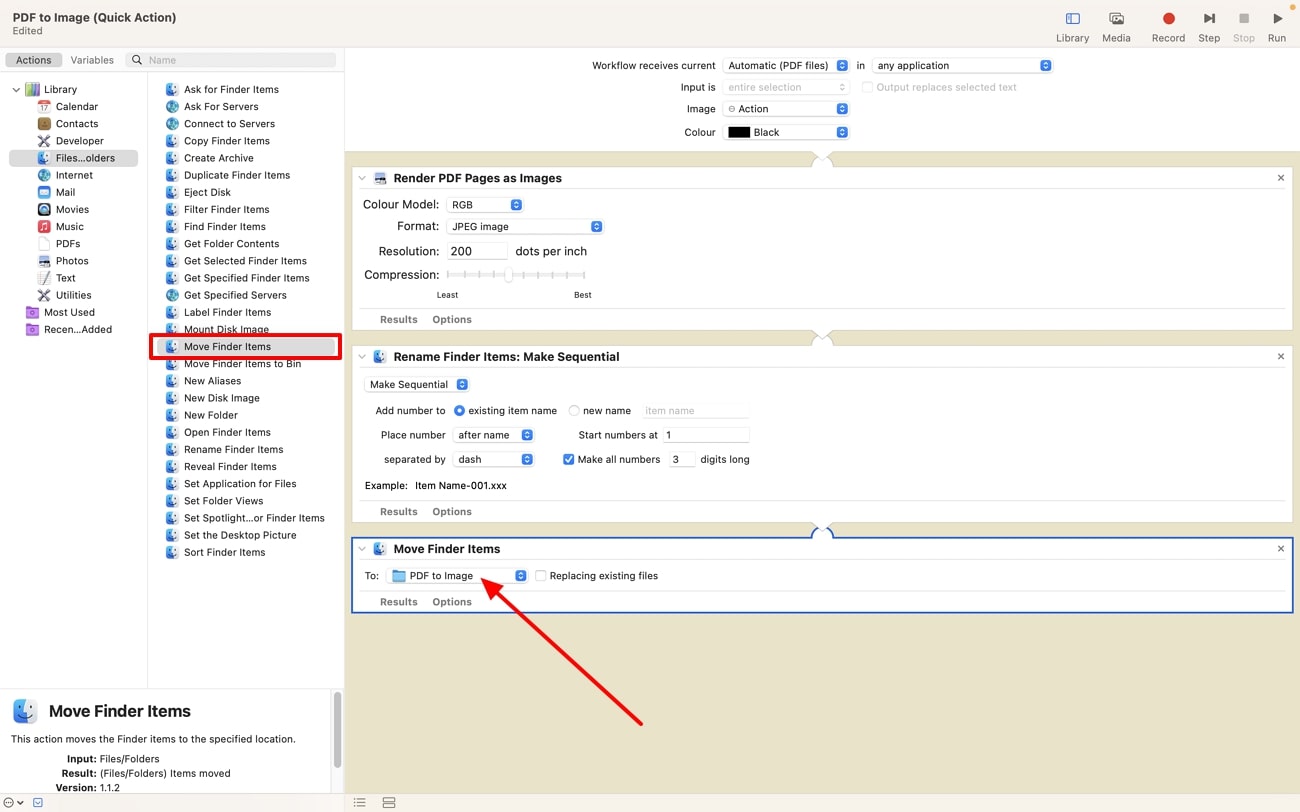
Step 5. Continue by adding the “Move Finder Items” option from the same “Files and Folders” library. After it’s added, click “To” and from the “Others” option, choose the created “PDF to Image” folder.
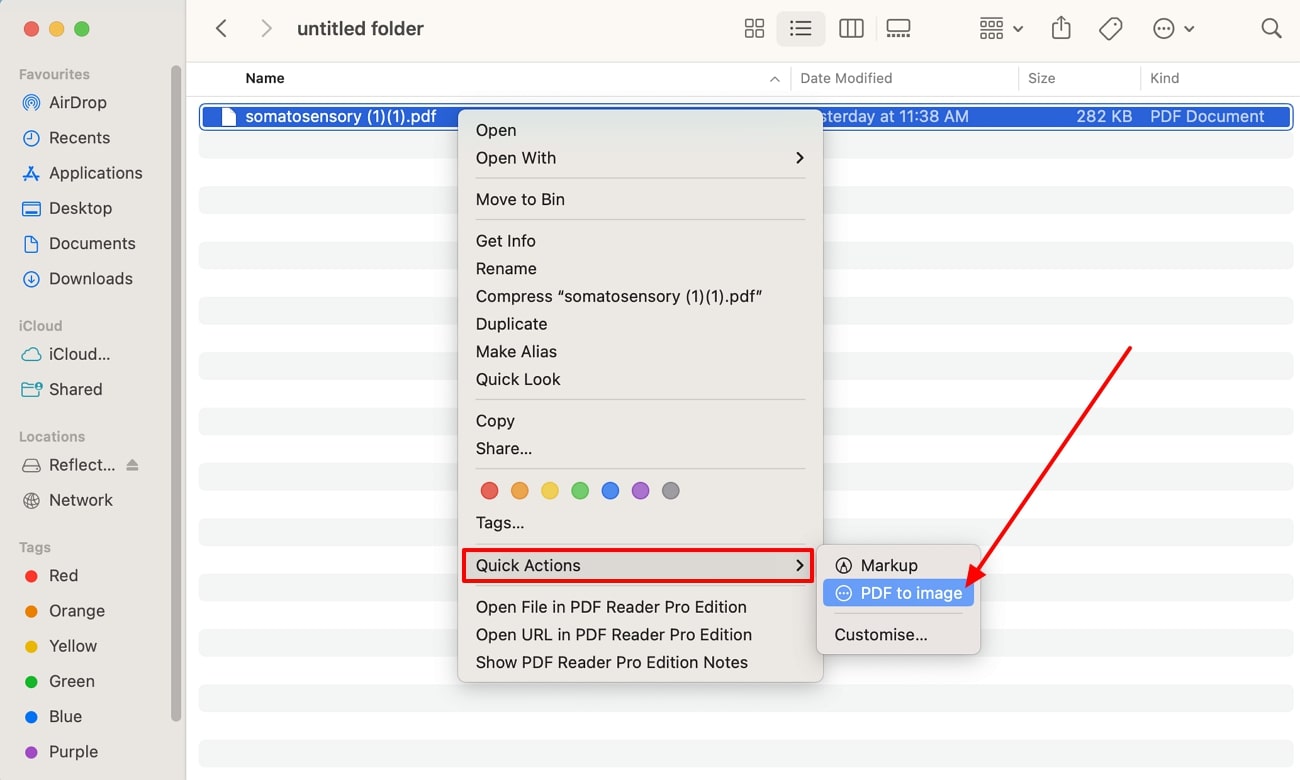
Step 6. Finally, save the created quick action on the Automator and open the folder on the desktop screen containing the desired file. Here, right-click on the file to open a drop-down menu, hover the mouse over “Quick Actions,” and click the “PDF to Image” option to convert PDF to image on Mac.
Pros
- You can convert multiple PDF files into images using Automator’s advanced batch conversion feature.
- This tool can effortlessly turn PDF into any image without losing any quality and resolution.
Cons
- The user interface of Automator is confusing, and it’s difficult for a non-technical person to figure out.
FAQs about How to Convert PDF to Image on Mac
Q1. How to export all PDF pages as images on Mac?
You can utilize the Afirstsoft PDF toolbox on your Mac for this purpose by importing the desired PDF document into the tool. After that, select the “Convert” tab and choose the “To Image” option to open a settings window. Here, you can pick a desired output folder and hit “Convert” to save all the PDF pages as images on the Mac.
Q2. How to print a PDF as an image on a Mac?
To print out a PDF as an image, first open Adobe Acrobat on your MacBook and upload the desired PDF file. From the top “File” tab, click the “Print” option to open its setting window and press the “Advanced” button. In the advanced window, tick the “Print as Image” and press “OK” to close the advanced print dialog box. After that, click “OK” to print out the PDF file as images from your MacBook.
Conclusion
To conclude this article, we understood the importance of converting PDF to image Mac as it allows better accessibility, shareability, and many more. Moreover, you discover many effective methods to seamlessly convert PDF to image on Mac with built-in software and more.
However, these built-in tools face minor limitations such as Preview does not offer batch conversion, whereas Automator requires learning curves. So, it will help you if you select a tool through which you can easily navigate features and convert multiple PDF files into images. In this scenario, Afirstsoft PDF is a complete tool that offers efficient conversion capacities with high-resolution, diverse image formats, and more.
- 100% secure
- 100% secure
- 100% secure


