For Mac users, Preview is a popular software that offers a diverse range of features for viewing and editing PDFs and images. It also provides other features that help you handle files and manage an array of files with ease. However, for various reasons, you may encounter the “Preview not working on Mac” issue that disrupts your workflow.
Due to this issue, users are unable to get access to different features of Preview software, such as annotation, view, edit, and more. In this article, we will understand what caused this issue and look at solutions to fix the “Preview is not working on Mac” issue.
- 100% secure
- 100% secure
- 100% secure
Part 1. Why is My Mac Preview Not Working?
Preview can experience multiple malfunctions that result in the “Preview for Mac not working” message being displayed. For these reasons, the tool is unable to work correctly, which can lead to a disruptive workflow among Mac users. In the following section, we have provided you with some common causes you need to understand to solve this issue:
- Software Glitches: Preview might experience some system glitches, which can dampen its performance and functionality. These glitches can be due to some system bug, memory issue, or the software having some conflicts with other running applications.
- Corrupted Files: One of the reasons you’re unable to open files on Preview is that they might have gotten corrupted due to transfer or downloading issues. Moreover, opening such corrupted PDF files can result in crashing the Preview tool entirely.
- Outdated OS Software: If Preview doesn’t work on Mac, one of the causes is that your macOS is outdated. This also implies that having an older version can affect its performance, compatibility, and display errors while opening software.
- Virus Infestation: It can be troublesome when your macOS is faced with malware or a virus attack. This can affect the overall execution of other software, like Preview, and it’s impossible to access PDF files without showing the error screen.
- Excessive Opened Files: Any software crashes or its performance dies down when there is too much going on all at once. That is why, having excessive files opened on Preview can lead to the “Preview not working on Mac” error.
Part 2. How to Fix Preview is Not Working on Mac Issues
After understanding some of the primary reasons behind the “Preview app on Mac not working” issue, we will dig deep into their possible solutions. In the following section, we will provide you with the top fixes that can help you resolve the issue.
1. Restart macOS
Sometimes, your Mac may experience conflicts, glitches, and even memory leaks that might be causing the “Preview not working on Mac” issue. Therefore, restarting the system can clear out these issues, along with deleting caches and terminating any background processes. Now, let’s look at the steps it takes to restart macOS and resolve this pressing issue:
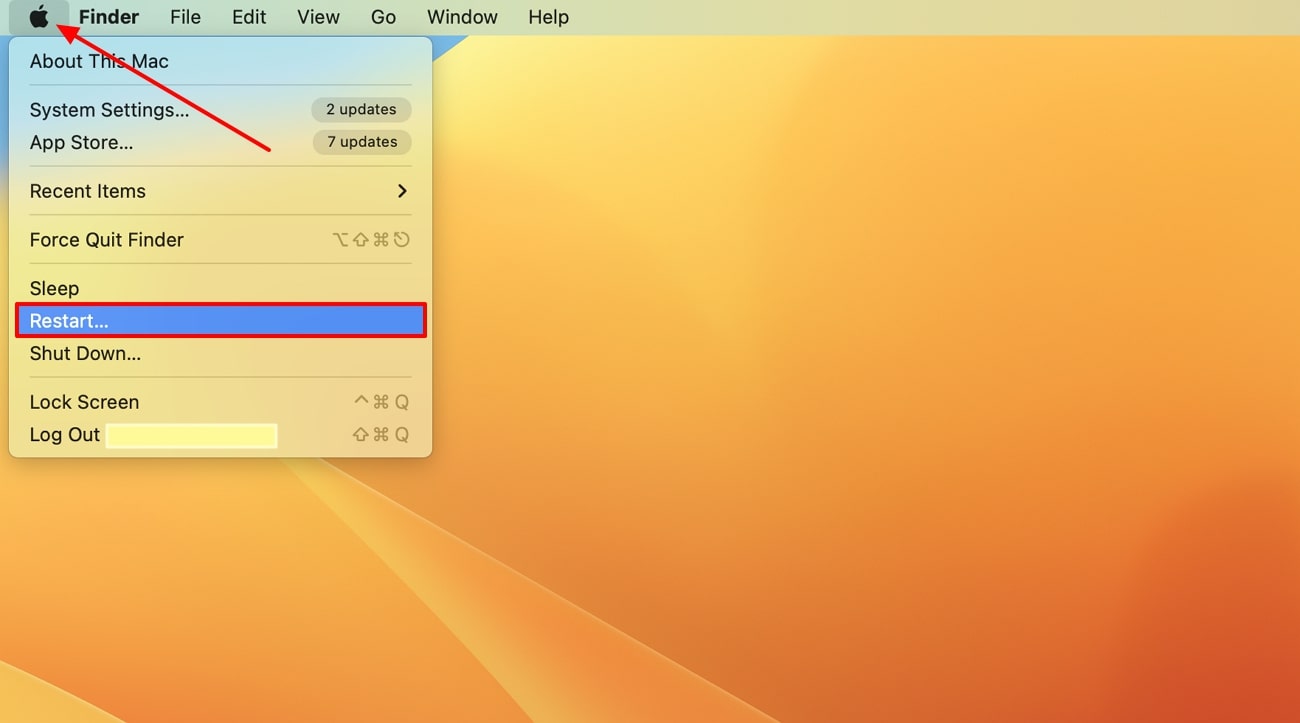
Step 1. To restart your macOS, go to the top right corner of the desktop and click the “Apple” icon. Now, when a drop-down menu appears, click the “Restart” option.
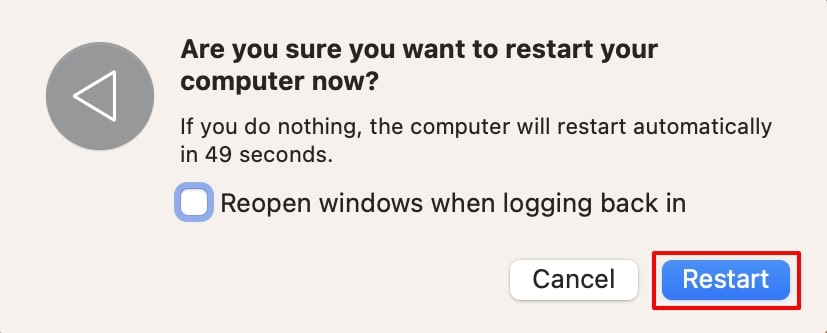
Step 2. Upon clicking, a confirmation box will emerge, where you can check the “Reopen windows when logging back in” option. After that, press the “Restart” button and wait for it to shut down and restart again.
2. Update macOS
It is a known fact that an outdated Mac has various system bugs, incompatibility, and performance issues. That is why updating the system can resolve such concerns, letting you open the Preview software and utilize its features. For a smooth workflow, go through the given steps and learn how to update your macOS to get rid of this annoying problem:
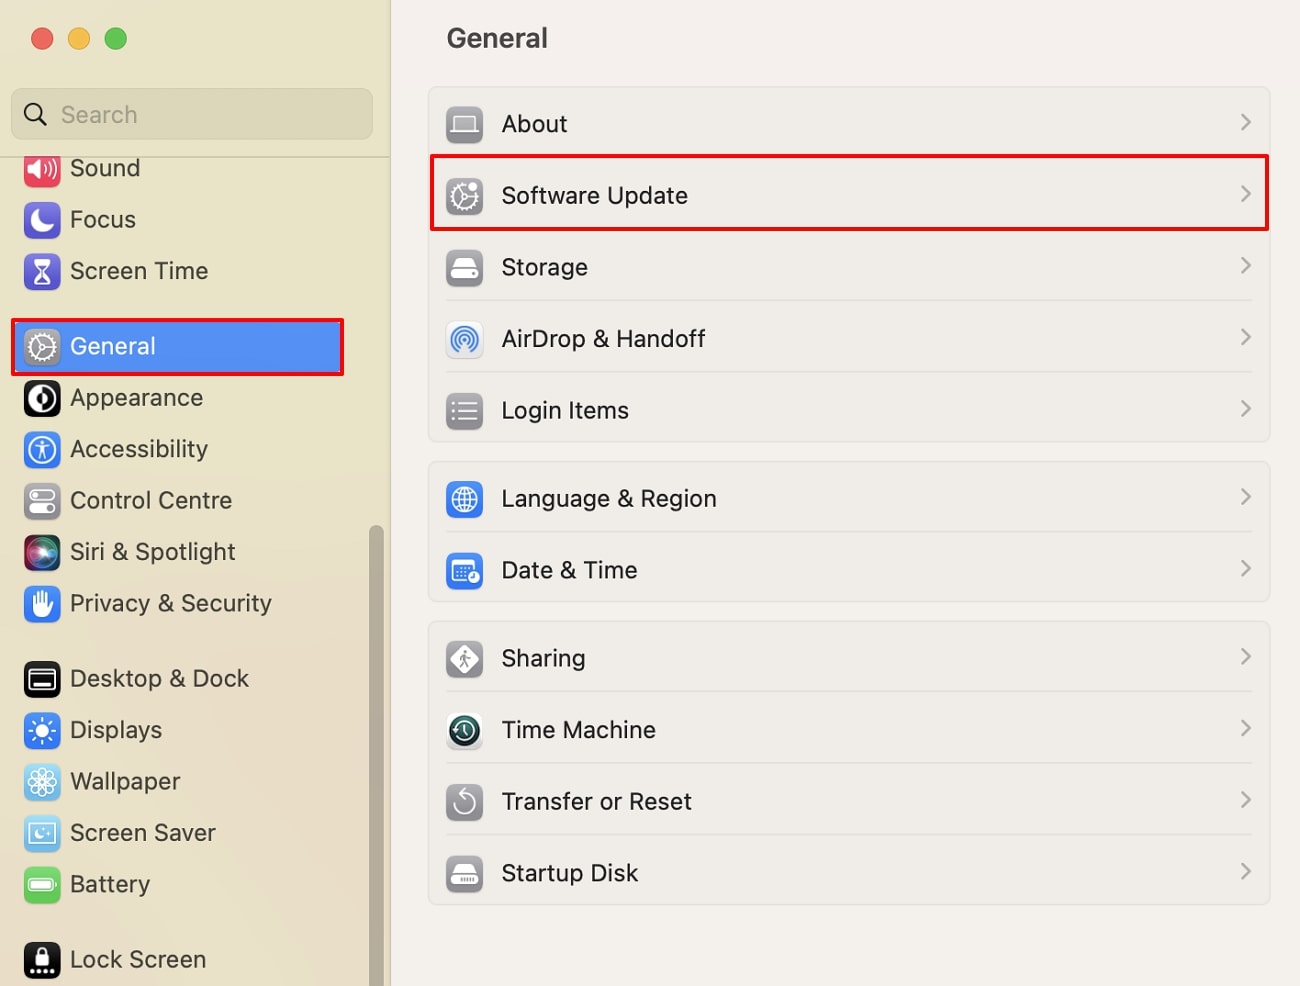
Step 1. Head to the Mac “Settings” folder and access the “General” tab from the left side panel. When it displays further options on the right, click the “Software Update” option to access upgrades.
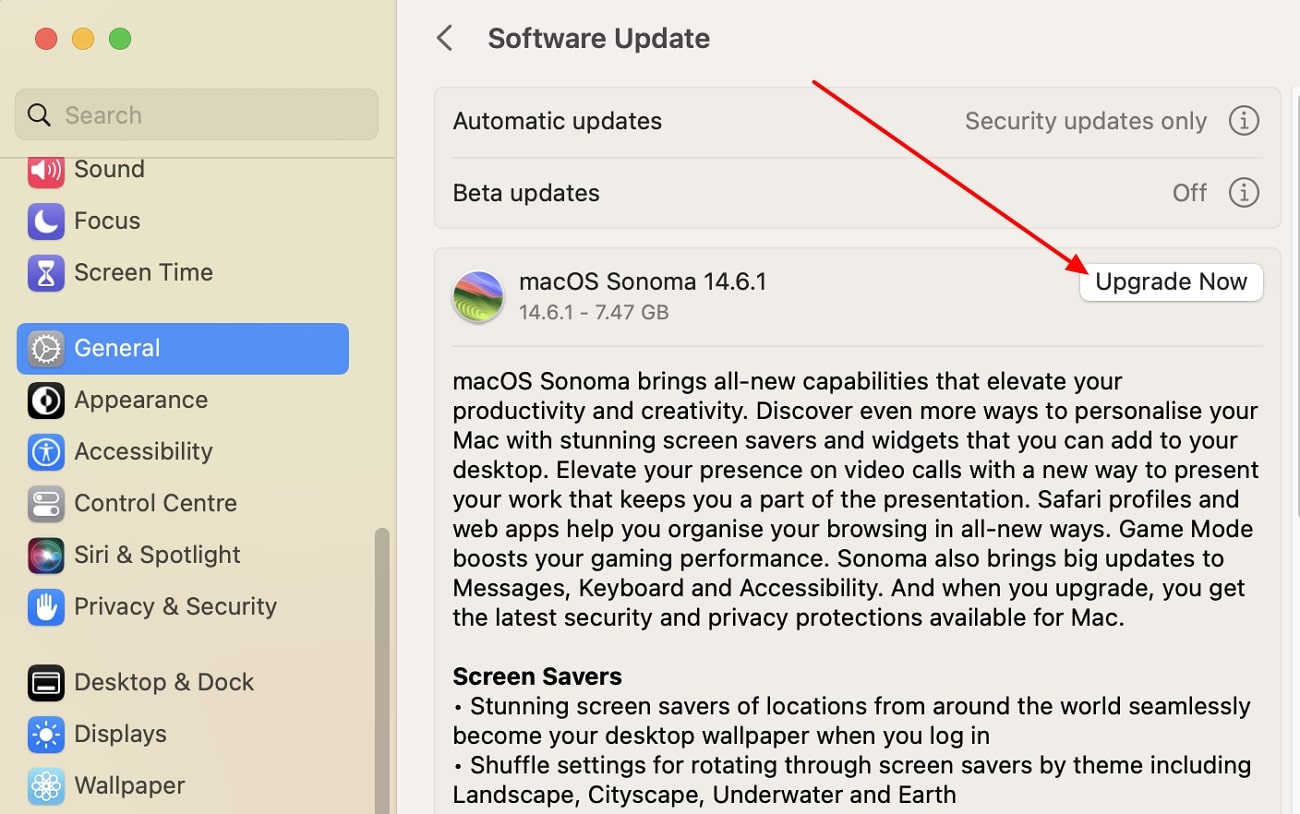
Step 2. When the “Software Update” window appears, press the “Upgrade Now” button and restart the device. After your Mac restarts, test the Preview app to check if the “macOS Preview not working” issue is resolved.
3. Remove the PLIST Files
When Preview fails to open, it can imply that the PLIST files have gotten corrupted, causing the issue. Removing such files is equivalent to resetting Preview, thus creating a default version of the software. In order to resolve the “Mac OS Preview not working” problem, we have provided you with the following steps on how to remove PLIST files from Mac:
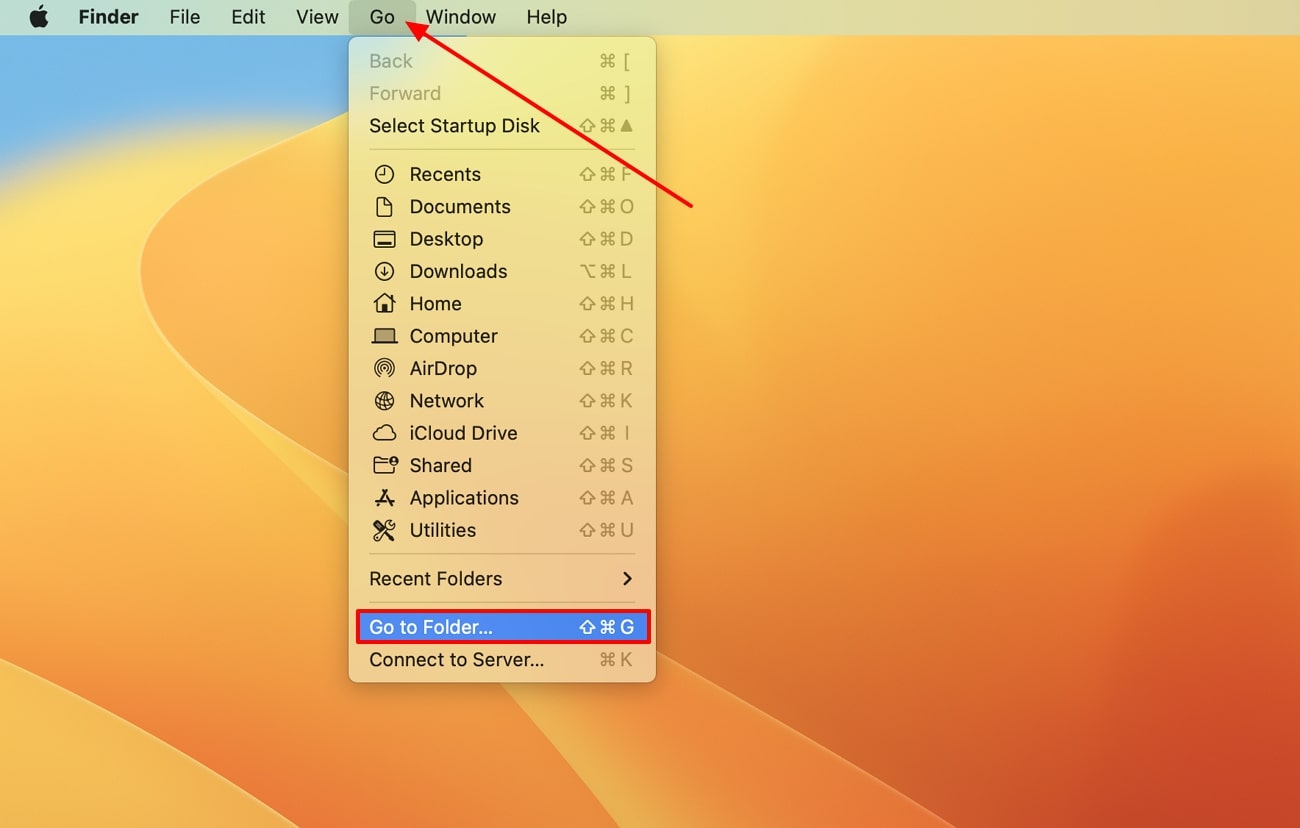
Step 1. To access the PLIST files of Preview, access the “Finder” folder and click the “Go” tab from the top toolbar to reveal its extended menu. From here, hit the “Go to Folder…” option and search for “~/Library/Preferences” on the dialog box.
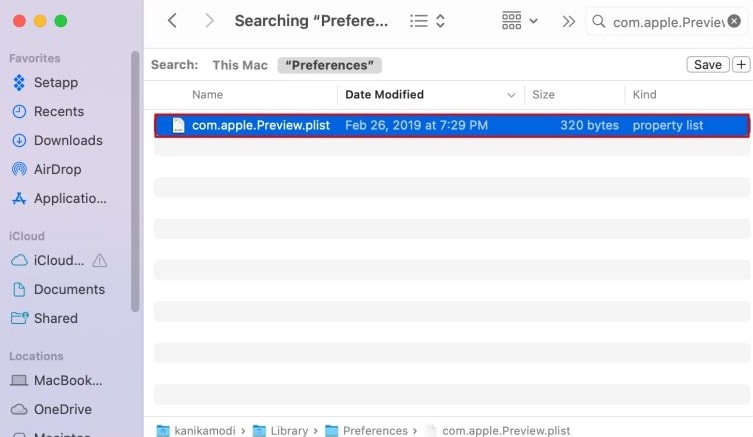
Step 2. Now, go to the search bar on the top right side and look for the file with the “com.apple.Preview.plist.” name.
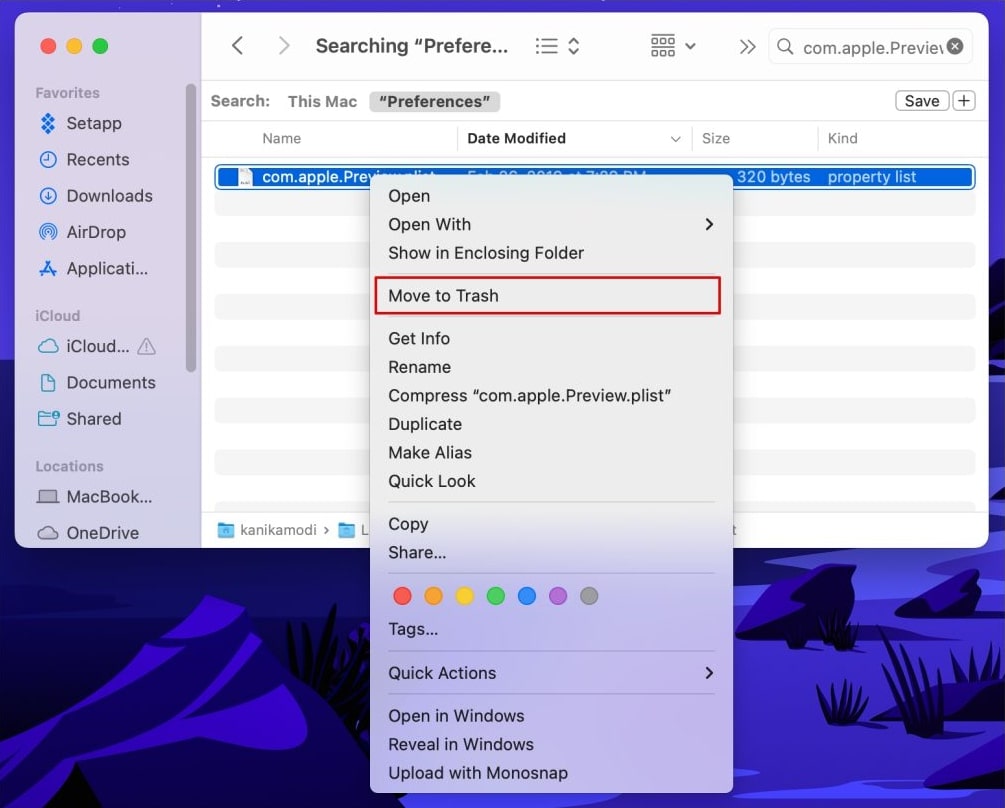
Step 3. When the file appears on the screen, press the “Option” key and right-click on the displayed PLIST file. Within the drop-down menu, hit the “Move to Trash” option to remove the Preview PLIST files and empty the Trash.
4. Force Quit Preview
If Preview is stuck or not working, it can be due to excessively opened files or malware, which causes it to get stuck. Therefore, force-quitting the tool can resolve such errors by resolving problematic processing and freeing up space. You can learn to fix this issue by following the given instructions of Force Quit:
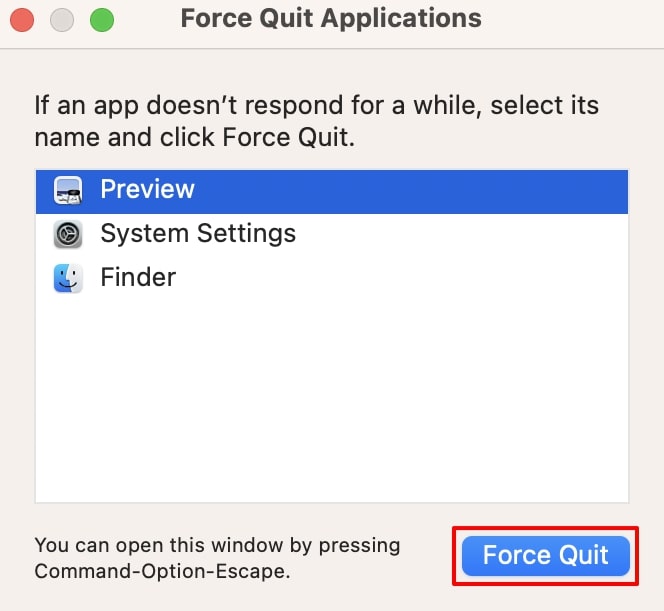
Instructions: When Preview does not respond after you open this software, click the “ Command + Option + Esc” keys. This will open the “Force Quit Application” pop-up box, where you have to select the “Preview” app. Once selected, press the “Force Quit” button, reopen the software, and see if the “Preview app on Mac not working” issue is resolved.
5. Try Using Safe Mode
This document management software can show errors due to some internal or third-party tool, making it challenging to open Preview. In that case, turning the Mac into safe mode can help prevent such issues and disable any non-essential software. So, let’s dive into the comprehensive steps on how to turn on the safe mode to check the Preview app:
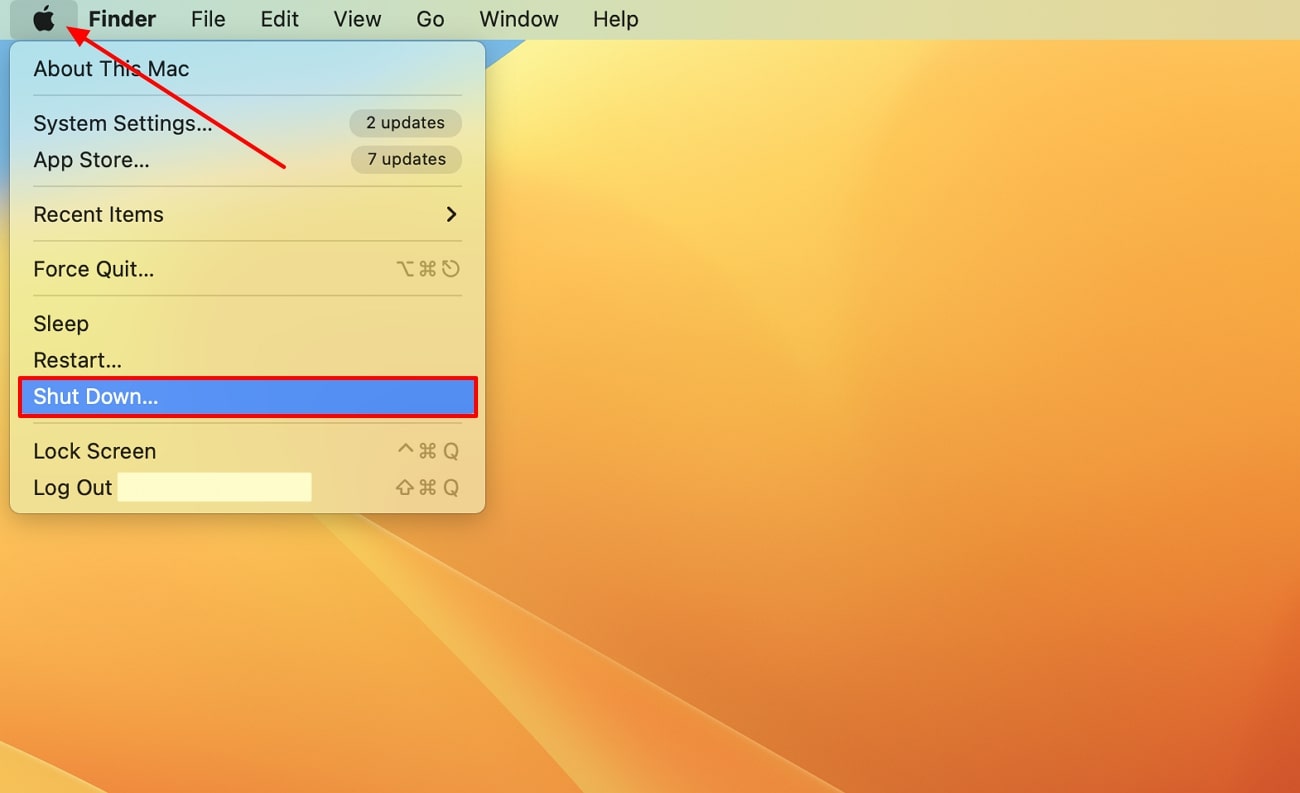
Step 1. You can resolve the “Preview is not working on Mac” issue by going to the top toolbar and clicking the “Apple” icon. Now, hit the “Shutdown…” option and wait a few minutes before powering your Mac device again.
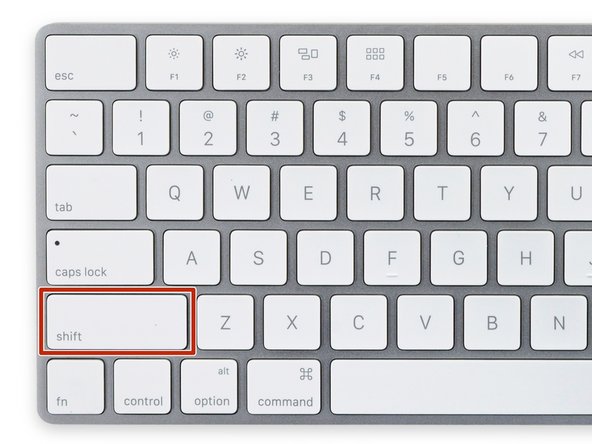
Step 2. While pressing the “Power” button to turn on your Mac, hold the “Shift” key and release it once the login screen appears. The “Safe Boot” name will appear in red at the top-right of the screen, which will hopefully resolve your issue.
For Apple silicon MacBook, you will have to access the “Loading startup options” by holding the Power button and then choosing the “Volume” option. Afterward, you will have to hold the “Shift” key until you see the login screen to activate the safe mode.
Part 3. Alternative Solution to Preview for Mac Not Working
If the “Preview not working on Mac” problem is not resolved by any of the methods described, you can turn to reliable PDF editing software. Afirstsoft PDF is one such tool that can help you manage files seamlessly with its advanced PDF handling features. Moreover, this tool offers a diverse collection of annotating, editing, and conversion features for handling PDF files.
- 100% secure
- 100% secure
- 100% secure
Other than that, due to its multi-compatibility properties, you can access it on various devices, like Windows, Web, and mobile devices. This tool has also revolutionized the way you manage your files by providing advanced AI features, thus making it a perfect alternative to Preview. Also, with its user-friendly interface, anyone can access it efficiently without needing any complex training.
Simplest Step-by-Step Guide on How to Edit PDF Documents
As we have established, Afirstsoft PDF can help you manage files in a more reliable and productive way. Let’s move forward and learn how this tool can assist you in editing and annotating files with its innovative features.
Step 1. Open PDF File on Afirstsoft
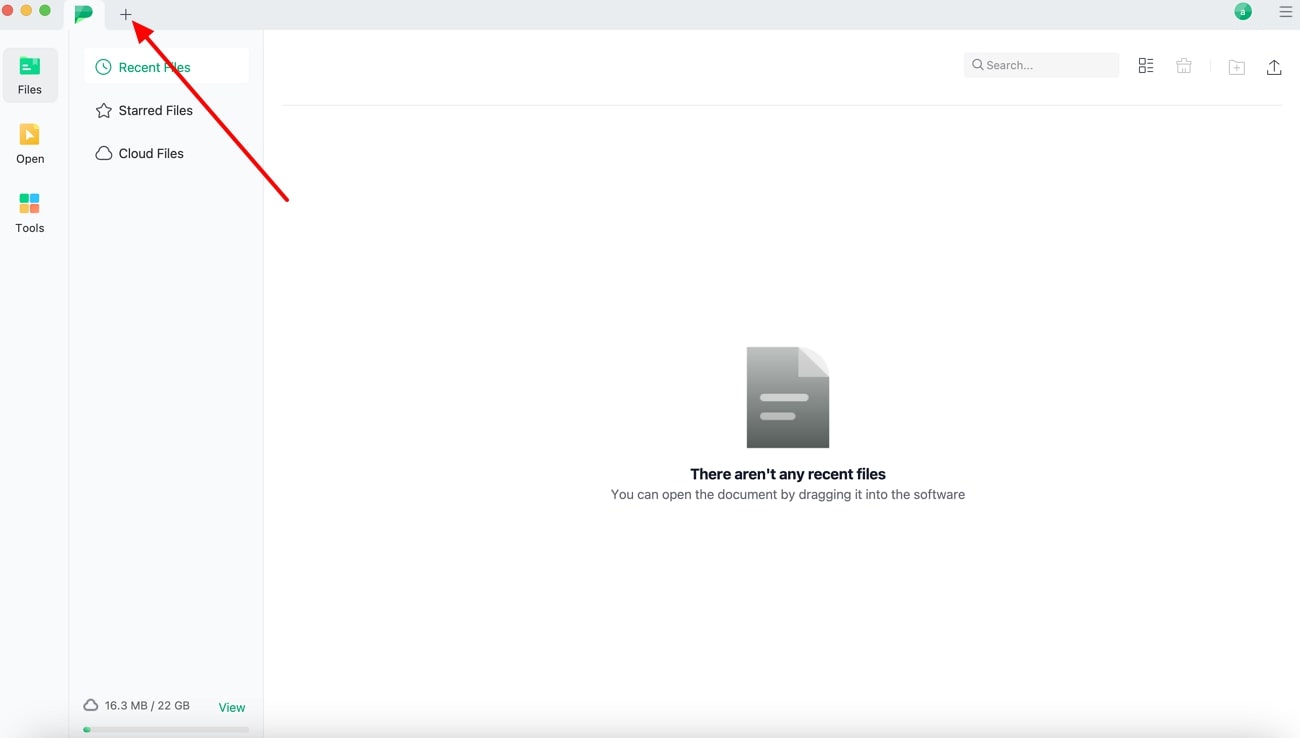
Access the main interface of Afirstsoft PDF on Mac after downloading it from its website or by pressing the “Free Download” button. Go to the top bar, press the “+” icon, and import any PDF file you want to modify.
Step 2. Modify Text Using Edit Feature
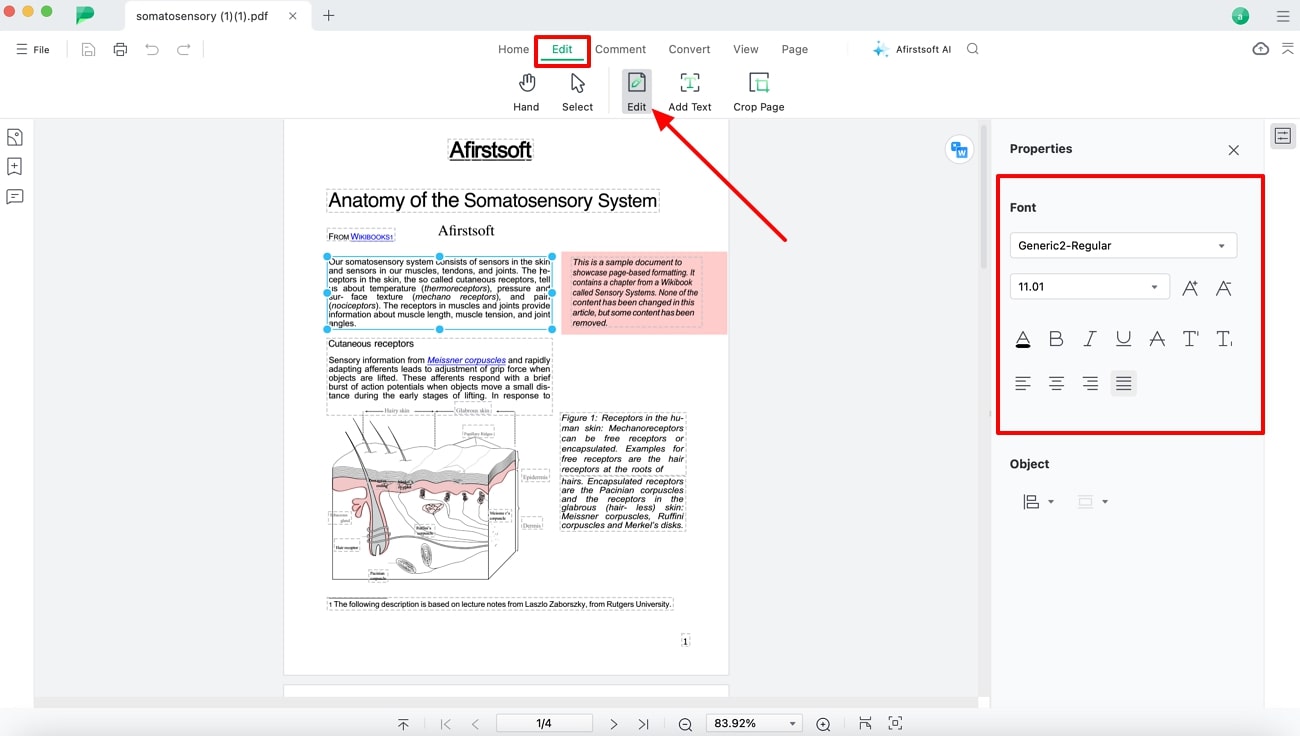
On the editing interface, head to the “Edit” tab and enable the customization of the text by clicking the “Edit” option. A “Properties” panel will appear on the right-side of the interface, where you can access different text modifications tools, like font, alignment, sizes, and many more.
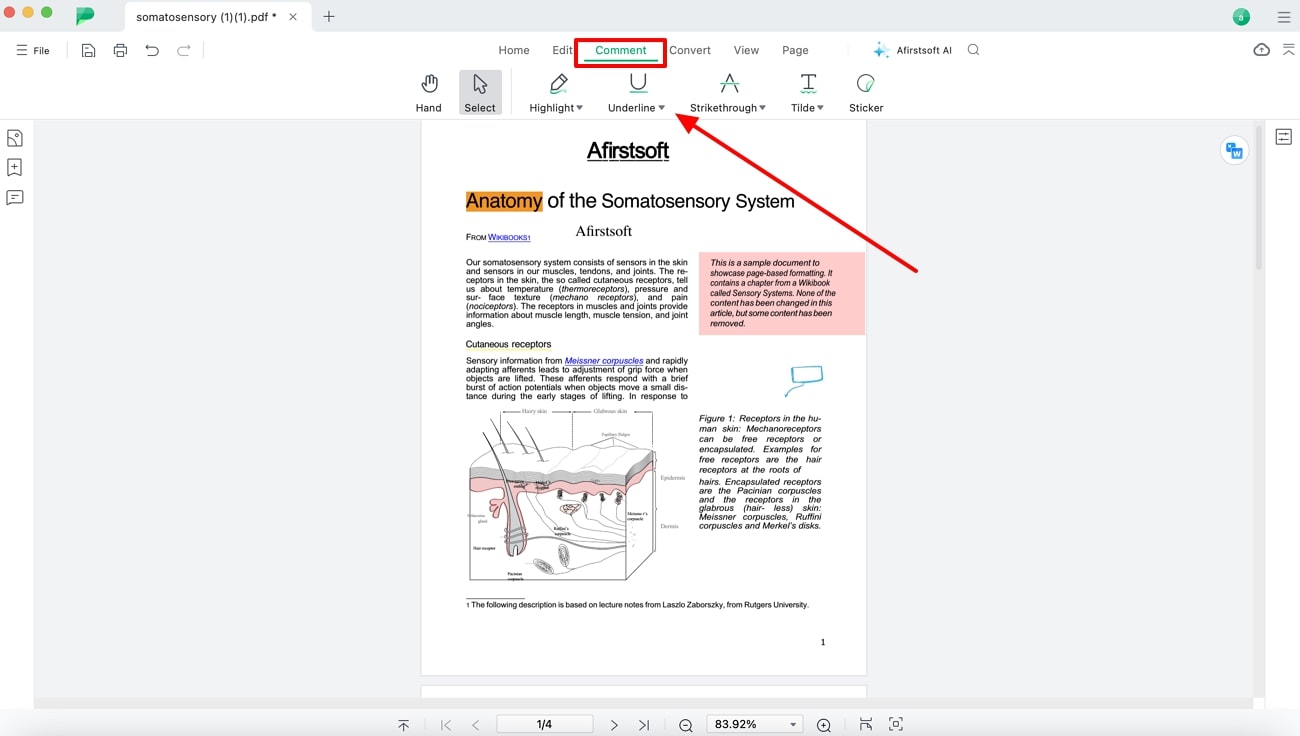
Step 3. Access the Annotation Tools
After modifying the text of the PDF, go to the “Comment” tab and personalize the document with different annotation features. You will be able add stickers, highlight text, and underline paragraphs or lines in different colors to emphasize them more.
Innovative Features of Afirstsoft PDF Toolbox
- Text Recognition with OCR: If you want to modify your PDF content further by accessing the text in the scanned images, use the OCR feature. This feature of Afirstsoft uses AI technology to recognize each character and turn it into editable text with ease.
- Lossless PDF Conversion: Users can easily convert PDF files into any likable format without losing any formatting or layout details. Moreover, you can achieve excellent accuracy as this feature turns PDF into Word, Excel, TIFF, RTF, etc.
- Efficient AI Assistant: You can automate your workflow by using the advanced AI chat and summarizer feature, which significantly improves your work. Furthermore, reach international clients by translating text into various languages with AI.
- Sync Files with Cloud: With the cloud feature of this tool, you can sync PDF files to Afirstsoft Drive and access them whenever you want. Therefore, you can edit, add, and personalize text on any device whenever you’re on the move.
- Quality Reading Session: While handling files, having a quality reading feature can immensely enhance file management. You can create bookmarks for quick accessibility, change the page layout for better interaction, and many more.
Conclusion
Although Preview is an excellent file managing and editing built-on tool for Mac, it can still experience various issues. One of those issues is the “Preview not working on Mac” that results in disruptive workflow and time loss. In this article, we explored all the possible reasons and the 6 best fixes to resolve this issue.
However, if the Preview still fails to work correctly, you can turn to the Afirstsoft PDF editing software. It acts as a comprehensive and friendly alternative tool with a range of features for managing your PDFs on Mac. Other than that, you can edit and annotate the contents of the document according to your needs with its advanced features.
- 100% secure
- 100% secure
- 100% secure


